8 Sided Animation Node – Buildbox 3 Manual

By |

8 Sided Animation Node

This content node changes an asset’s 2D animation based on the asset’s direction of movement or the direction it faces in a 3D World.

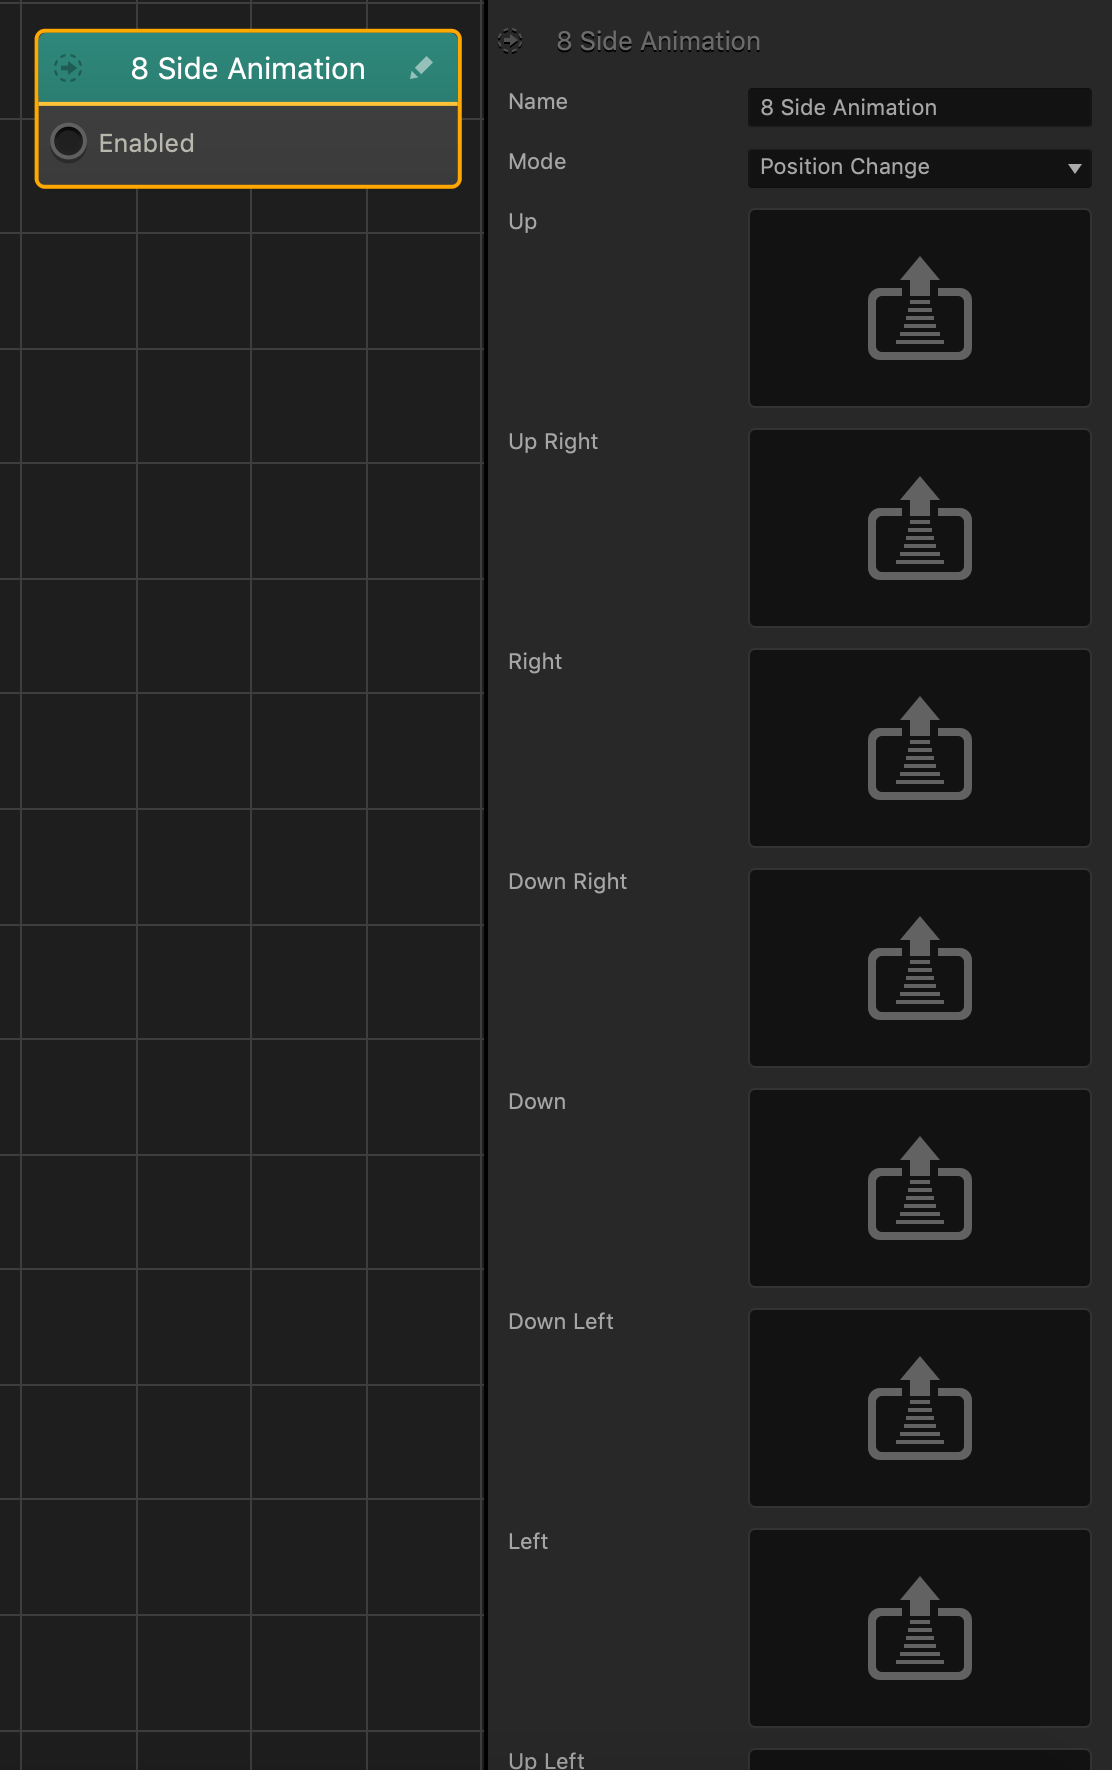
To apply animations to an asset that change based on the asset’s movement, do the following:

  1. Select the Mode attribute to determine when you want the animation to change.
    • Position Change—the asset’s movement in the X and Z direction.
    • Rotation Change—the asset’s rotation along the Y axis.
  2. Drag a PNG image sequence to each animation field. The animation will change when the asset moves or rotates in the following directions:
    Attribute Direction Axis Direction
    Up Forward Negative Z
    Up Right Forward Right Negative Z and Negative X
    Down Backward Positive Z
    Down Left Backward Left Positive Z and Positive X
    Left Left Positive X
    Up Left Forward Left Negative Z and Positive X
If the asset moves in a direction that does not contain an animation in its field, the current animation will continue to play.

Circular Move Node – Buildbox 3 Manual

By |

Circular Move Node

This movement node makes an asset orbit around a specific point in a scene.

If the asset is gradually descending or falling, make sure its physics is not set to Dynamic.

Node Attributes

Option Description
Name Type a custom name for this node, if needed.
Seconds Per Orbit Enter the number of seconds it will take for the asset to complete a full circle.
Radius Enter a numeric value to specify the radius of the orbit. The higher the number, the wider the orbit
Center Enter a numeric value in any of the axis fields to offset the center of the orbit.

For example, if the asset’s position in a scene is 0, 0, 0, and the Center is set to 0, 5, 0, then the center of the asset’s orbit will be 5 units higher than its original scene position.

Reverse Direction Select to reverse the direction of the movement.
Plane Select the plane the asset will orbit in.

  • XY—clockwise/counterclockwise along a horizontal plane.
  • XZ—forward/backward along a horizontal plane.
  • YZ—forward/backward along a vertical plane.

If needed, you can also customize this node. For details, see Customizing Nodes.

Gravitate Node – Buildbox 3 Manual

By |

Gravitate Node

This movement node allows a dynamic asset to move and gravitate toward other assets in a scene.

To make an asset gravitate toward another asset, do the following:

  1. In a World workspace and in the Asset panel, double-click the asset to open it’s Node Map.
  2. On the Node Map grid, select the Start node and in the options panel on the right, click the Physics field and select Dynamic.
  3. In the Node panel on the left and in the Search fiexld, type Gravitate and drag the name or icon to the Node Map grid.
  4. On the Gravitate node, connect the Enabled input to the Created output of the Start node.
  5. Select the Gravitate node and in the Options panel on the right, adjust the Strength attribute as needed.
  6. Preview your game. The asset will now gravitate toward another asset in the scene.

Node Attributes

Option Description
Name Type a custom name for this node, if needed.
Strength Enter the amount of strength to determine how quickly the asset will gravitate toward another asset. The higher the number, the faster the asset will gravitate.

If needed, you can also customize this node. For details, see Customizing Nodes.

Stick to Edge Node – Buildbox 3 Manual

By |

Stick to Edge Node

This advanced node maintains an asset’s position and size in relation to the screen size.

This node only works with  UI Screens assets and will overwrite the current the asset’s position in the UI Editor.

This node automatically enabled when the asset is created or spawned in the game.

After you add this node to a UI asset, you need to specify the following:

  • Select the Side attribute to specify which side of the screen you want to place the asset, then specify the Horizontal and Vertical Distance depending on which side you chose.
  • The following lists each Side option as well as the Distance attributes you need to specify.
    • Bottom—Vertical
    • BottomLeft—Horizontal & Vertical
    • BottomRight—Horizontal & Vertical
    • Left—Horizontal
    • Right—Horizontal
    • Top—Vertical
    • TopLeft—Horizontal Dist. & Vertical
    • TopRight—Horizontal & Vertical

Node Attributes

Option Description
Name Type a custom name for this node, if needed.
Horizontal Dist. The distance measured from the right or left side of the screen to the asset’s center.
Vertical Dist. The distance measured from the top or bottom side of the screen to the asset’s center.
Side Select the side of the screen that the distance attributes will be measured from.

If needed, you can also customize this node. For details, see Customizing Nodes.

Set UI Text Node – Buildbox 3 Manual

By |

Set UI Text Node

This action node changes the text on a specified UI Label.

The New Text input receives information from a connected node and displays it on the UI Label specified by the UI Text Name.

Currently, this node only functions with the Speedometer node.

The following is an example of a Set UI Text node displaying the asset’s movement speed on the UI Label located in a UI Screen node.

  • On the Speedometer node, the Speed Value output keeps track of the asset’s movement speed and sends it as a numeric value to the connected Set UI Text node.
  • The New Text input receives the Speed Value and displays it on the Speed UI label located on a UI Screen node.
  • The image below displays the asset moving across the scene at a speed value of 10.

Node Attributes

Option Description
Name Type a custom name for this node, if needed.
UI Text Name Enter the name of a UI Label as it appears on the UI Screen node.

Sound – API Reference

By |

Sound

The Sound Node plays an mp3 file.

Function Description
isPlaying()

Returns true if the sound is currently playing, false if not.

setVolume(value)

Sets the volume of the sound, from 0-1. The sound must already be playing before you set the sound with this function, and must be looped or non-overlapping.

volume()

Returns the volume of the sound if it is playing, from 0-1.


isPlaying()

Returns true if the sound is currently playing, false if not.

Returns

boolean – true if the sound is playing, false if not

↑ Back to top


setVolume(value)

Sets the volume of the sound, from 0-1. The sound must already be playing before you set the sound with this function, and must be looped or non-overlapping.

Parameters

number value – the volume of the sound

↑ Back to top

let fadein = false;
let mySound;
let volume = 0;

function start() {
	// start the fade in at the start of the scene
	fadein = true;
	mySound = this.entity().component("My Sound");
}

function update(dt) {
	// stops adjusting volume once volume goes over 1
	if (fadein && volume <= 1) {
		// check if the sound is playing
		if (mySound.isPlaying()) {
			// set the volume, and then increase the volume for the next update loop
			mySound.setVolume(volume);
			volume += 0.001;
		}
	}
}

volume()

Returns the volume of the sound if it is playing, from 0-1.

Returns

number - the volume of the sound

↑ Back to top

Did you find this page useful?

Please give it a rating:

Please provide some feedback!

This is very helpful to us.

Tell us how we can improve this post?

LevelSector – API Reference

By |

LevelSector

The LevelSector class represents a Scene Selector “level” at the bottom of the screen in a 3D World. You can get the LevelSector that an Entity exists in with this.entity().level().

Function Description
isRemoved()

Returns true if the level has been removed, false if not. This can be used to make sure you’re not accessing a level that has been unloaded before you try using it (which would cause errors).

name()

Returns the name of the level.


isRemoved()

Returns true if the level has been removed, false if not. This can be used to make sure you’re not accessing a level that has been unloaded before you try using it (which would cause errors).

Returns

boolean true if the level is removed, false if not

↑ Back to top


name()

Returns the name of the level.

Returns

string the name of the level

↑ Back to top

Did you find this page useful?

Please give it a rating:

Please provide some feedback!

This is very helpful to us.

Tell us how we can improve this post?

Keyboard Shortcuts – Buildbox 3 Manual

By |

Buildbox 3 Keyboard Shortcuts

General
Operation Windows Mac
Save Ctrl + S Command + S
Open Ctrl + O Command + O
Minimize/Hide Buildbox Windows logo key + Down arrow Command + H
Quit Buildbox Alt + F4 Command + Q
Tab Navigation
Operation Windows Mac
Close Tab Ctrl + W Command + W
Next tab Ctrl + Page Down Command + Page Down
Previous tab Ctrl + Page Up Command + Page Up
Previously viewed tab Ctrl + 9 Command + 9
Go to a specific tab Ctrl + 1-8 Command + 1-8
View Navigation
All Editors
Operation Windows Mac
Move view in any direction Middle-click + Drag / Spacebar + Left-click + Drag Middle-click + Drag / Spacebar + Left-click + Drag
Zoom in Scroll up / Ctrl + + (plus) Scroll up / Command + + (plus)
Zoom out Scroll down / Ctrl + – (minus) Scroll up / Command + – (minus)
3D Worlds
Operation Shortcut
Center your view on the selected object F
Rotate view in any angle around the scene Spacebar+ Right-click + Drag
Rotate view Rick-click + Drag
Move view forward Right-click (hold) + W
Move view backward Right-click (hold) + S
Move view left Right-click (hold) + A
Move view right Right-click (hold) + D
Move view up Right-click (hold) + E
Move view down Right-click (hold) + Q
Rotate view up Numpad 8
Rotate view down Numpad 2
Rotate view counterclockwise Numpad 4
Rotate view clockwise
Numpad 6
Front view Numpad 1
Left view Numpad 3
Top view Numpad 7
Top view flipped Numpad 9
Perspective/Orthographic Numpad 5
Duplicate Selected Objects and Nodes
Operation Windows Mac
Cut Ctrl + X Command + X
Copy Ctrl + C Command + C
Paste Ctrl + P Command + P
Duplicate Up W W
Duplicate Down S S
Duplicate Right D D
Duplicate left  A A
Scene Editor and Tools
Operation Shortcut
Switch to Select tool `
Switch to Move tool 1
Switch to Rotate tool 2
Switch to Scale tool 3
Switch to Multitool 4
Maintain aspect ratio while using the Manipulator Shift (hold)
Move selected object 0.1 unit

(2d Worlds and UI Screens)

Arrow Keys
Move selected object 1 unit

(2d Worlds and UI Screens)

Shift + Arrow Keys
Solo scene S
Mute Scene M
Preview Window
Operation Windows Mac
Preview Ctrl + P Command + P
Preview Scene Ctrl + Alt + P Option + Command + P
Restart Ctrl + R Command + R
Take screenshot Alt + S Option + S
Node Map: JavaScript panel
Operation Windows Mac
Search Ctrl + F Command + F

Color Animation Node – Buildbox 3 Manual

By |

Color Animation Node

This action node changes the asset color over time.

After the Start input activates, the asset’s color changes over the amount of time specified by the Duration attribute. During this time, the current color of the asset will blend with the color specified by the Target Color attribute. After the Duration finishes, the Done output will activate all its connected nodes

Option Description
Name Type a custom name for this node, if needed.
Target Color To Click the field, and in the Colors window, select a color and click OK.
Duration Enter the amount of seconds it will take for the asset’s current color to change to the Target Color.
Easing Function Specifies the rate of change when the camera changes position.

  • For an ease in ease out pattern, select InOutCube.
  • For a straight and constant pattern, select linear.
Model Name To change the color on a specific mode, enter the name of a 3D Model node. Leave blank if you want to affect all models and images attached to the asset.

If needed, you can also customize this node. For details, see Customizing Nodes.

Level Selector Node – Buildbox 3 Manual

By |

Level Selector Node

This action node allows the player to advance to the next scene after the World restarts.

This node contains two inputs:

  • The Enabled input allows this node to keep track of the current scene.
  • The Next input allows the player to advance to the next scene (after the start scene) after the World restarts.

The following is an example from the Character asset in the Progression template:

The Progression template contains a single world and and utilizes scenes as game levels. The following presents how the Level Selector node advances players to the next level:

When when the game begins, the Start scene begins, followed by scene 1, as shown at the top of the screen. After the character collides with the dotted line at the end, the If Collide node activates the Next output and the Delay node. After the delay node activates the Event (Finish) node, the game moves to the complete menu where the player can advance to the next level. After players click the play button, the game restarts the world and after the start scene finishes, scene now appears.

If needed, you can also customize this node. For details, see Customizing Nodes.