
Making a Simple Game
If you have explored Buildbox and want to see how the tasks explained and demonstrated by the interactive and video tutorials and templates come together when building a game, you’ve come to the right place!
The instructions below consolidate most important tasks into a single, comprehensive guide. This guide walks you step by step through the game creation process from start to finish and allows you to learn Buildbox at your own pace.
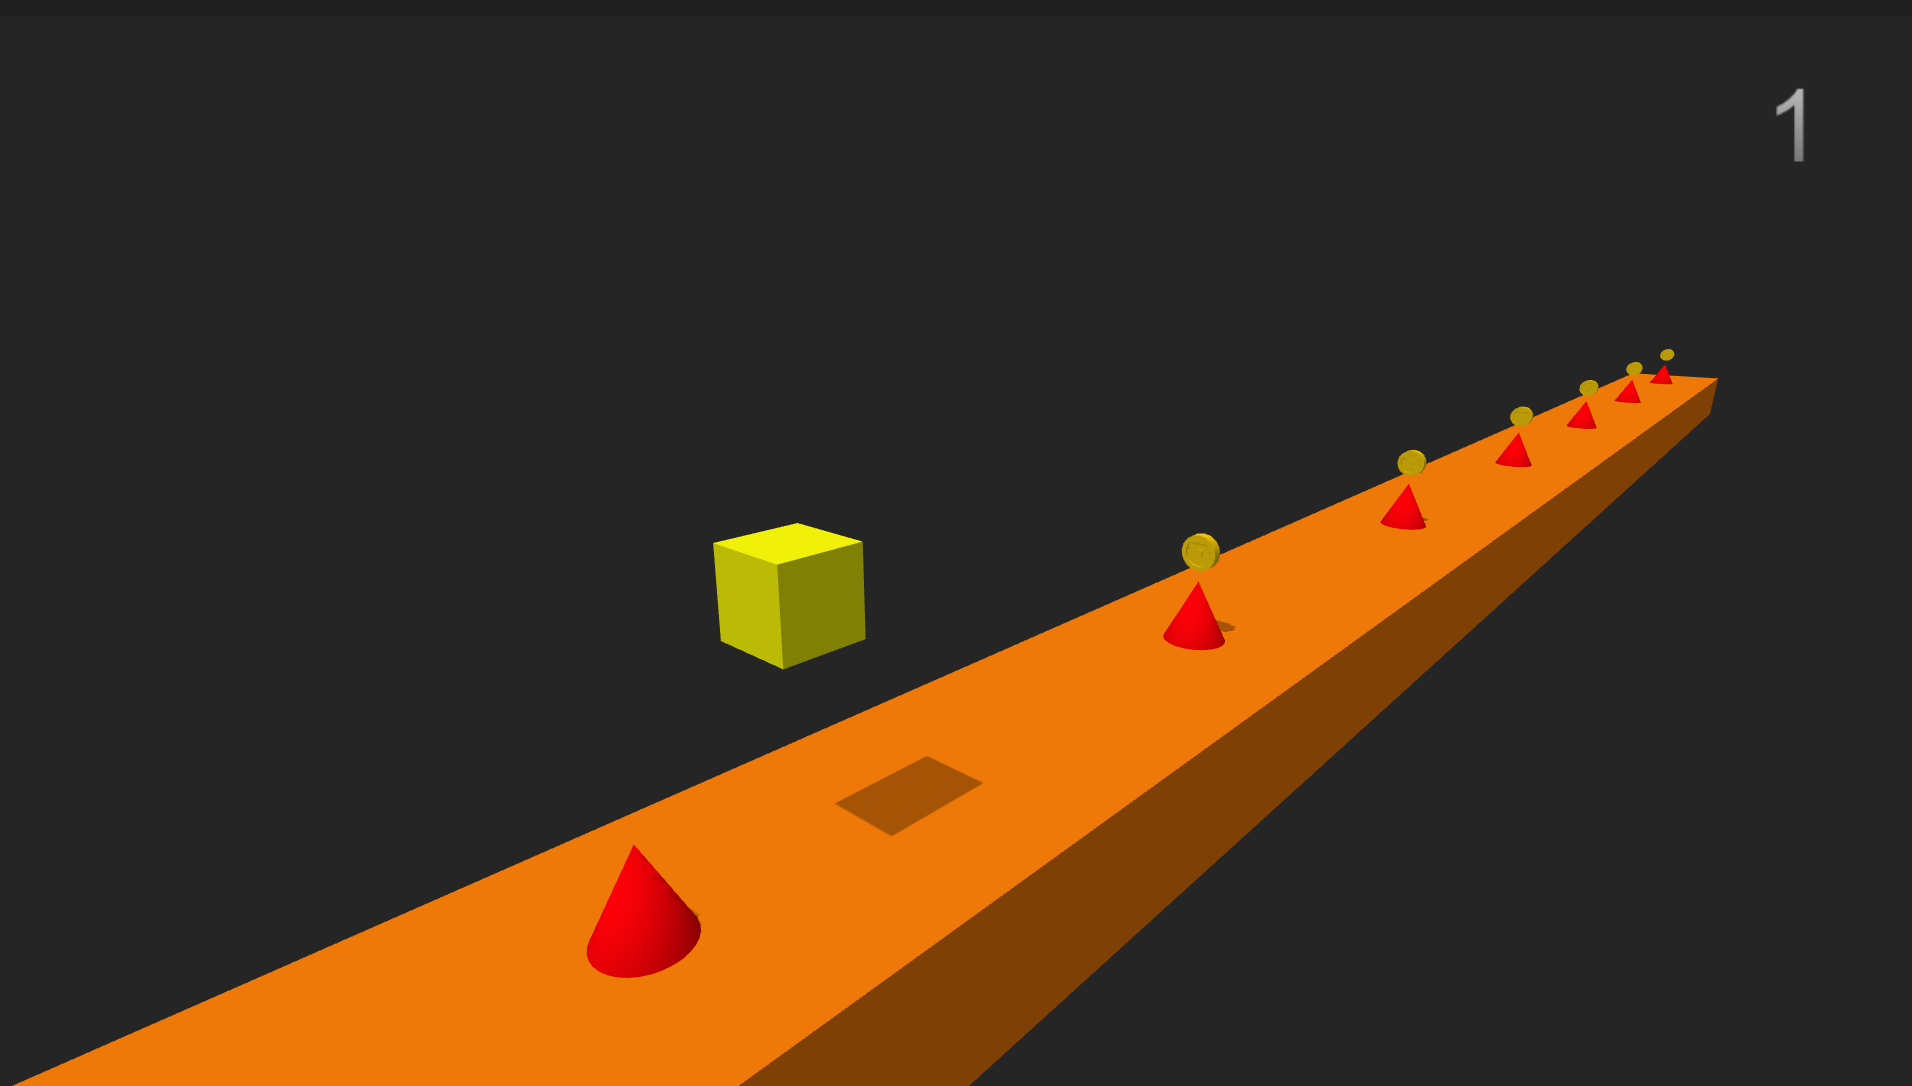
After completing the steps below, you will create a simple game, in which players control a cube character that moves along a platform (ground) and jumps to avoid enemy cone obstacles while collecting reward coins.
What You Need to Know
- There are more than one way of doing things in Buildbox, such as selecting and manipulating objects or entering values.
Each procedure intentionally demonstrates various ways of setting desired values, for example, by entering them in the respective fields or by manipulating the objects in an Editor.
Experiment and choose your preferred way! - Images are provided for your reference only.
Your view of the scenes on the screen may differ based on the zoom level and angle you choose using the spacebar and left and right mouse clicks.
It is the position and scale values that you will be instructed to enter that matter. - The order of procedures is intended to maximize efficiency and reduce the number of tedious, repetitive tasks. Yet some of them are unavoidable.
Practice makes perfect! Your patience and diligence will result in mastery of skills. - The steps below tell you only what to do, not why.
For details and explanations of tools and features, see the respective sections in this documentation.
Let’s Get Started!
- In the Asset panel on the left, click Asset Library.
- Double-click the Cube shape.
It appears under the Objects category in the Asset panel. - Click Asset Library to close it.
- In the Asset panel, click the Cube object and in the Options panel on the far right, do the following:
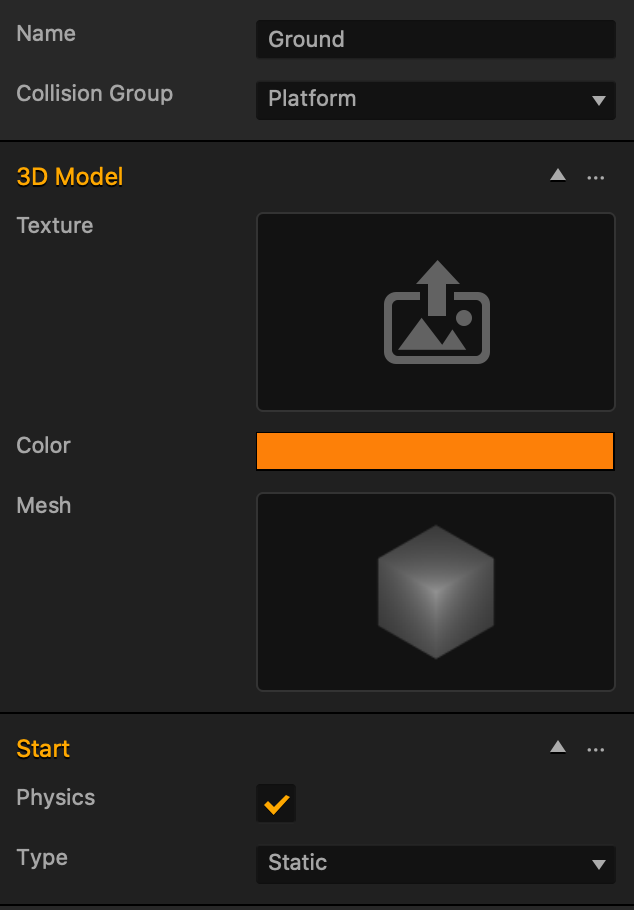
- In the Name field, type Ground.
The name is automatically updated in the Asset panel. - In the Collision Group list, select Platform.
- Expand the 3D Model drop-down list.
- Click Color and in the displayed window, choose an orange color, and click OK.
- Select the Physics checkbox.
- In the Type list, select Static.

- In the Name field, type Ground.
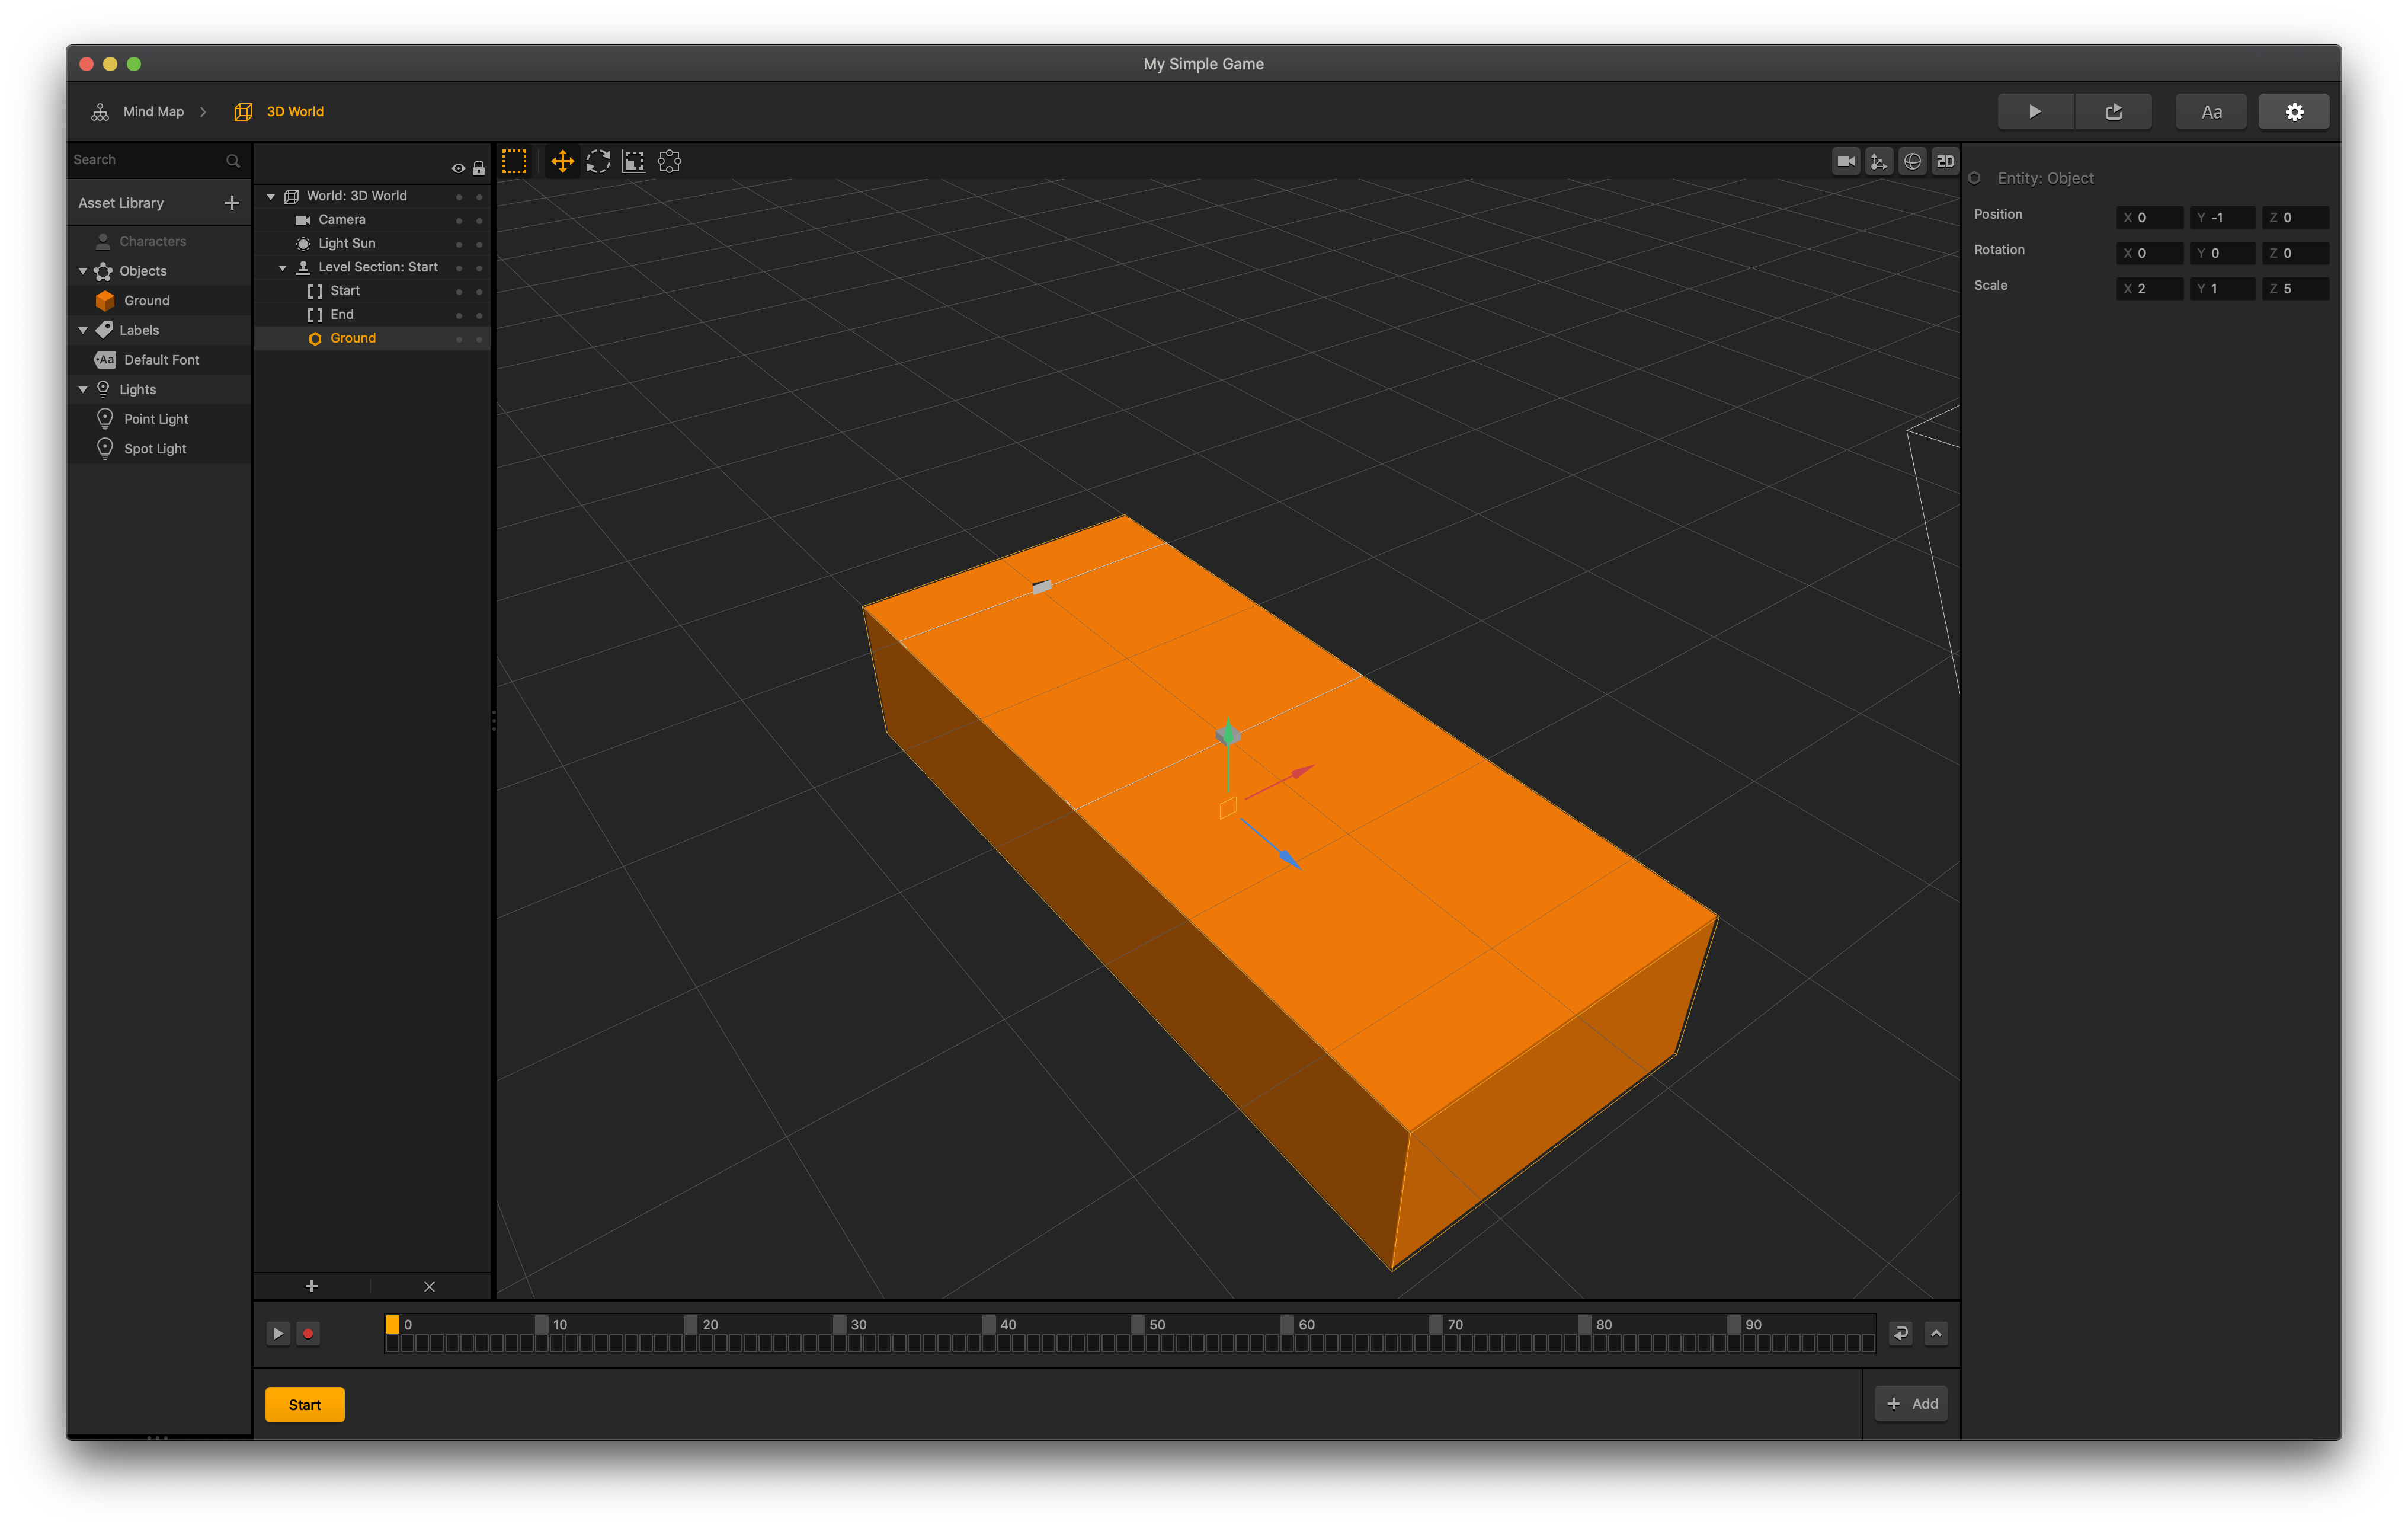
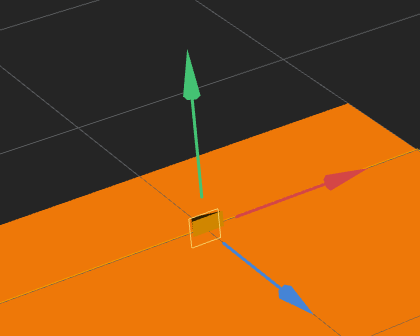
- From the Asset panel, drag the Ground asset to the Scene Editor.
- In the Options panel, in the Position X, Y, and Z axis fields, enter 0, -1, 0 respectively.
- In the Scale axis fields, enter the following values: 2, 1, 5.
This is what your ground would look like in the Scene Editor:
- In the Asset panel on the left, click Asset Library.
- Double-click the Cube shape.
It appears under the Objects category in the Asset panel. - Click Asset Library to close it.
- In the Asset panel, drag the Cube object to the Characters category.
The Characters category changes to a drop-down list with the Cube asset in it.
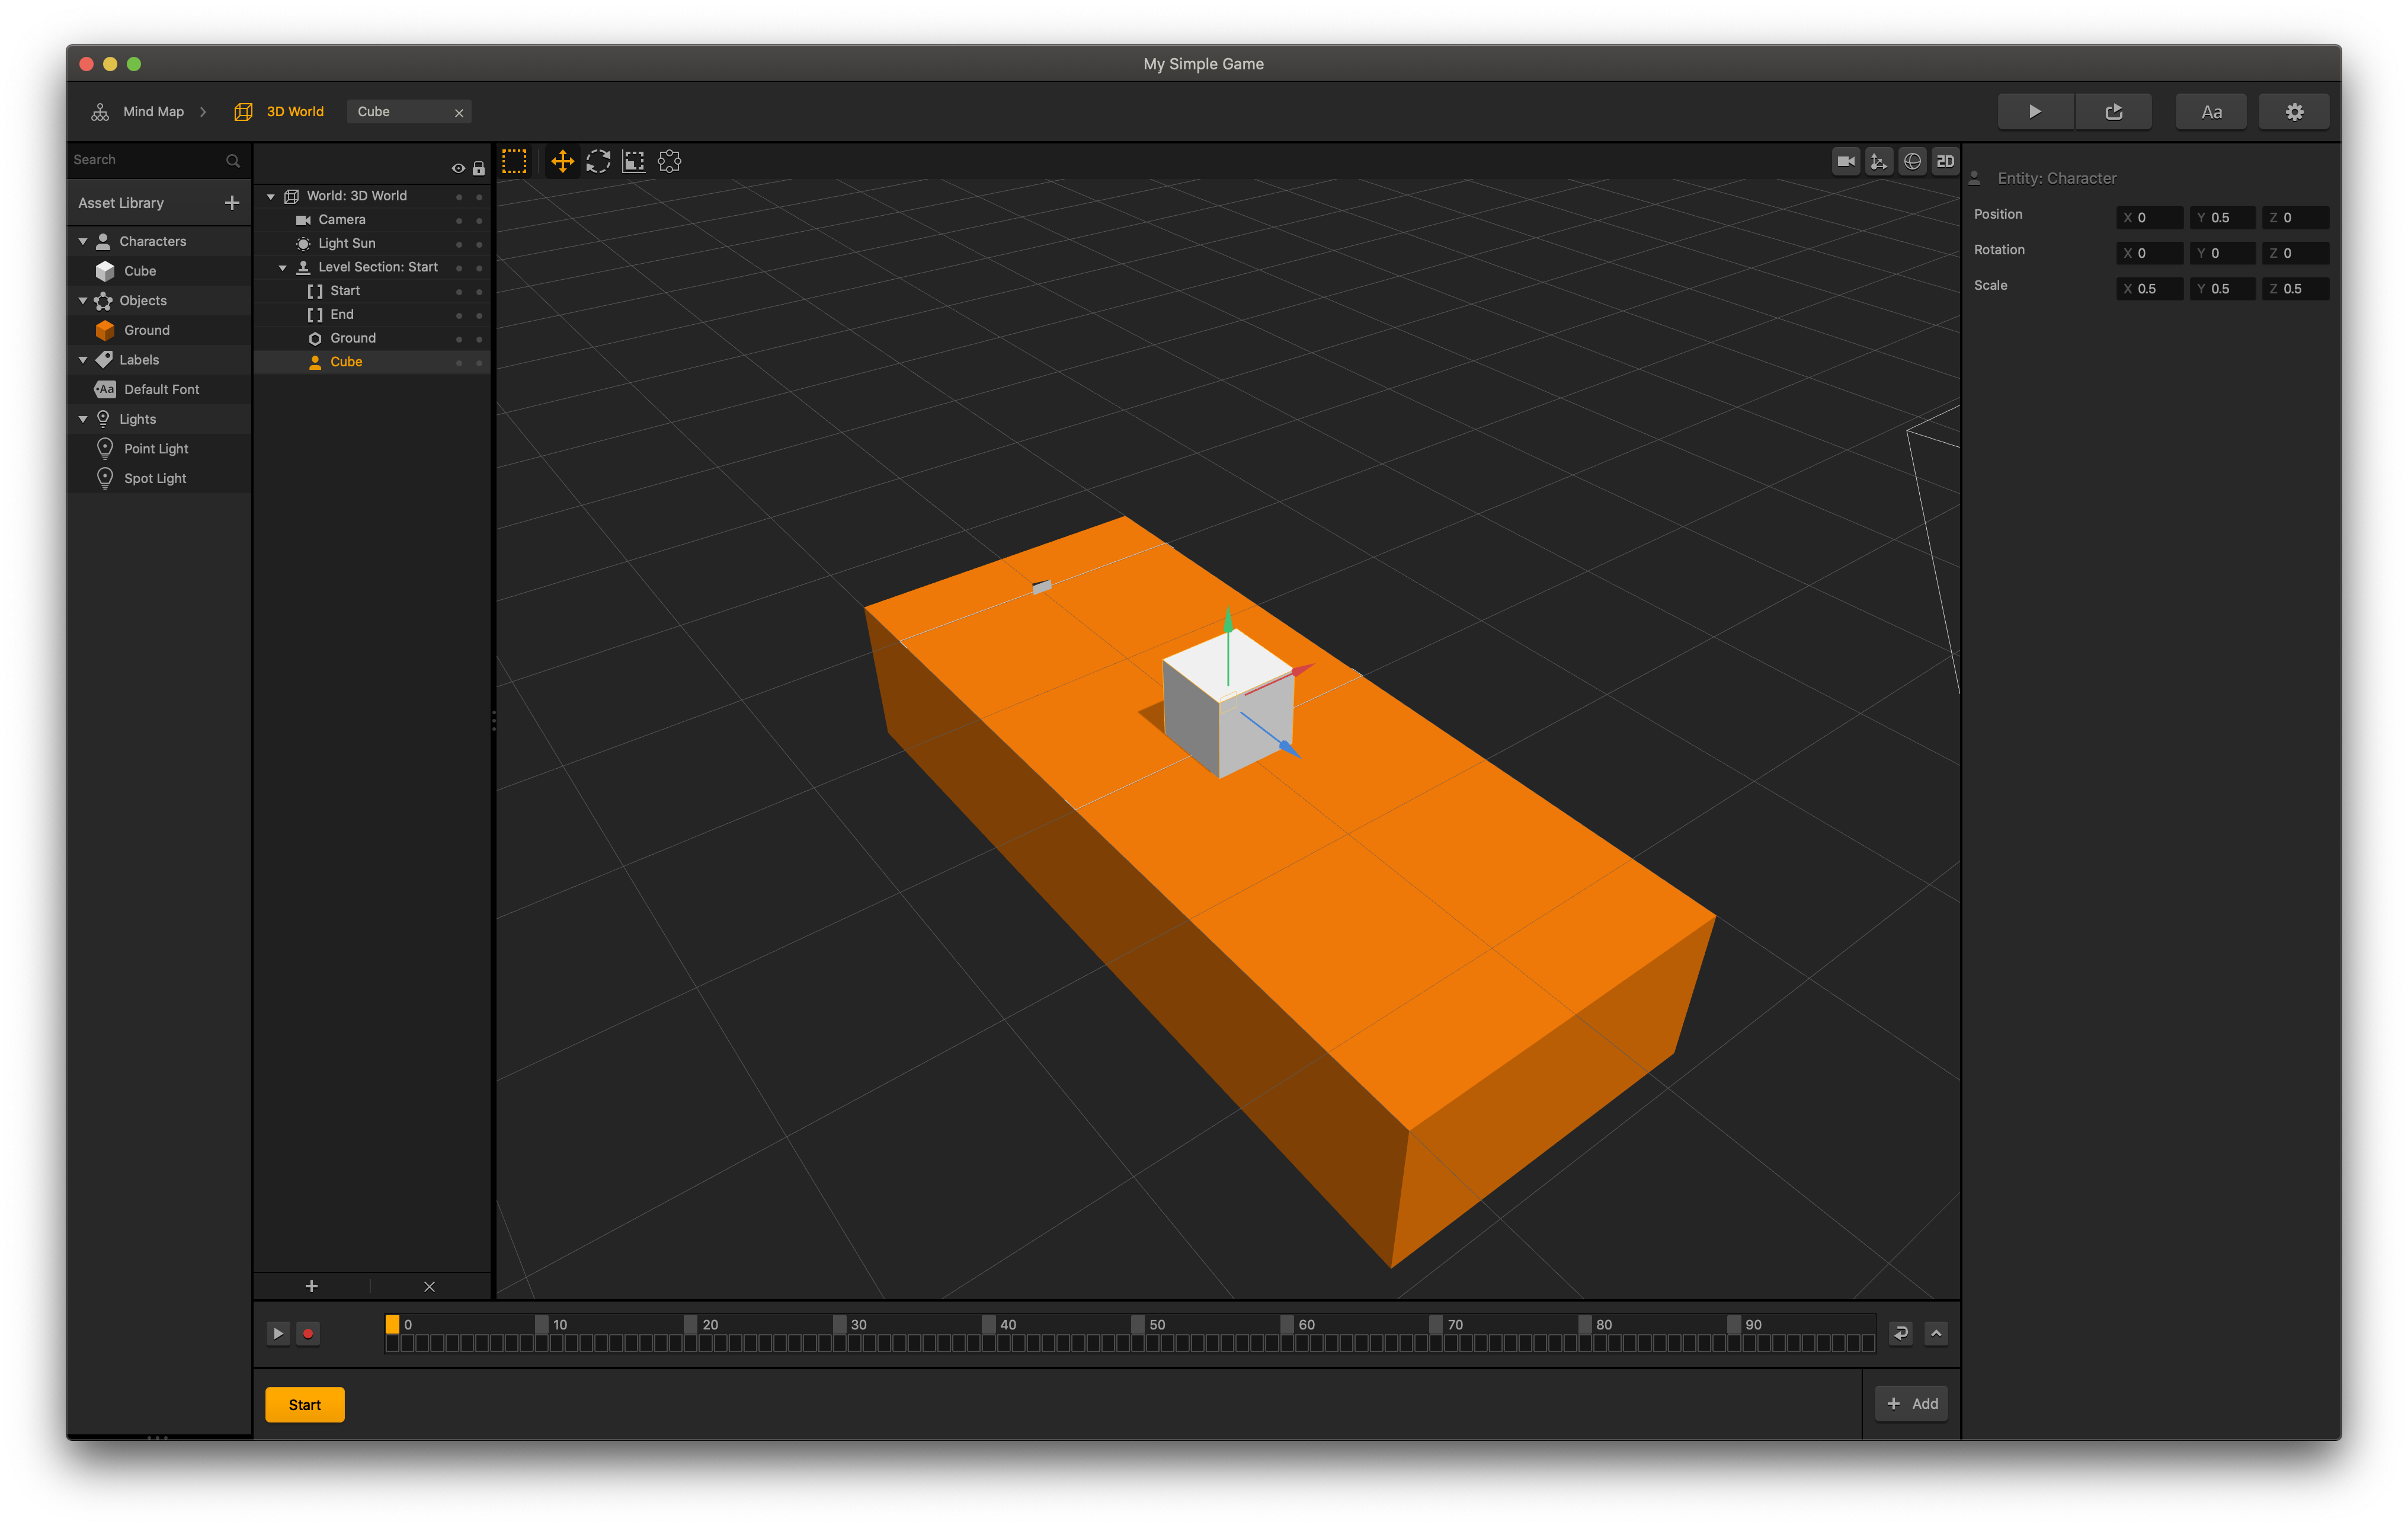
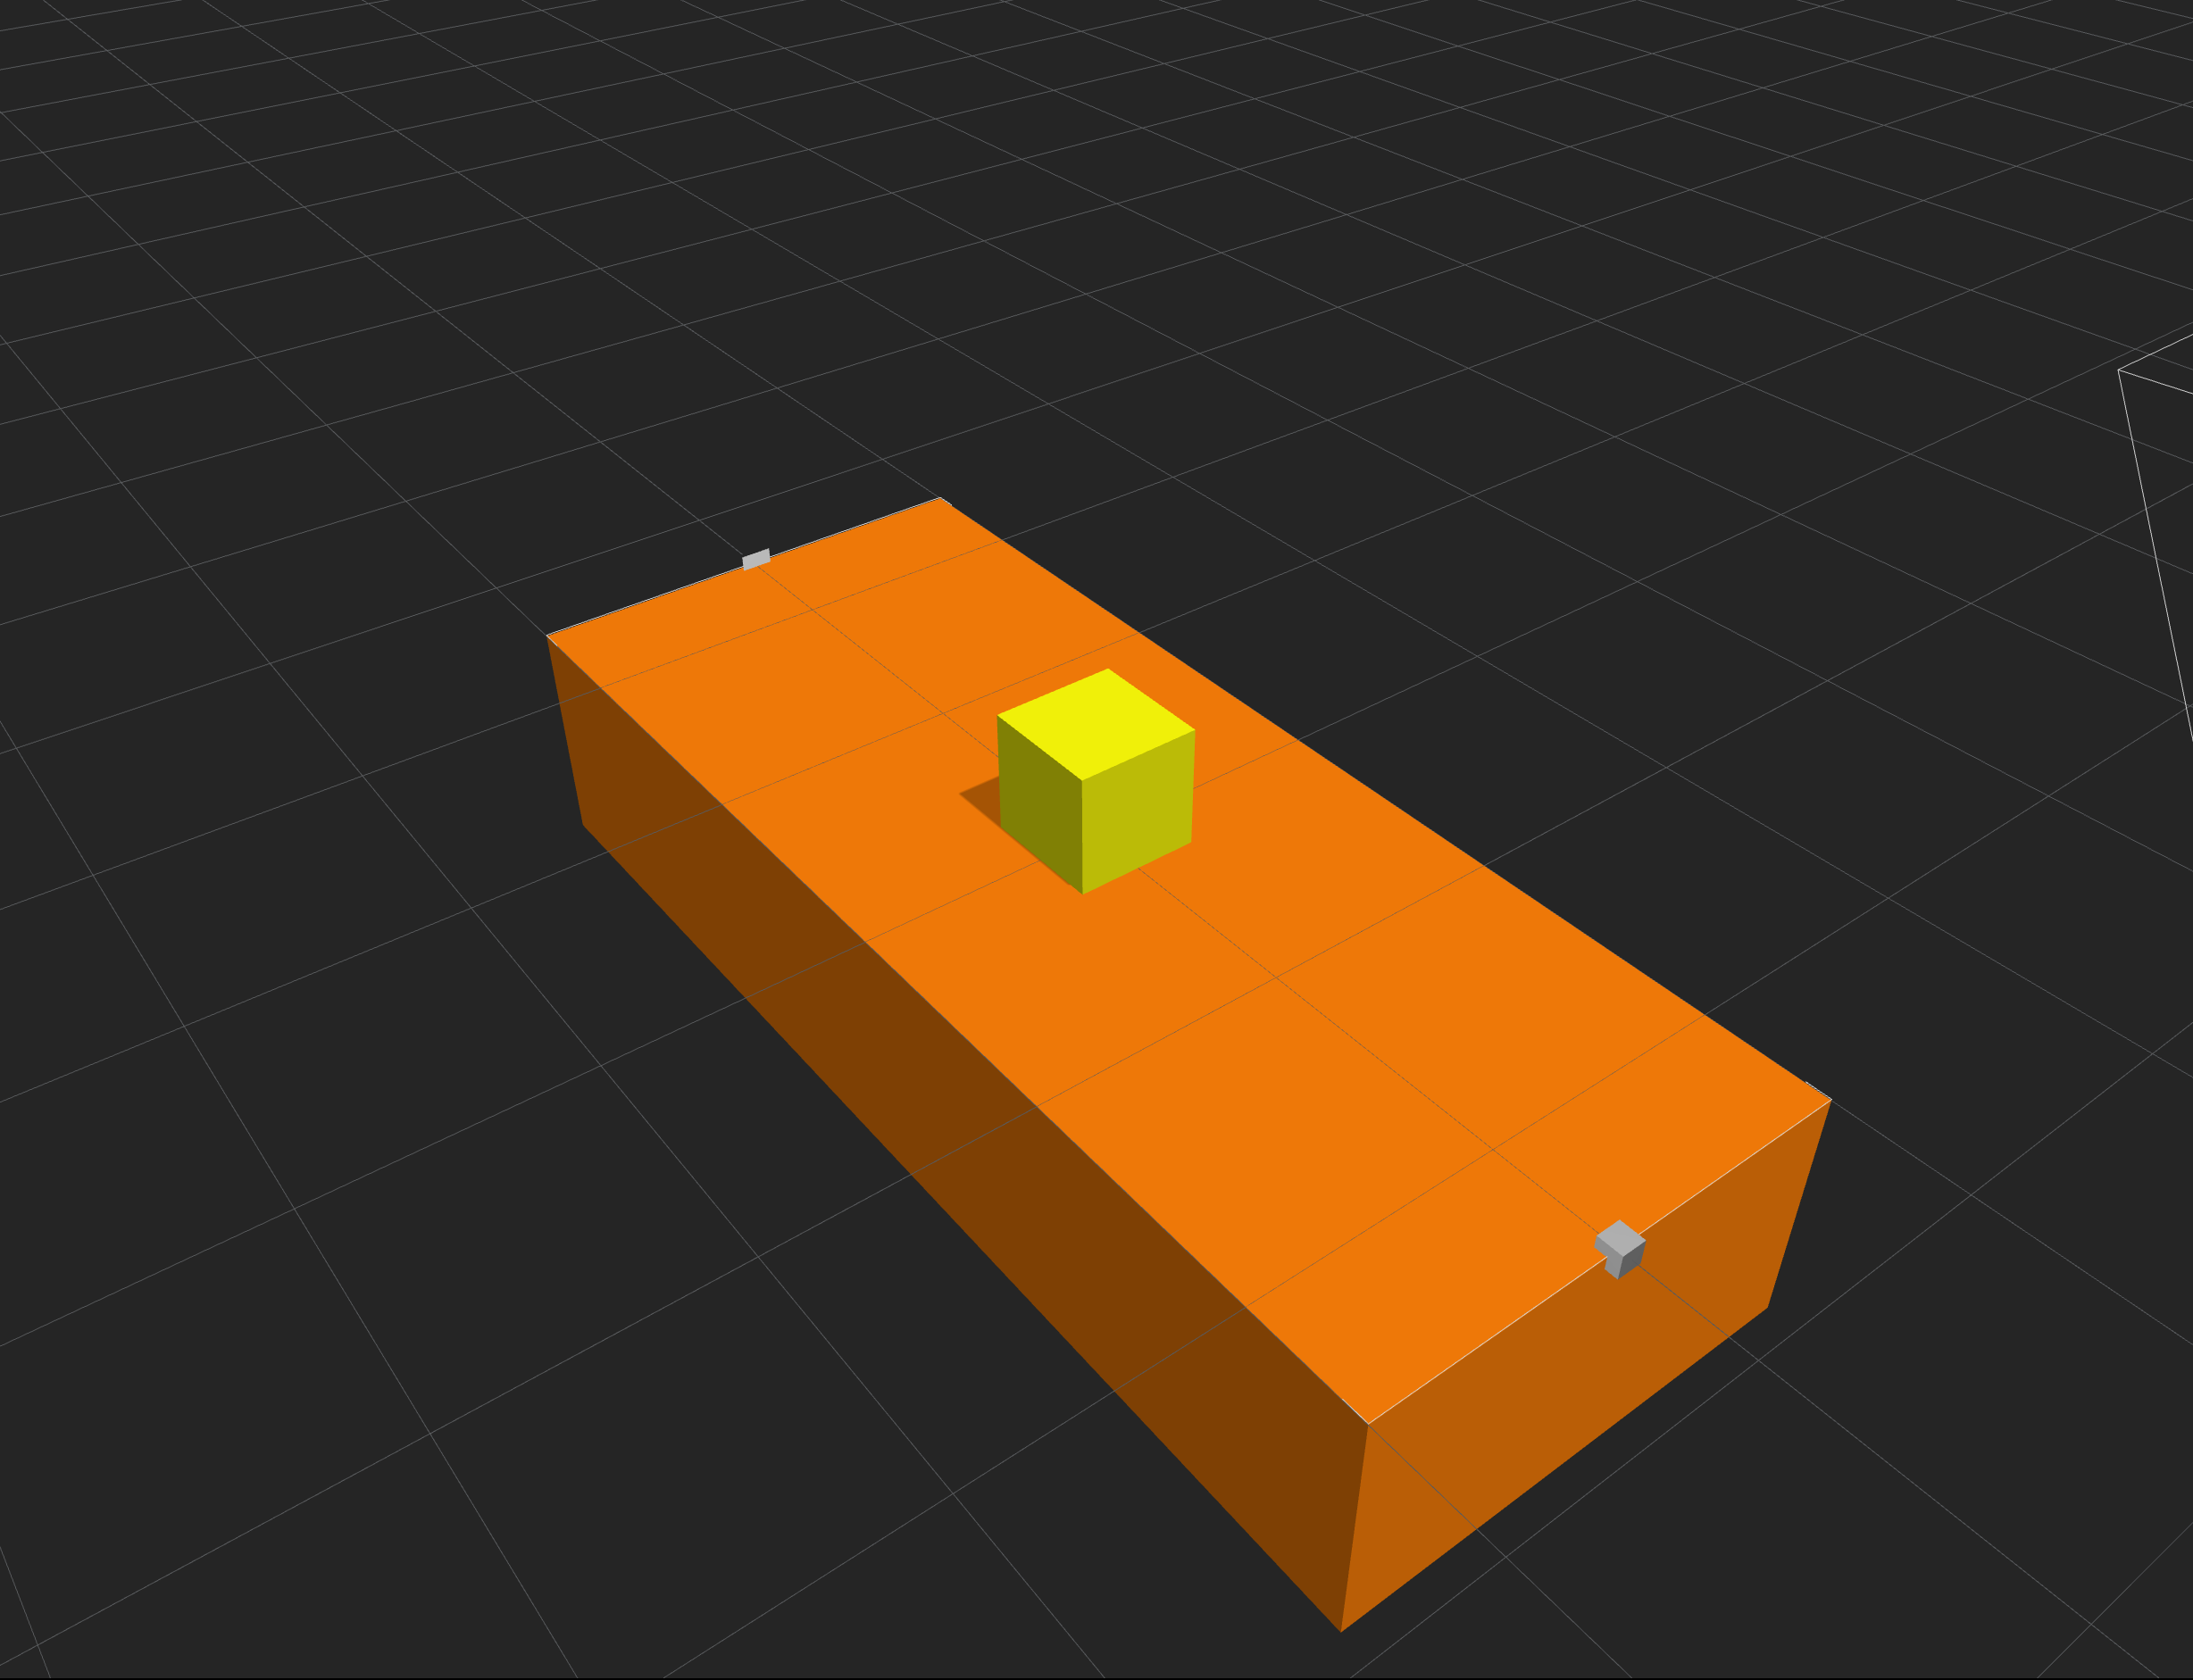
- Drag the Cube character to the Scene Editor.
- In the Options panel, enter the following values in the Position axis fields: 0, 0.5, 0.
- In the Scale axis fields, enter the following values: 0.5, 0.5, 0.5.
This is what your character would look like in the Scene Editor:
- In the Asset panel, click the Cube character.
- In the Options panel on the far right, do the following:
- In the Name field, type Player.
The name is automatically updated in the Asset panel. - In the Collision Group list, select Character.
- Expand the 3D Model drop-down list.
- Click Color and in the displayed window, choose a yellow color, and click OK.
- Select the Physics checkbox.
- In the Type list, which appears underneath the checkbox, select Dynamic.
- To make the character move and jump, at the bottom of the panel, click Add Brain Box.
- Scroll to find the Move box and click it.
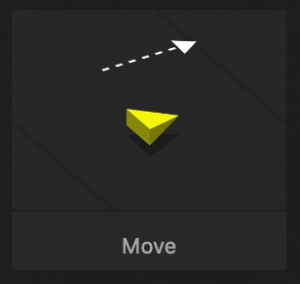
The expanded Move drop-down list is added to the attributes in the Options panel. - In the Speed Y axis field, delete the 0 value (this sets its value to none) and in the Z axis field, type -10.
- Click Add Brain Box and add the Jump box.
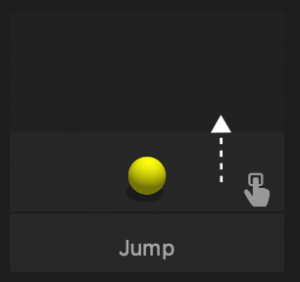
- In the Jump Force fields, set the Y axis value to 10.
- Scroll to find the Move box and click it.
- To manage the character’s defeat, click Add Brain Box and add the Health Brain box.
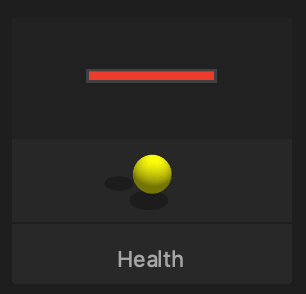
- In the Affected Attribute list, select Enemy.
- In the Name field, type Player.
- To finalize the movement and defeat behavior, in the Asset panel, double-click the Player character.
The character’s Node Map opens with the added Jump and Defeat boxes and their nodes connected to the Start node.- On the Start node, click the Collide output and drag the connector to the Reset input of the Jump node.
- Click the Jump node.
- In the Options panel, in the Jump Limit field, type 1.
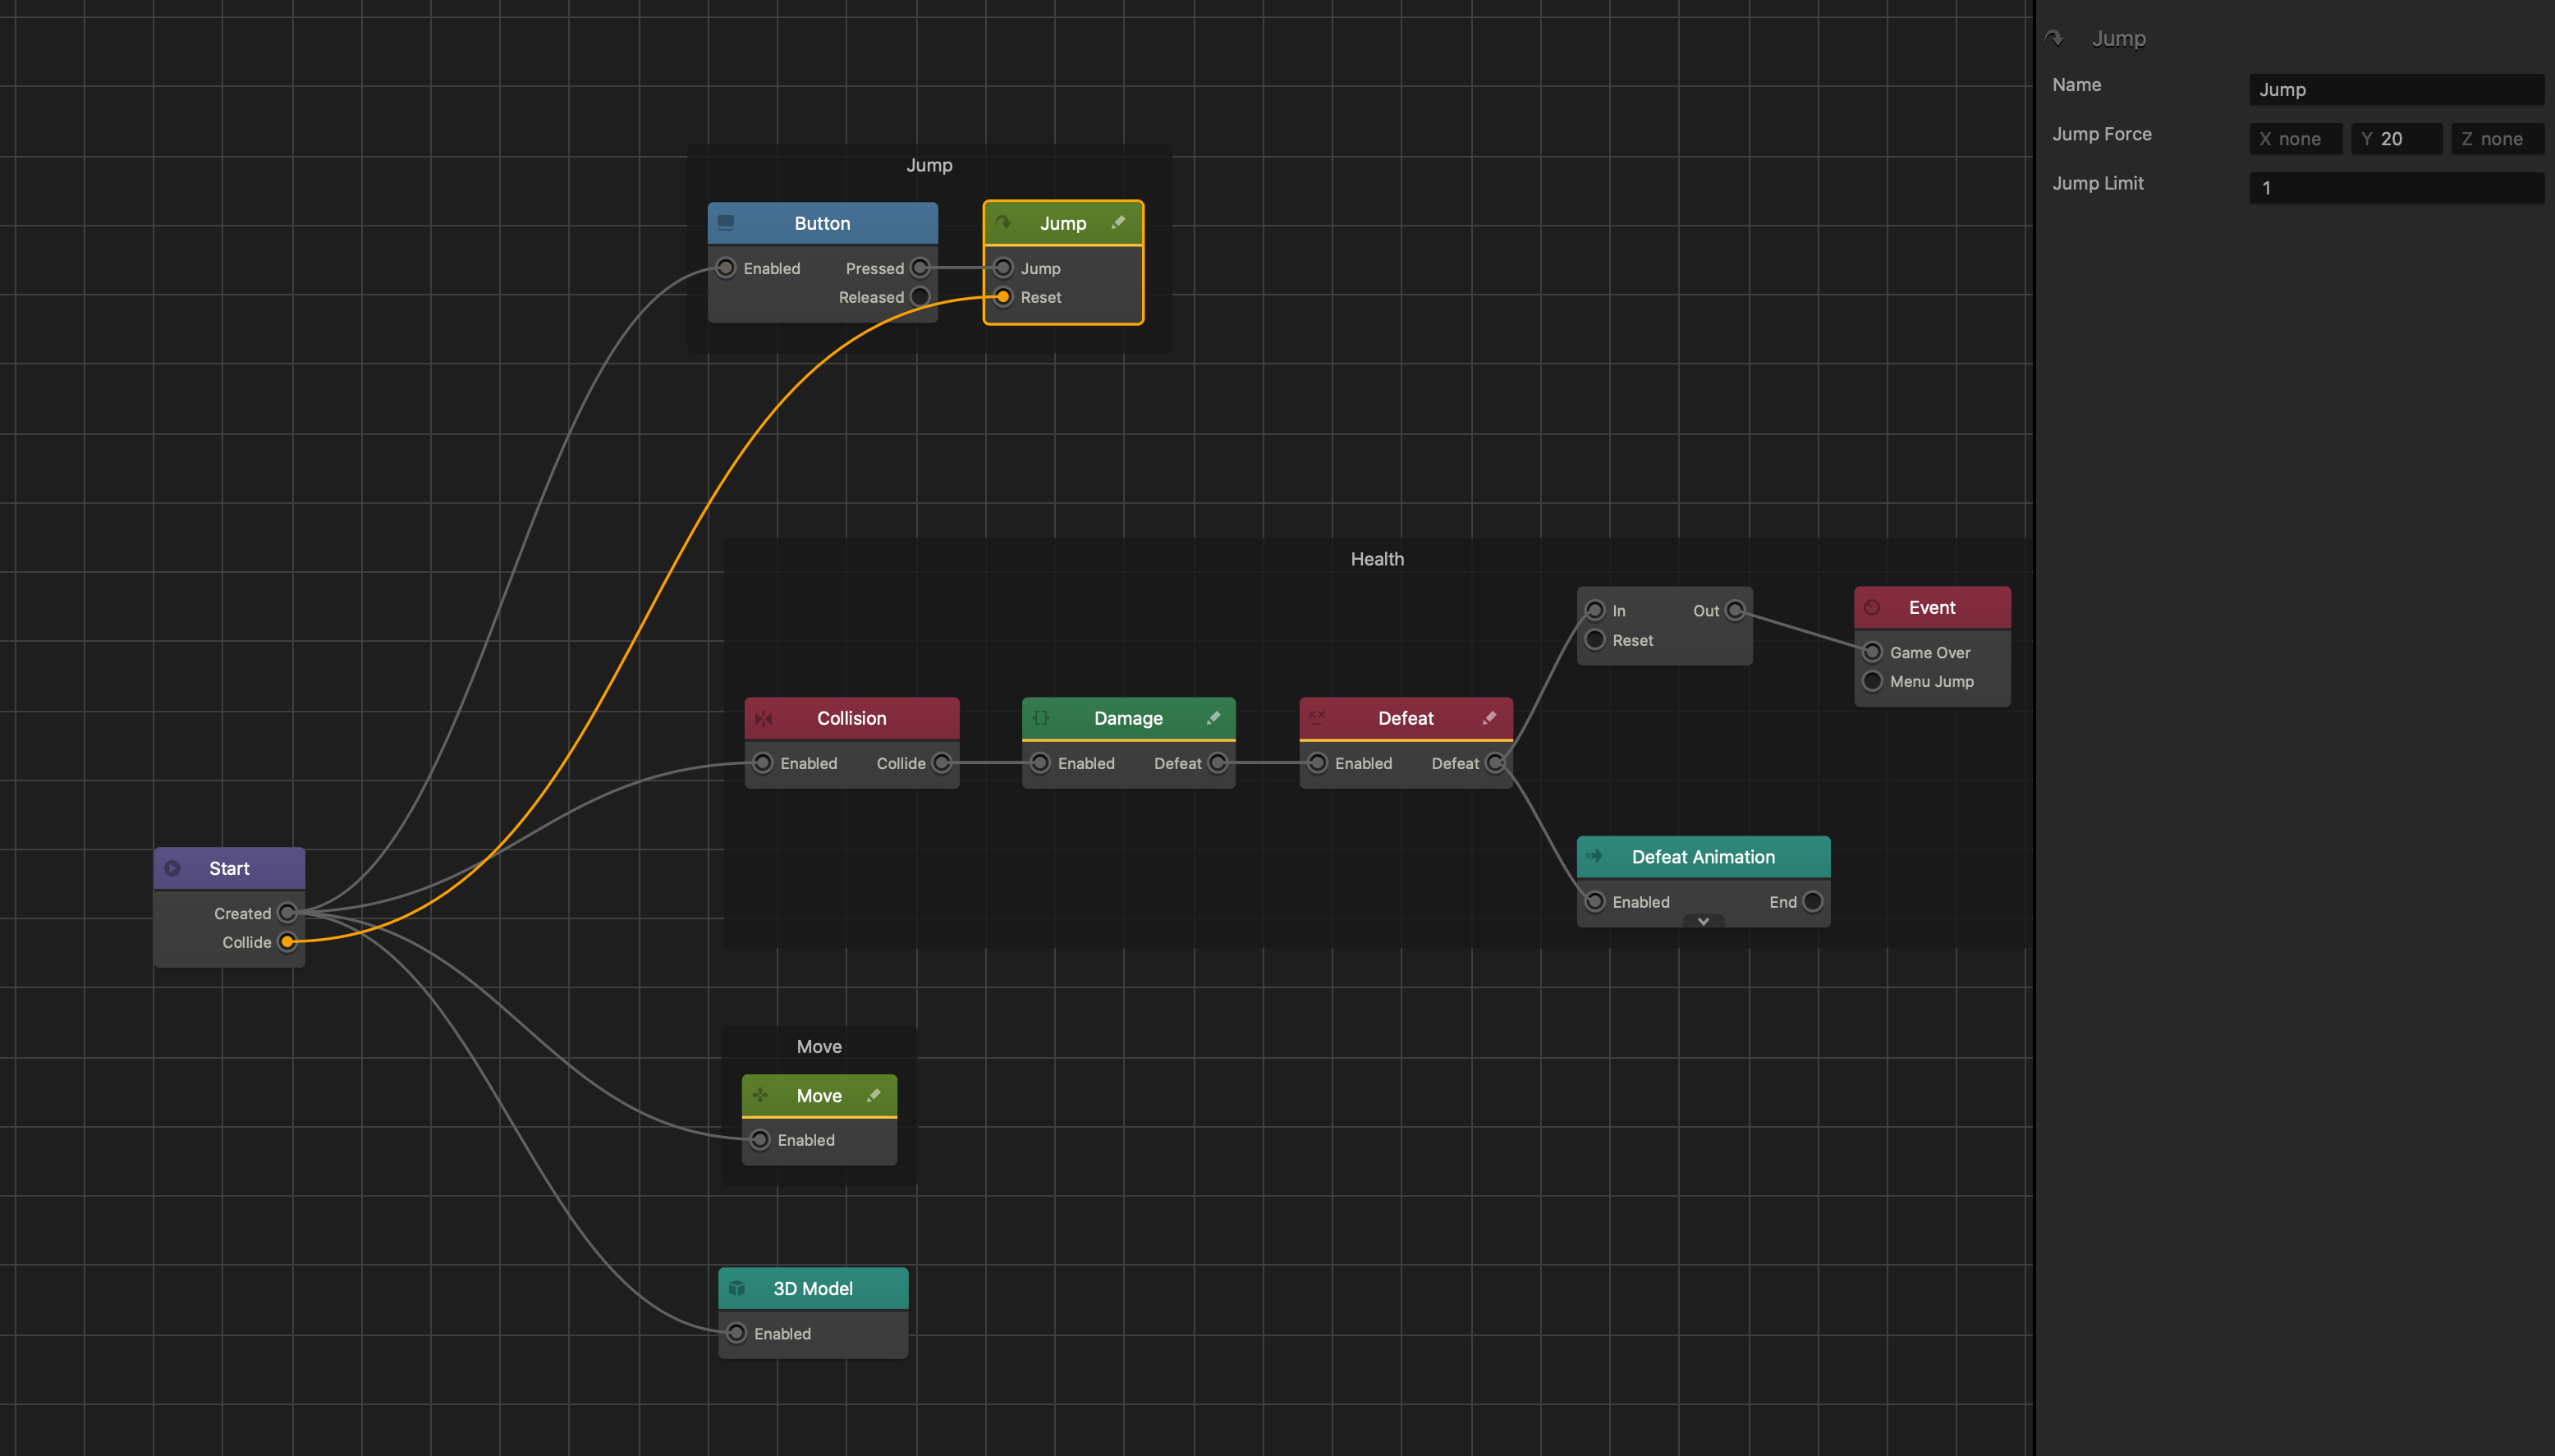
- To prevent gravity from affecting the horizontal movement and rotation of the character, click the Start node and do the following:
- In the Options panel, enter the following values in the Position Factor axis fields: 0, 1, 1.
- In the Rotation Factor axis fields, enter the following values: 0, 0, 0.
- To return to the World workspace, on the Navigation bar, click 3D World.


A game World consists of sections called Scenes. Every scene in a world has a Start point and an End point that define the length and direction of a scene.
- In the Outliner panel, select the End point.
Three colored axis arrows appear around the End point in the Scene Editor.
- In the Scene Editor, drag the blue arrow forward so that in the Options panel on the right, the Position Z axis field value is set to -5.
- Repeat the above steps for the Start point. Drag the blue arrow backward so that the Position Z axis field value is set to 5.
- To Zoom out in the scene view, scroll down so that you can see the Camera and select it.
The colored axis arrow appear around the camera with its attributes displayed in the Options panel.
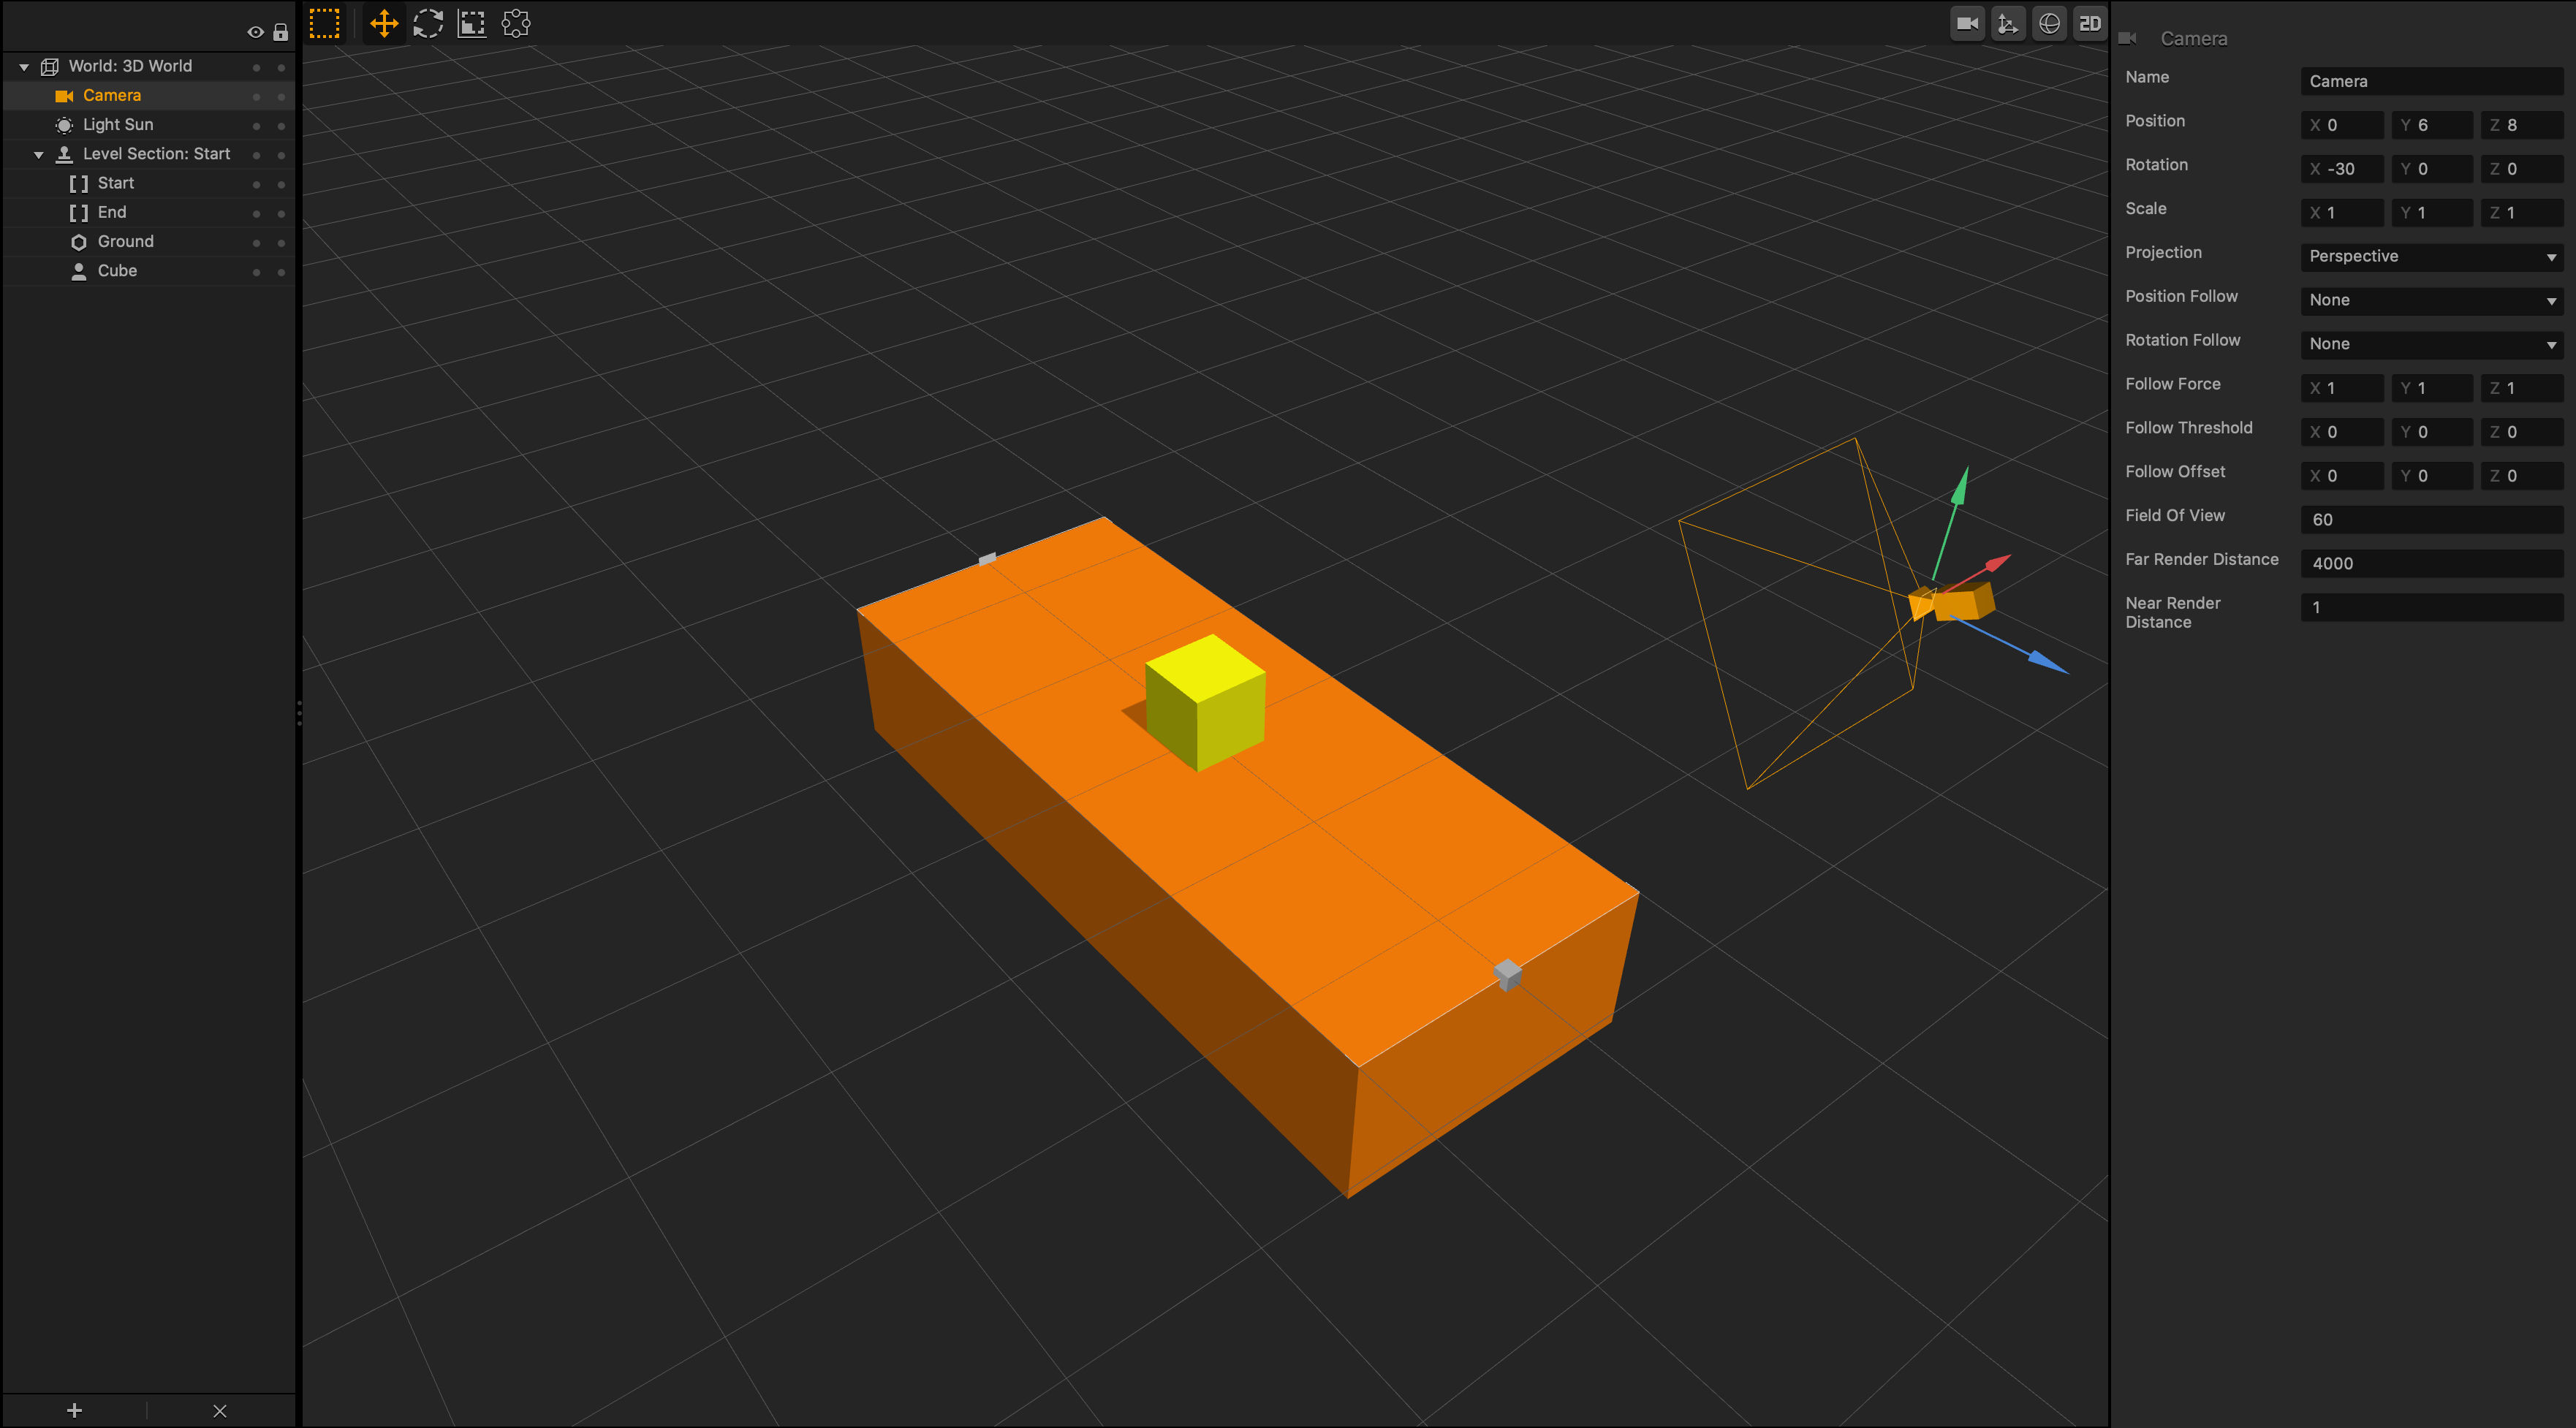
- On the Scene Editor toolbar, click the Camera button
 to turn on the camera view of the game.
 - With the Camera selected, practice the camera view controls below to adjust the camera position and rotation. Watch how the values change in the Position and Rotation axis fields in the Options panel as you move the camera.
- To pan the camera, hold the spacebar on your keyboard and drag the grid.
- To rotate the camera, hold the spacebar, right-click, and drag the grid.
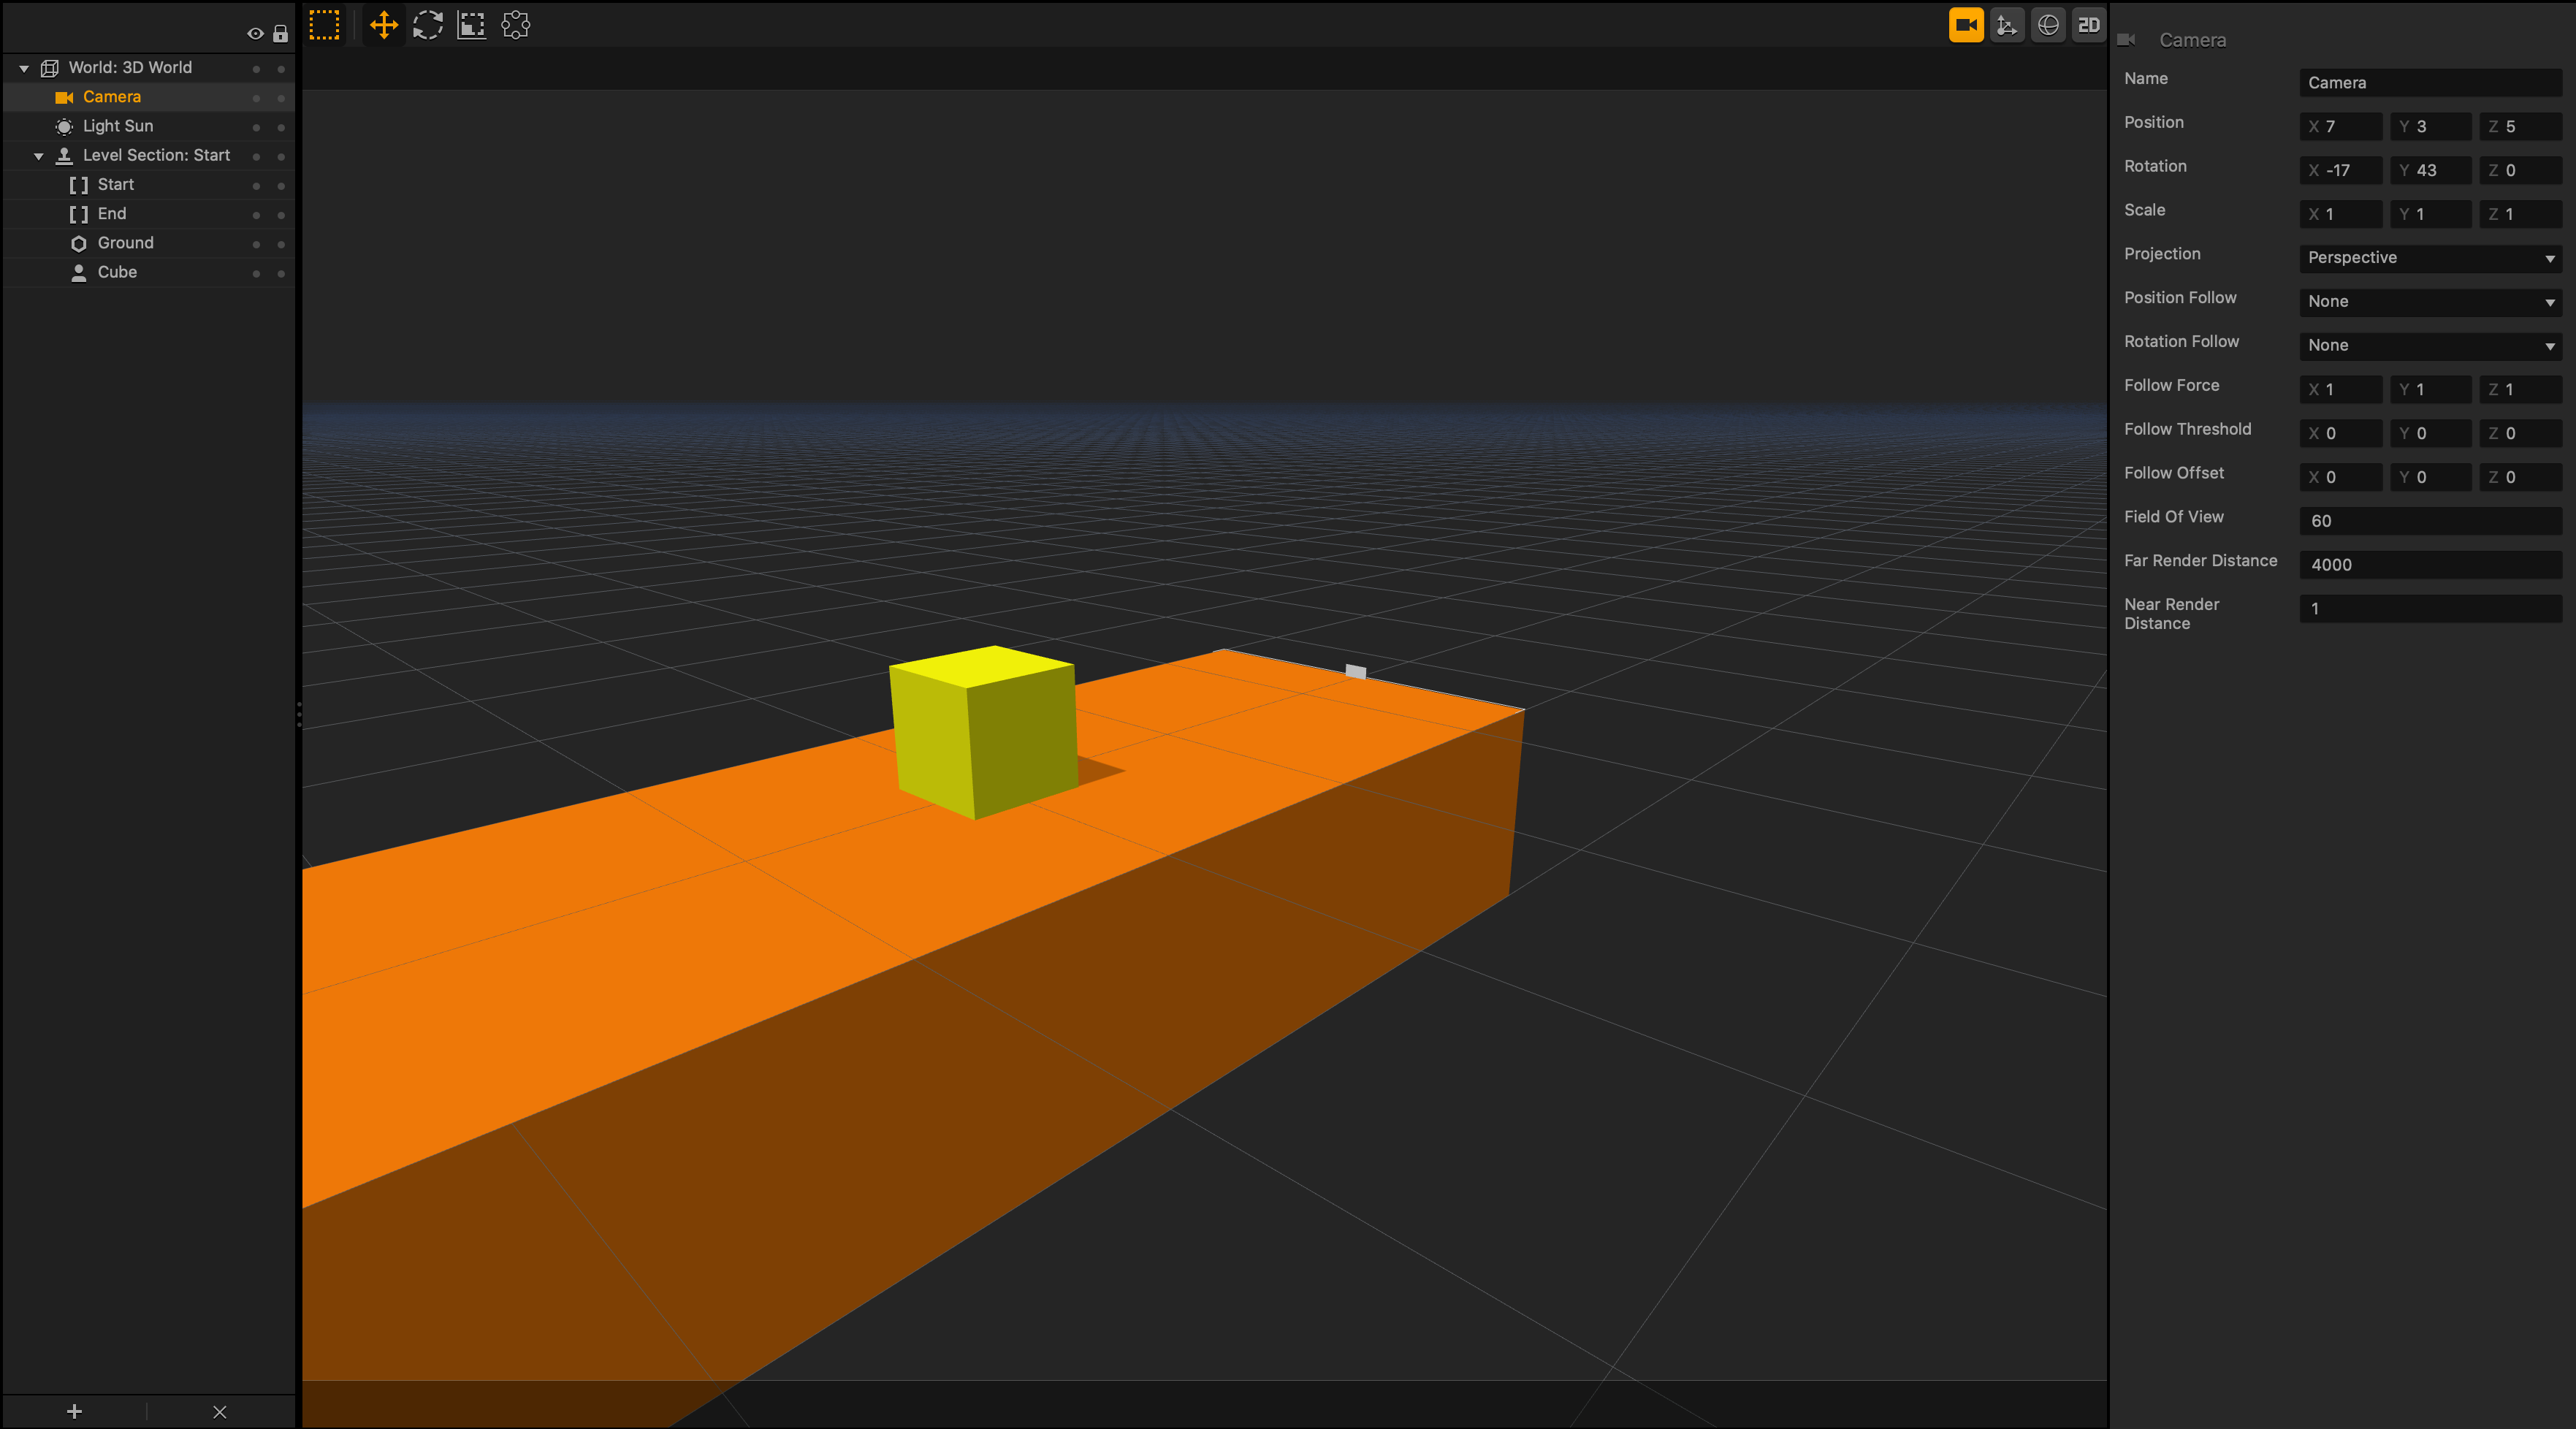
- To set the appropriate angle for the game, enter the following values for the camera directly in the Position and Rotation axis fields or use the above controls to set them:
- Position X, Y, and Z values: 7, 3, 5.
- Rotation X, Y, and Z values: -17, 43, 0.
This is how your game camera view would look:
- In the Options panel, click the Position Follow drop-down list and select Character.
- To turn off the camera view in the Scene Editor, click the Camera button on the toolbar.
- In the Scene Selector at the bottom, click Start, and press D on the keyboard.
A duplicate Start scene is added to the World.
- In the Options panel, in the Name field type Scene 1.
The scene name in the Scene Selector automatically updates as you continue. - In the Outliner, select Player and press Delete on the keyboard.
- In the Asset panel on the left, click Asset Library.
- Double-click the Cone shape.
It appears under the Objects category in the Asset panel. - Click Asset Library to close it.
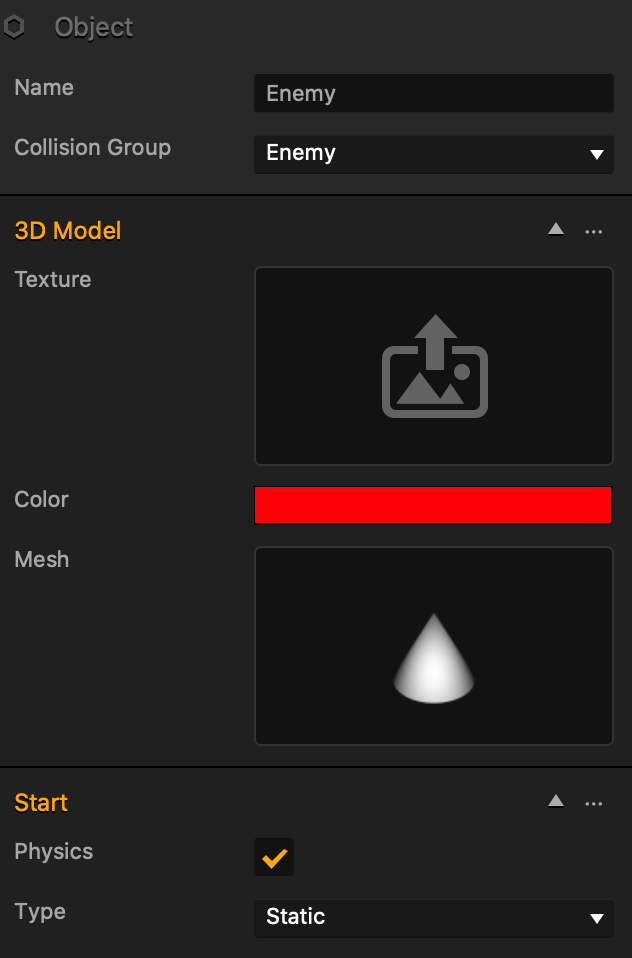
- In the Asset panel, click the Cone object and in the Options panel on the far right, do the following:
- In the Name field, type Enemy. The name is automatically updated in the Asset panel.
- In the Collision Group list, select Enemy.
- Expand the 3D Model drop-down list.
- Click Color and in the displayed window, choose a red color, and click OK.
- Select the Physics checkbox.
- In the Type list, select Static.
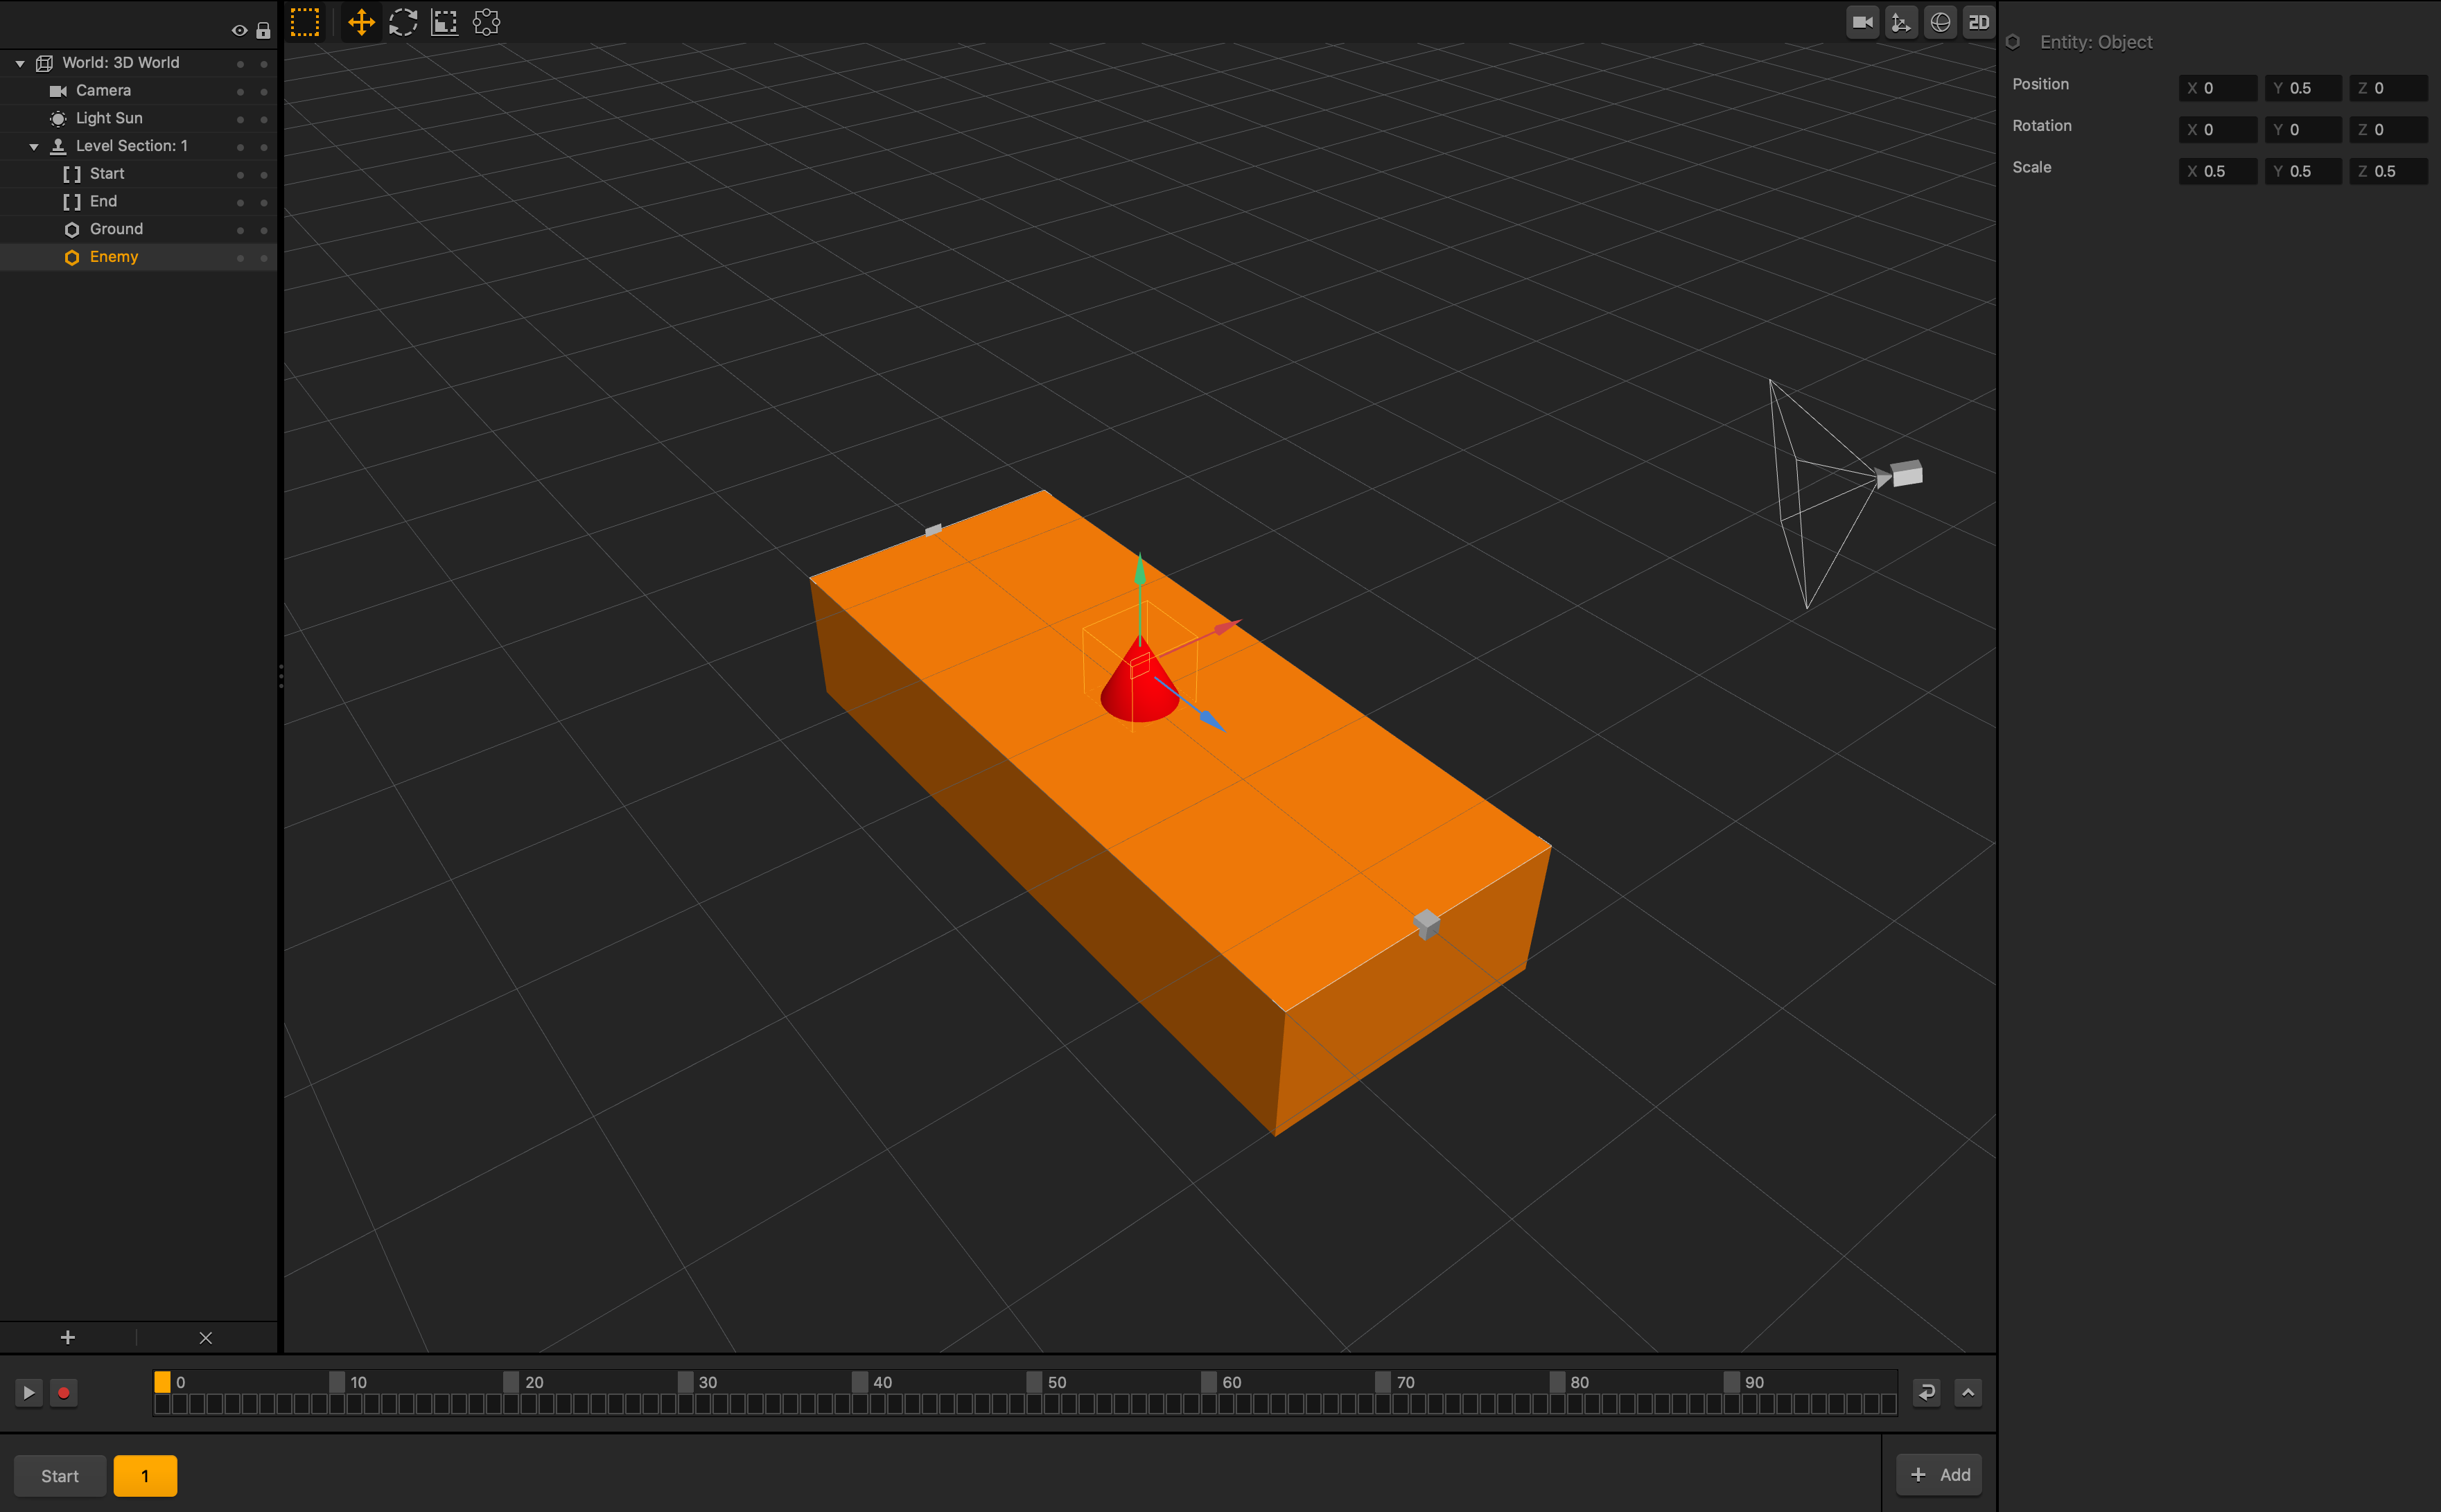
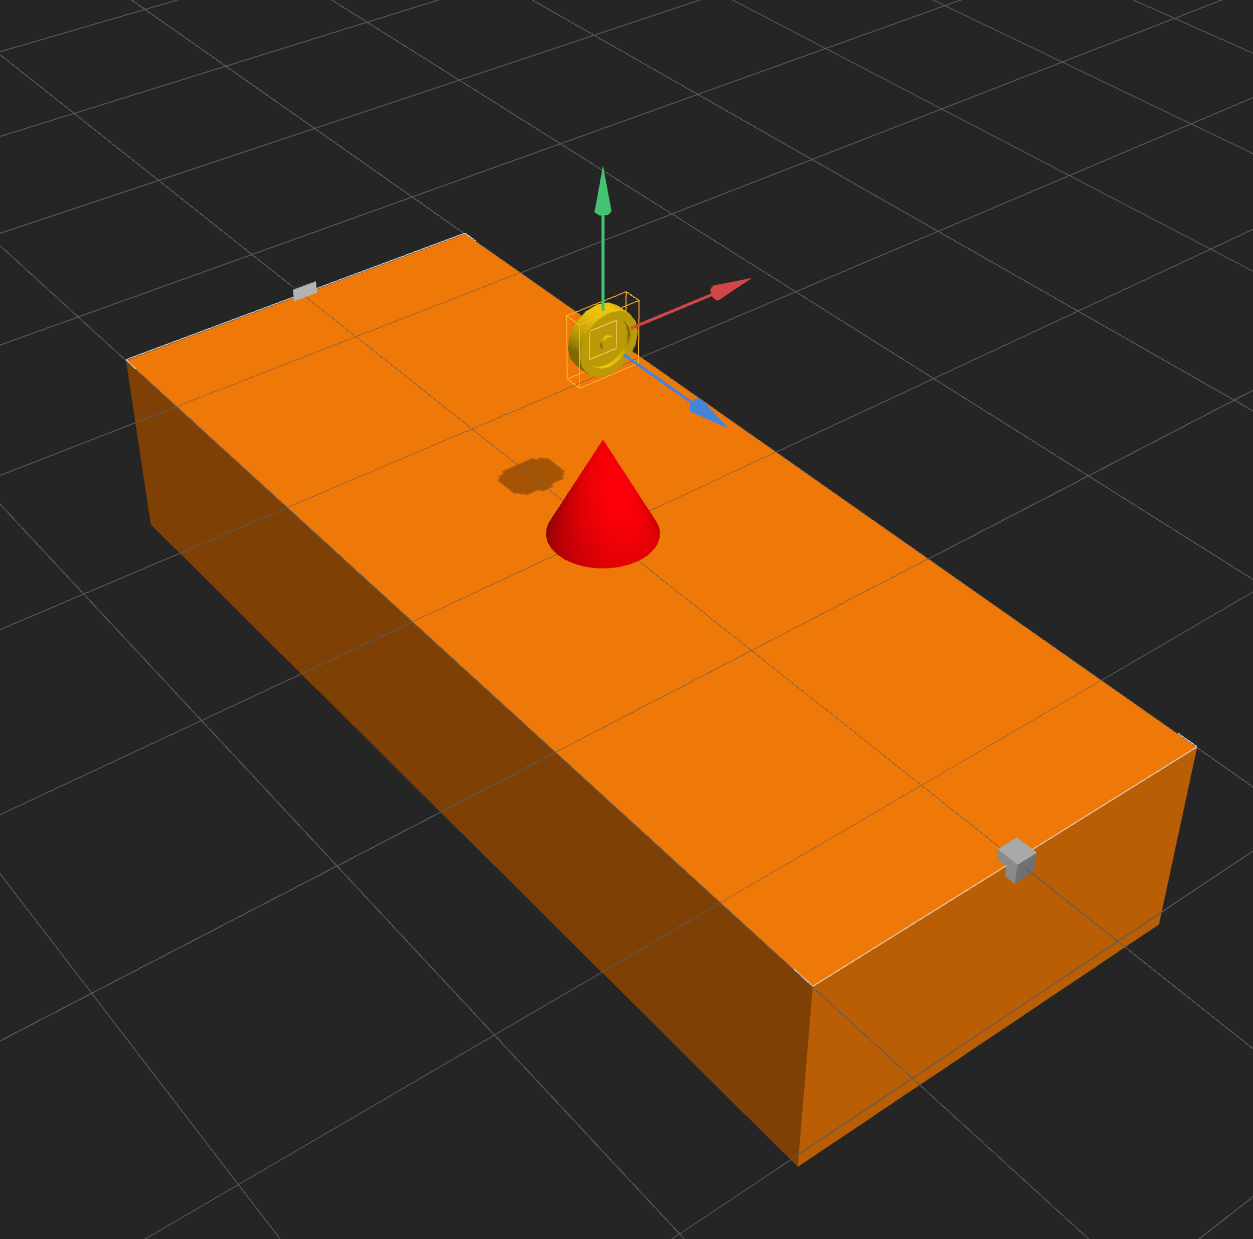
- Make sure you are in Scene 1.
- From the Asset panel, drag the Enemy asset to the Scene Editor.
- In the Options panel, in the Position X, Y, and Z axis fields, enter 0, 0.5, 0 respectively.
- In the Scale axis fields, enter the following values: 0.5, 0.5, 0.5.
- In the Asset panel, click Asset Library.
- Click the Assets tab.
- Double-click the Coin smart asset.
It appears under the Objects category in the Asset panel. - Click Asset Library to close it.
- Make sure you are in Scene 1.
- From the Asset panel, drag the Coin asset to the Scene Editor.
- In the Position axis fields, enter the following values: 0, 2, 0.
This places the coin above the Enemy cone.
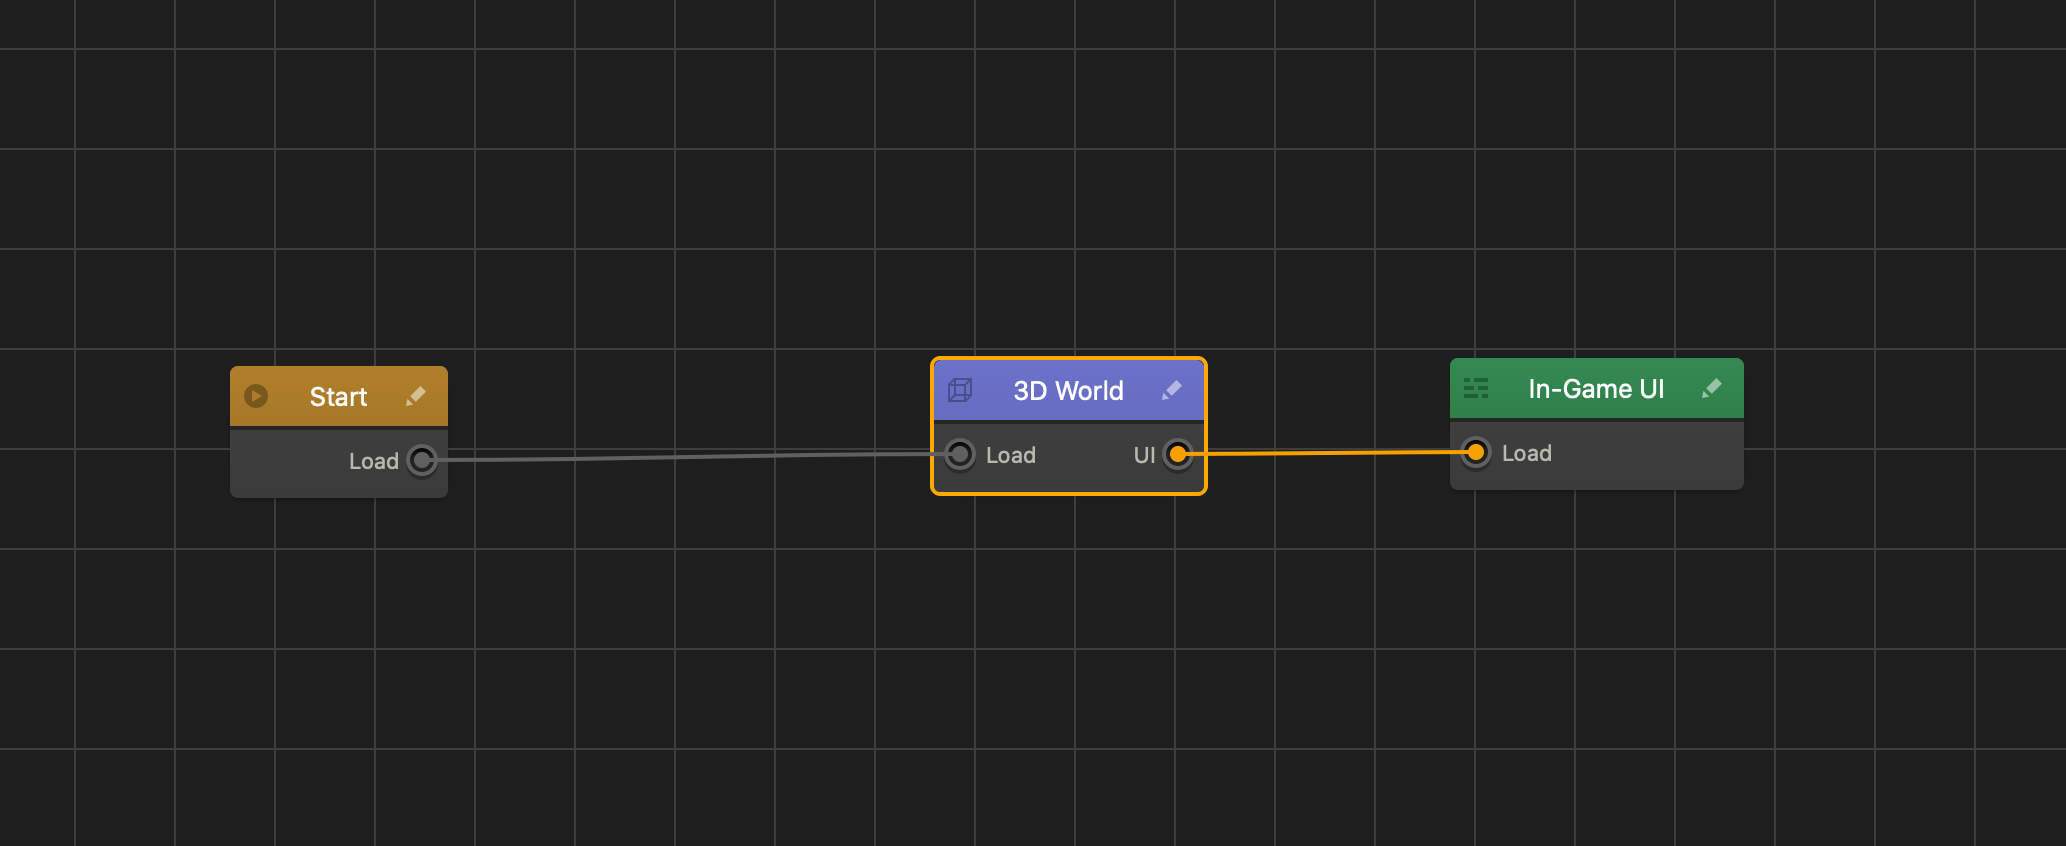
- On the Navigation bar, click Mind Map.
- From the Node panel, drag the UI Screen node to the grid and place it next to the 3D World.
- In the Options panel, in the Name field, type In-Game UI.
The name of the node on the Map is automatically updated. - On the 3D World node, click the UI output and drag a connector to the Load input of the In-Game UI.
- Double-click the In-Game UI node to open its UI workspace.
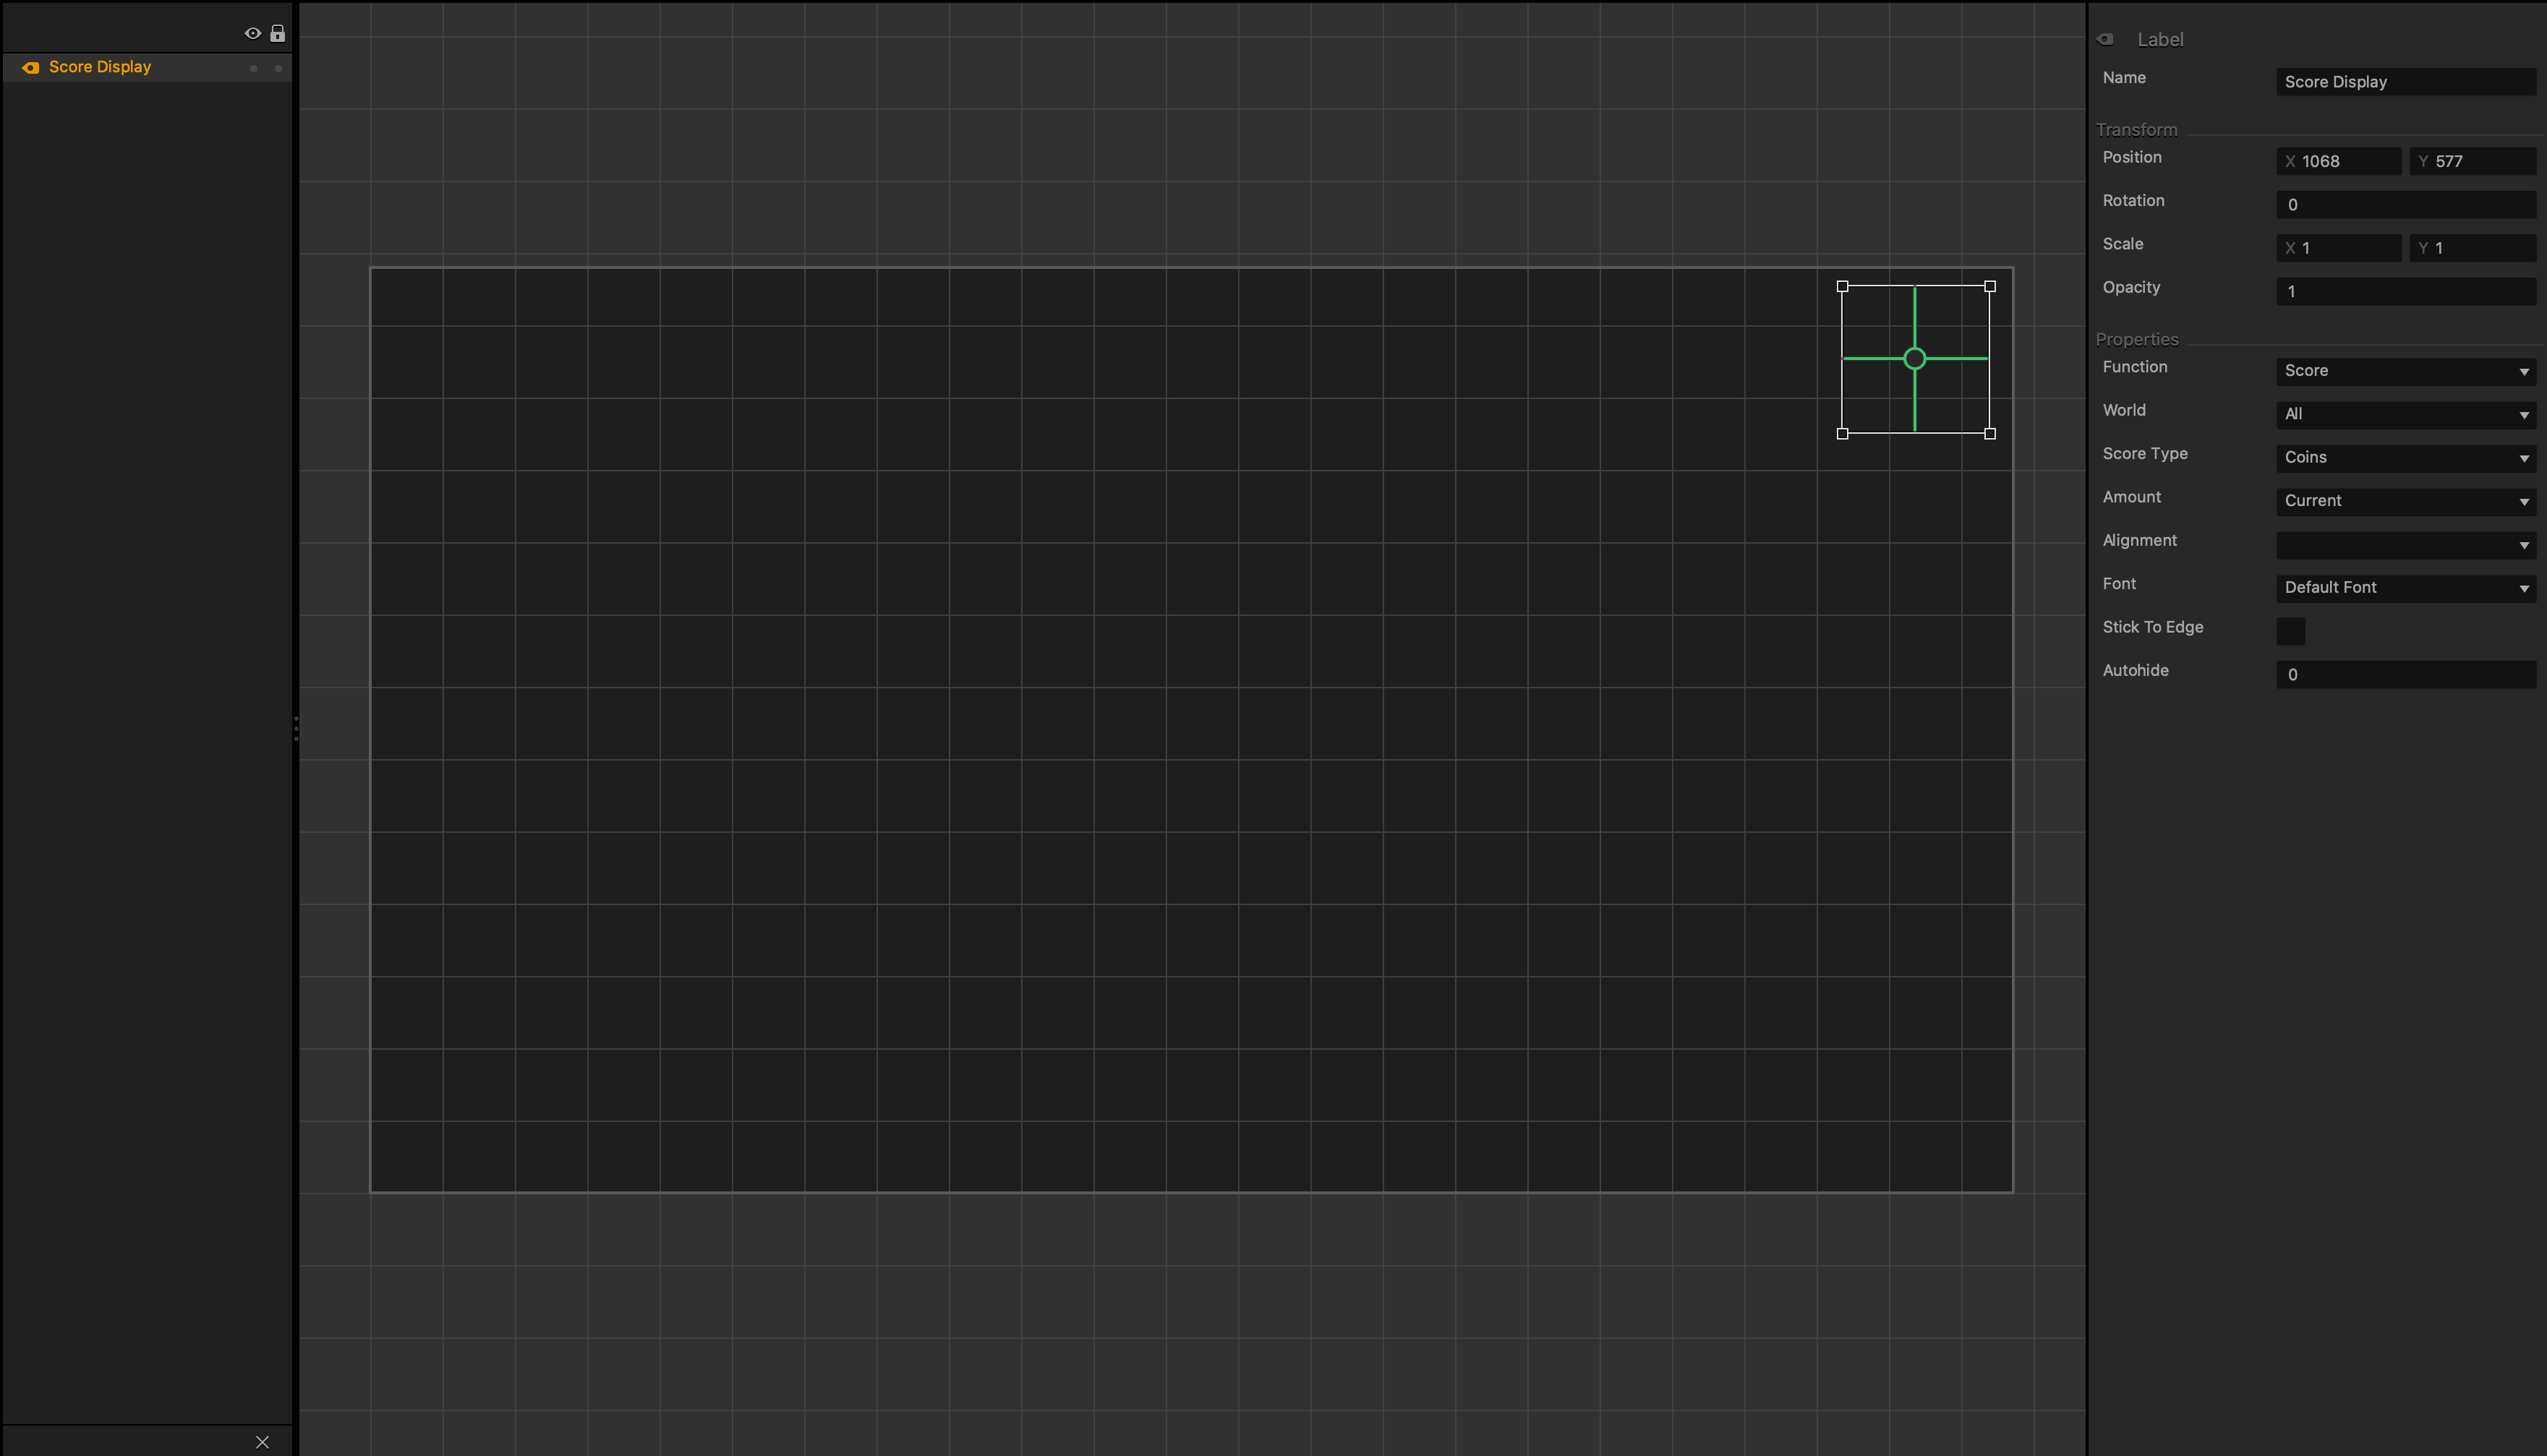
- In the Asset panel, from the Labels category, drag the Default Font label to the top-right corner of the grid.
- In the Options panel, do the following:
- In the Name field, type Score Display.
- In the Function list, select Score.
- In the Score Type list, select Points.
- In the Amount list, select Current.
- In the In-Game UI node workspace, from the Logic category in the Asset panel, drag the Event Observer asset to the UI Editor and place it in the top-left corner of the screen.
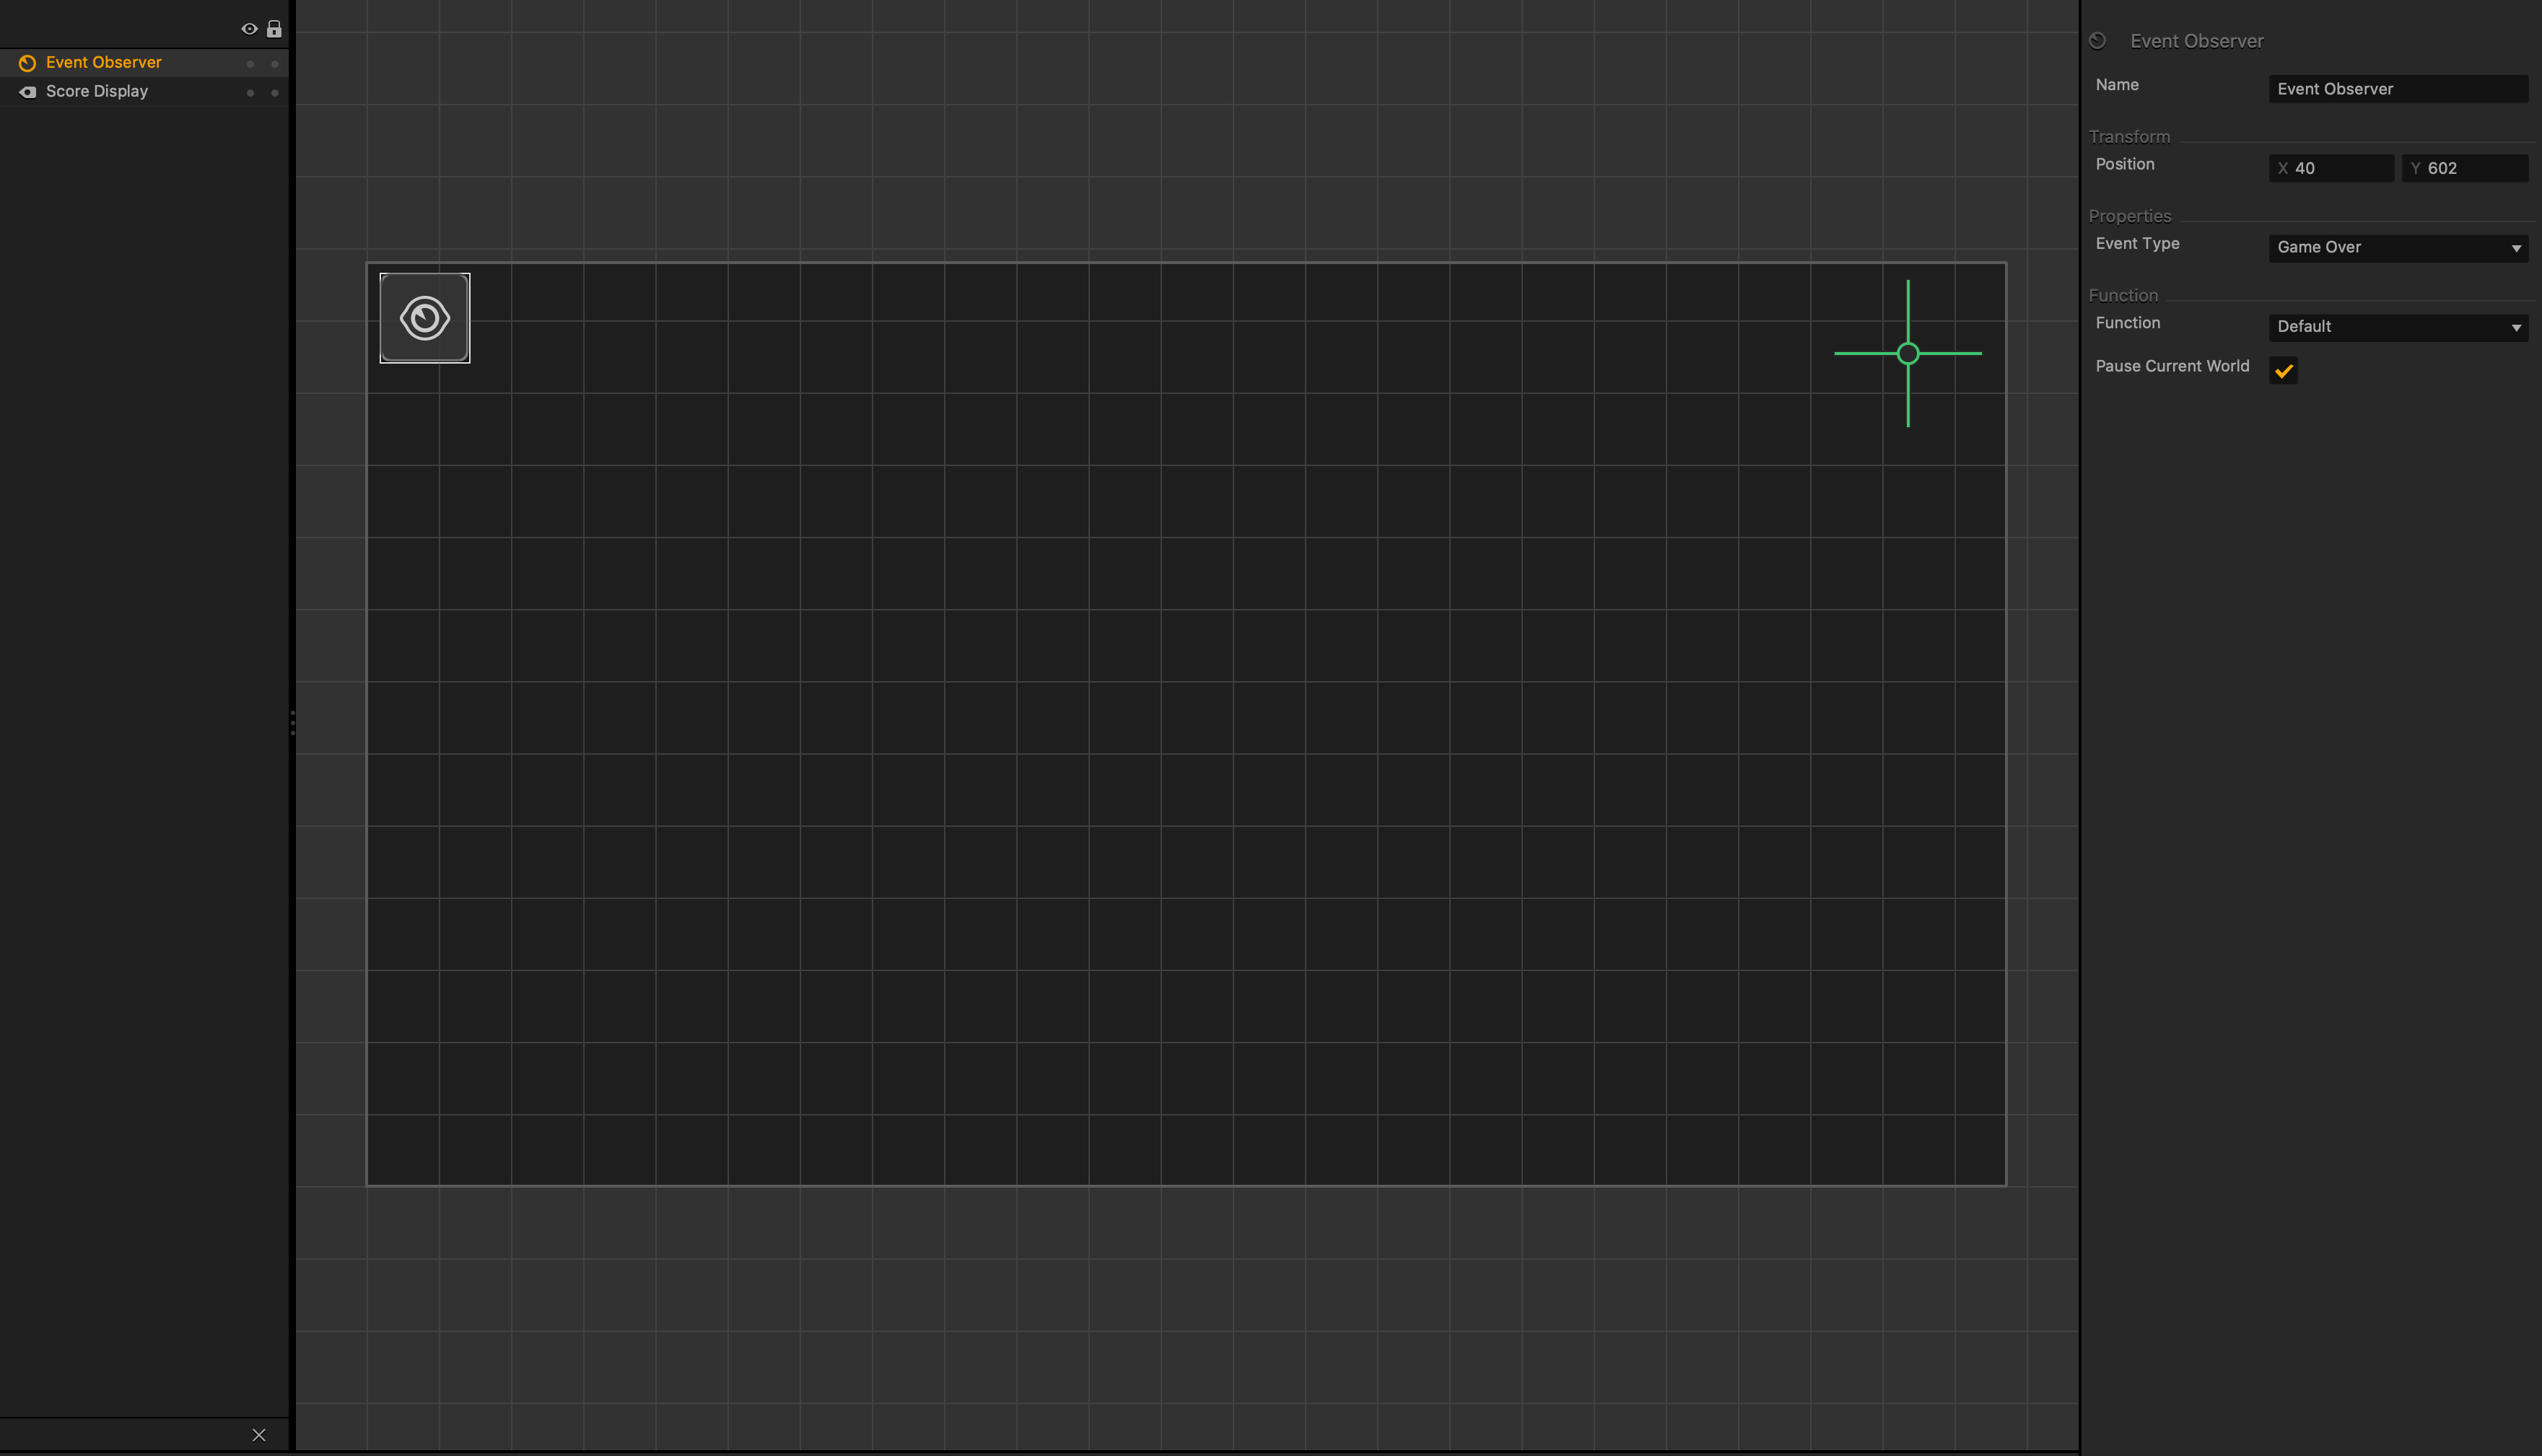
- In the Options panel, in the Name field, type Game Over.
- On the Navigation bar, click Mind Map.
- From the Node panel, drag the UI Screen node to the grid and place it next to the In-Game UI node.
- In the Options panel, in the Name field, type Game Over UI.
- On the In-Game UI node, click the Game Over output and drag a connector to the Load input of the Game Over UI node.

- On the Mind Map, double-click the Game Over UI node to open its UI workspace.
- In the Asset panel, from the Labels category, drag the Default Font label to the top of the grid and center it.
- In the Options panel, do the following:
- In the Name field, type Game Over Title.
- In the Scale axis fields, set both values to 1.5.
- In the Text field, type Game Over.
The label text is updated.
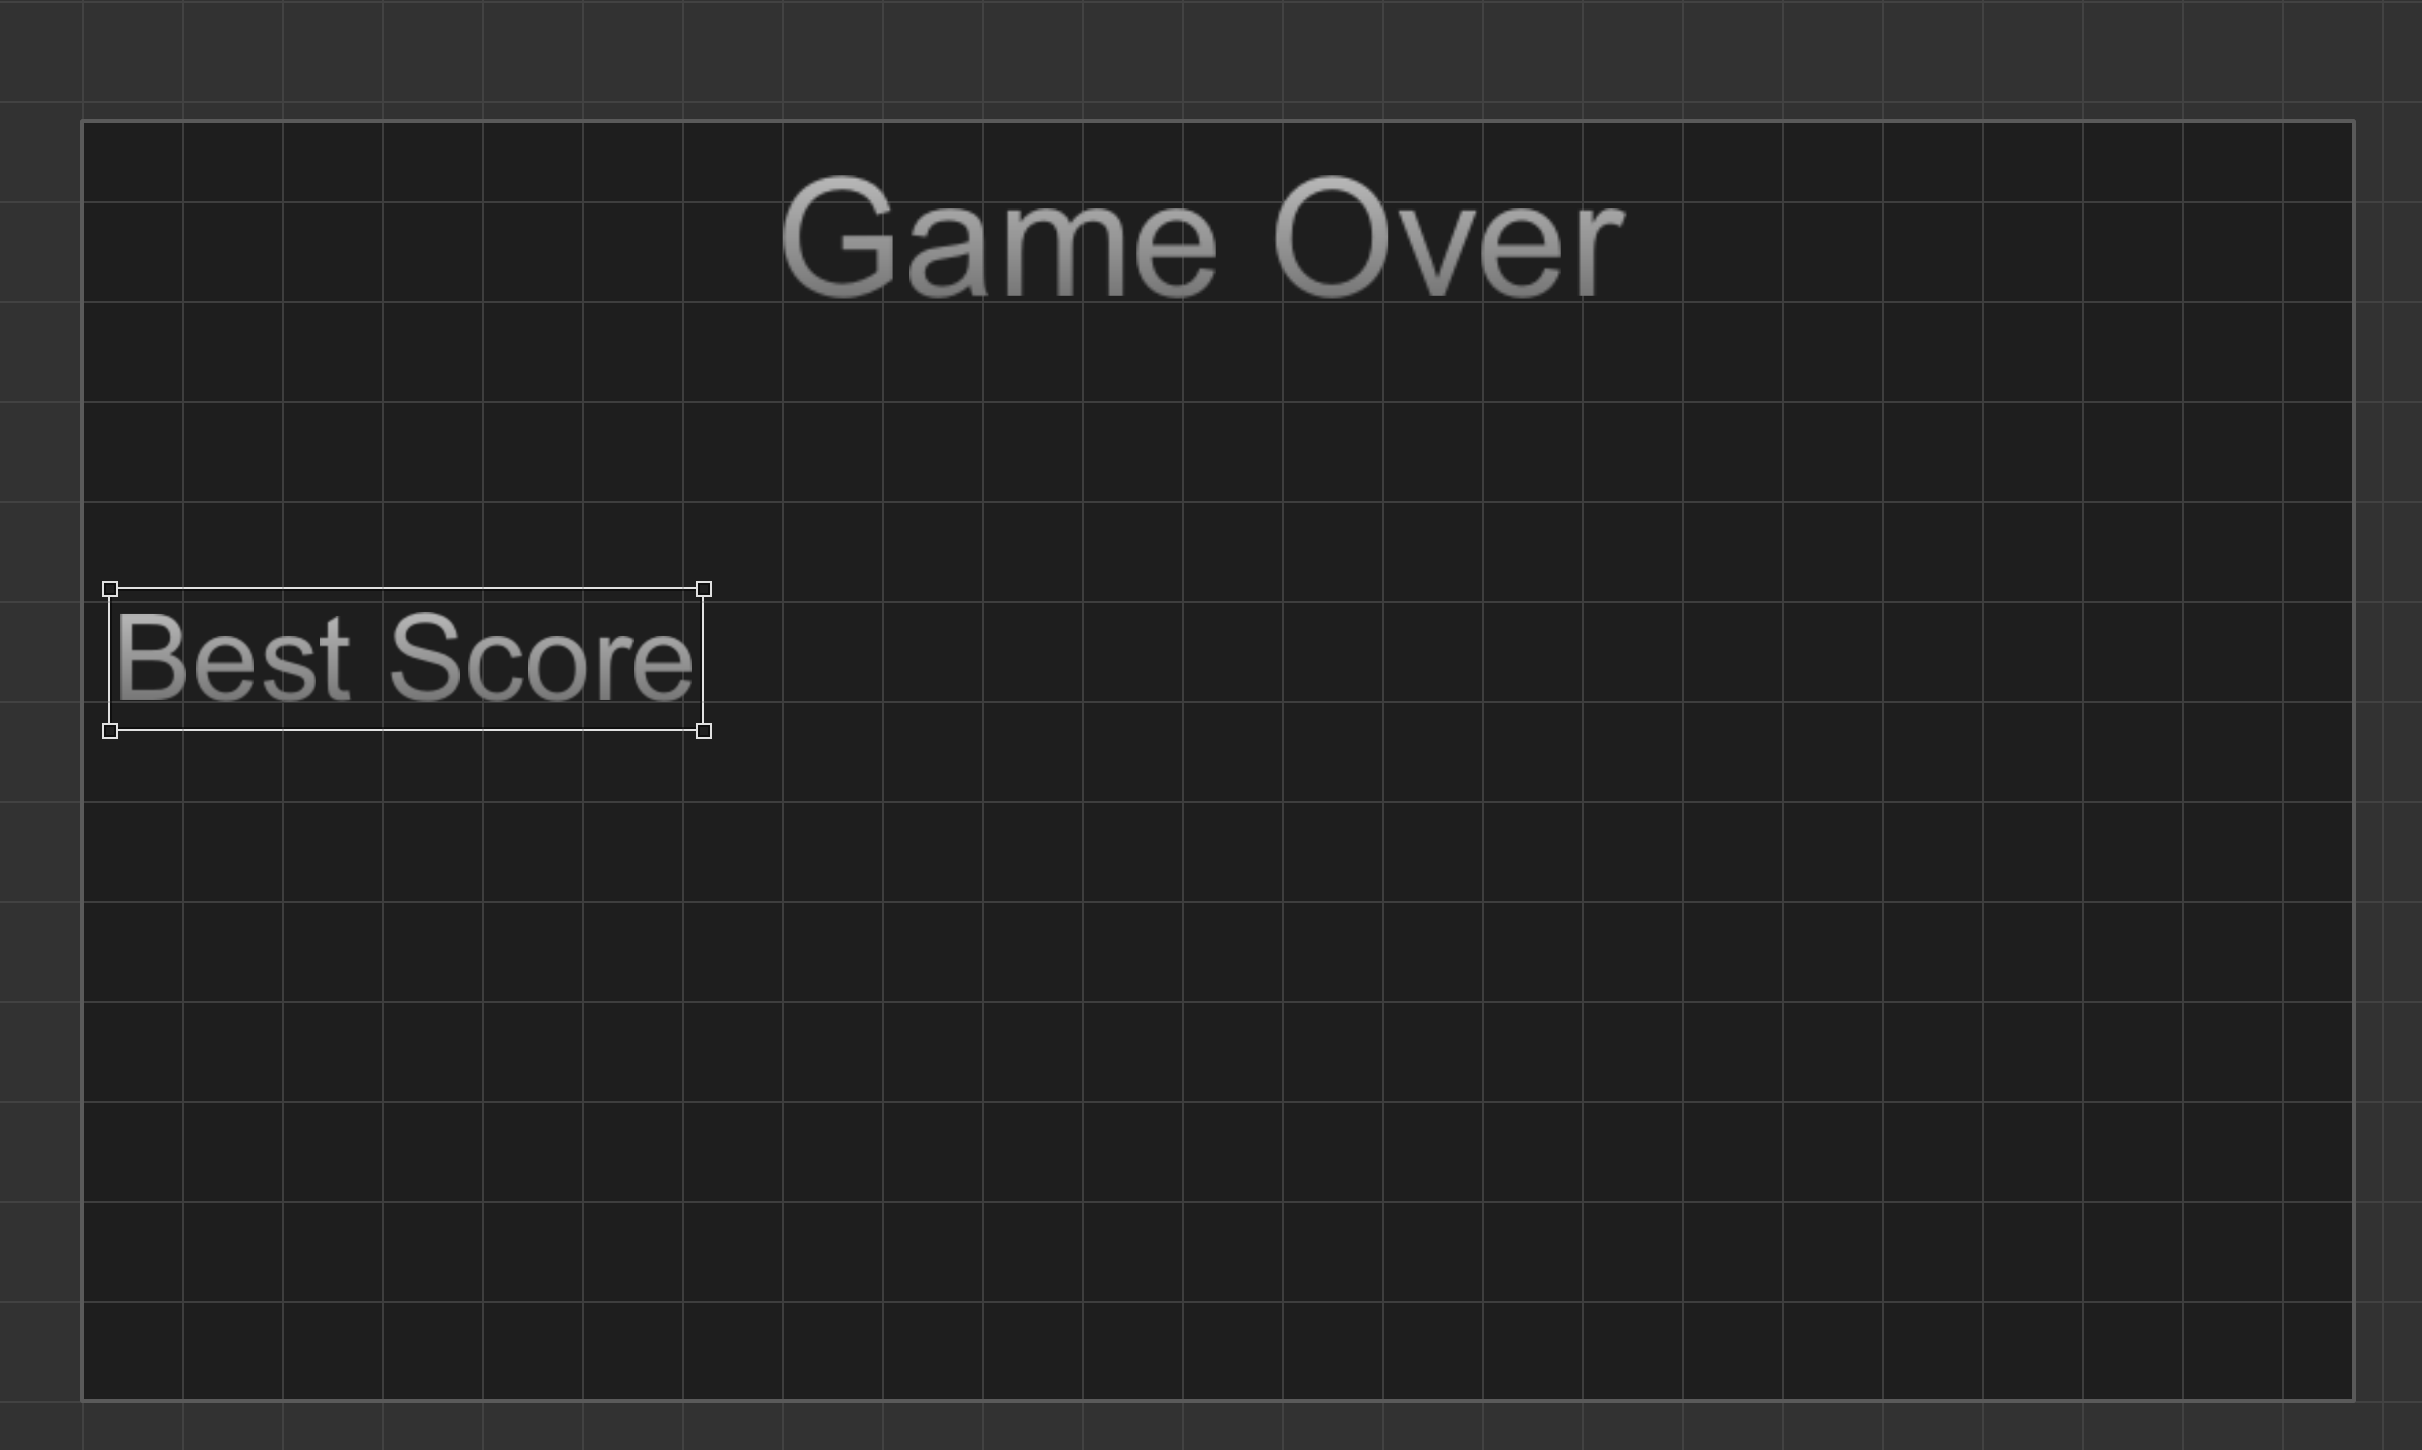
- To add the best score title, do the following:
- Select the Game Over label on the grid and press S on the keyboard.
A duplicate label appears underneath. - In the Options panel, in the Name field, type Best Score Title.
- Change both Scale axis values to 1.
- In the Text field, type Best Score.
- Drag the Best Score label to the left side of the grid and make it vertically aligned in the middle of the screen.
- Select the Game Over label on the grid and press S on the keyboard.
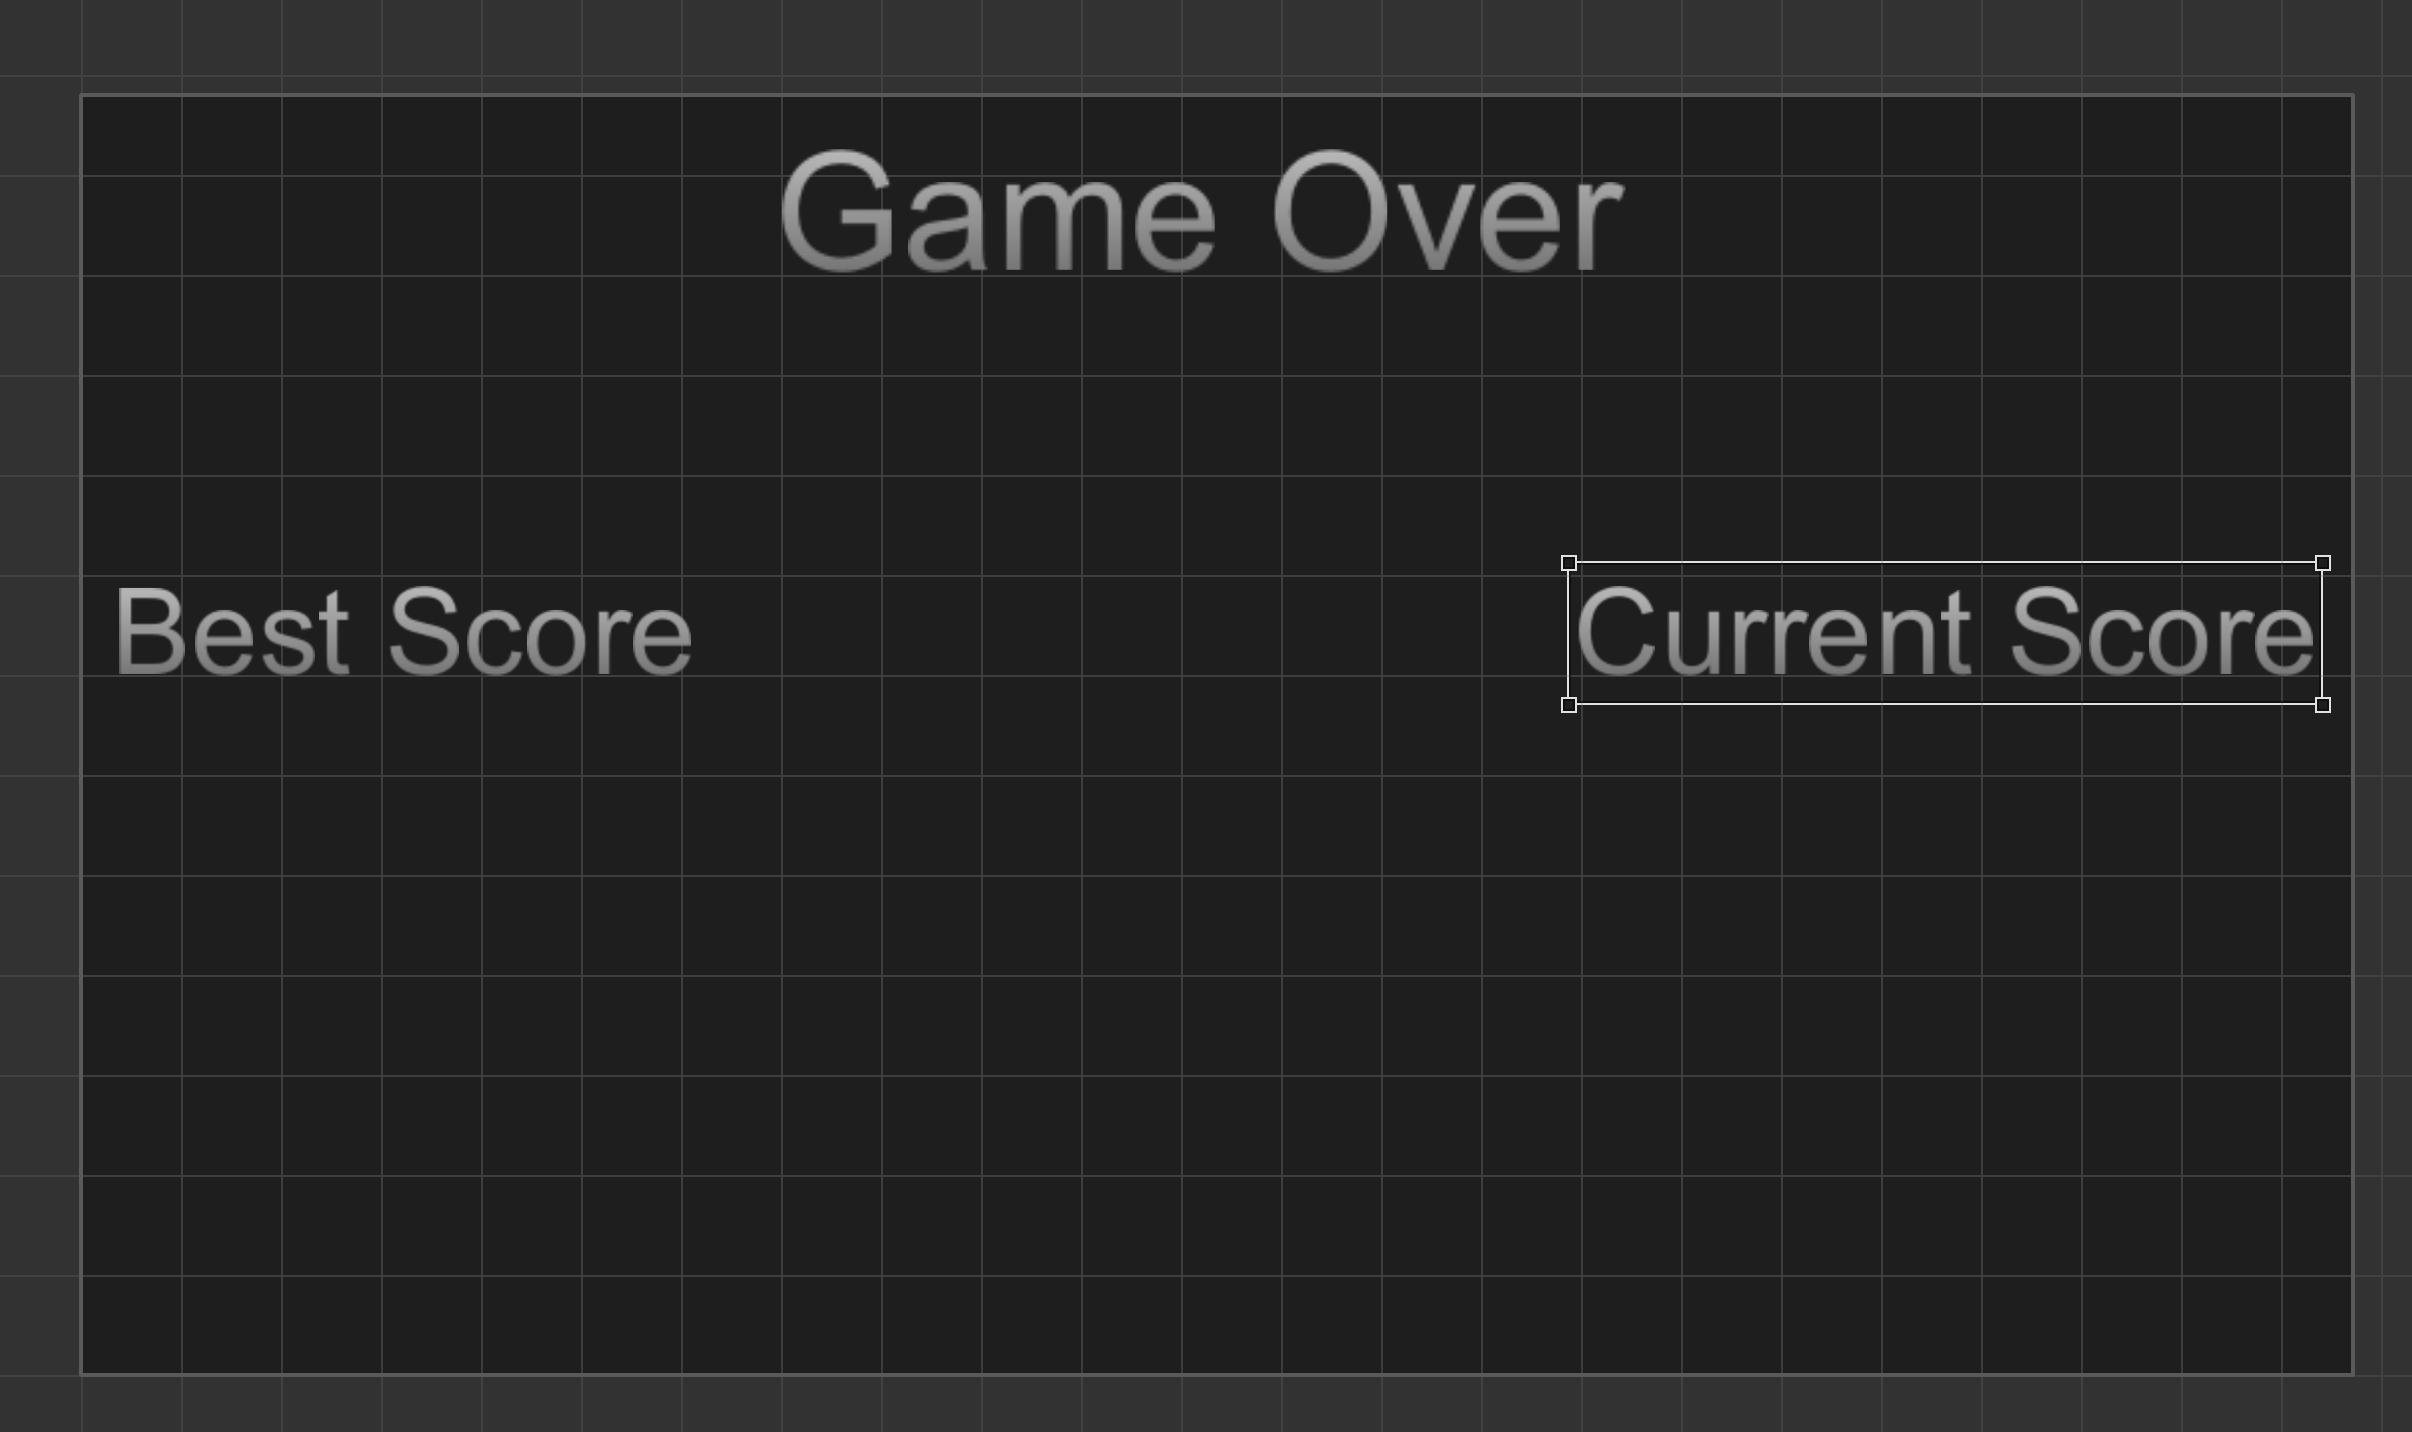
- To add the current score title, do the following:
- Select the Best Score label and press D on the keyboard.
A duplicate label appears on the right. - In the Options panel, in the Name field, type Current Score Title.
- In the Text field, type Current Score.
- Hold the Shift key and drag the Current Score label to the right side of the screen.
- Select the Best Score label and press D on the keyboard.
- To add best and current score displays, do the following:
- Holding the Shift key, select the Best Score and the Current Score labels.
- Press S on the keyboard.
A duplicate set appears underneath. - Keeping both labels selected, go to the Options panel and in the Function list, select Score.
In the UI Editor, the text labels are displayed as the score icons under their titles.
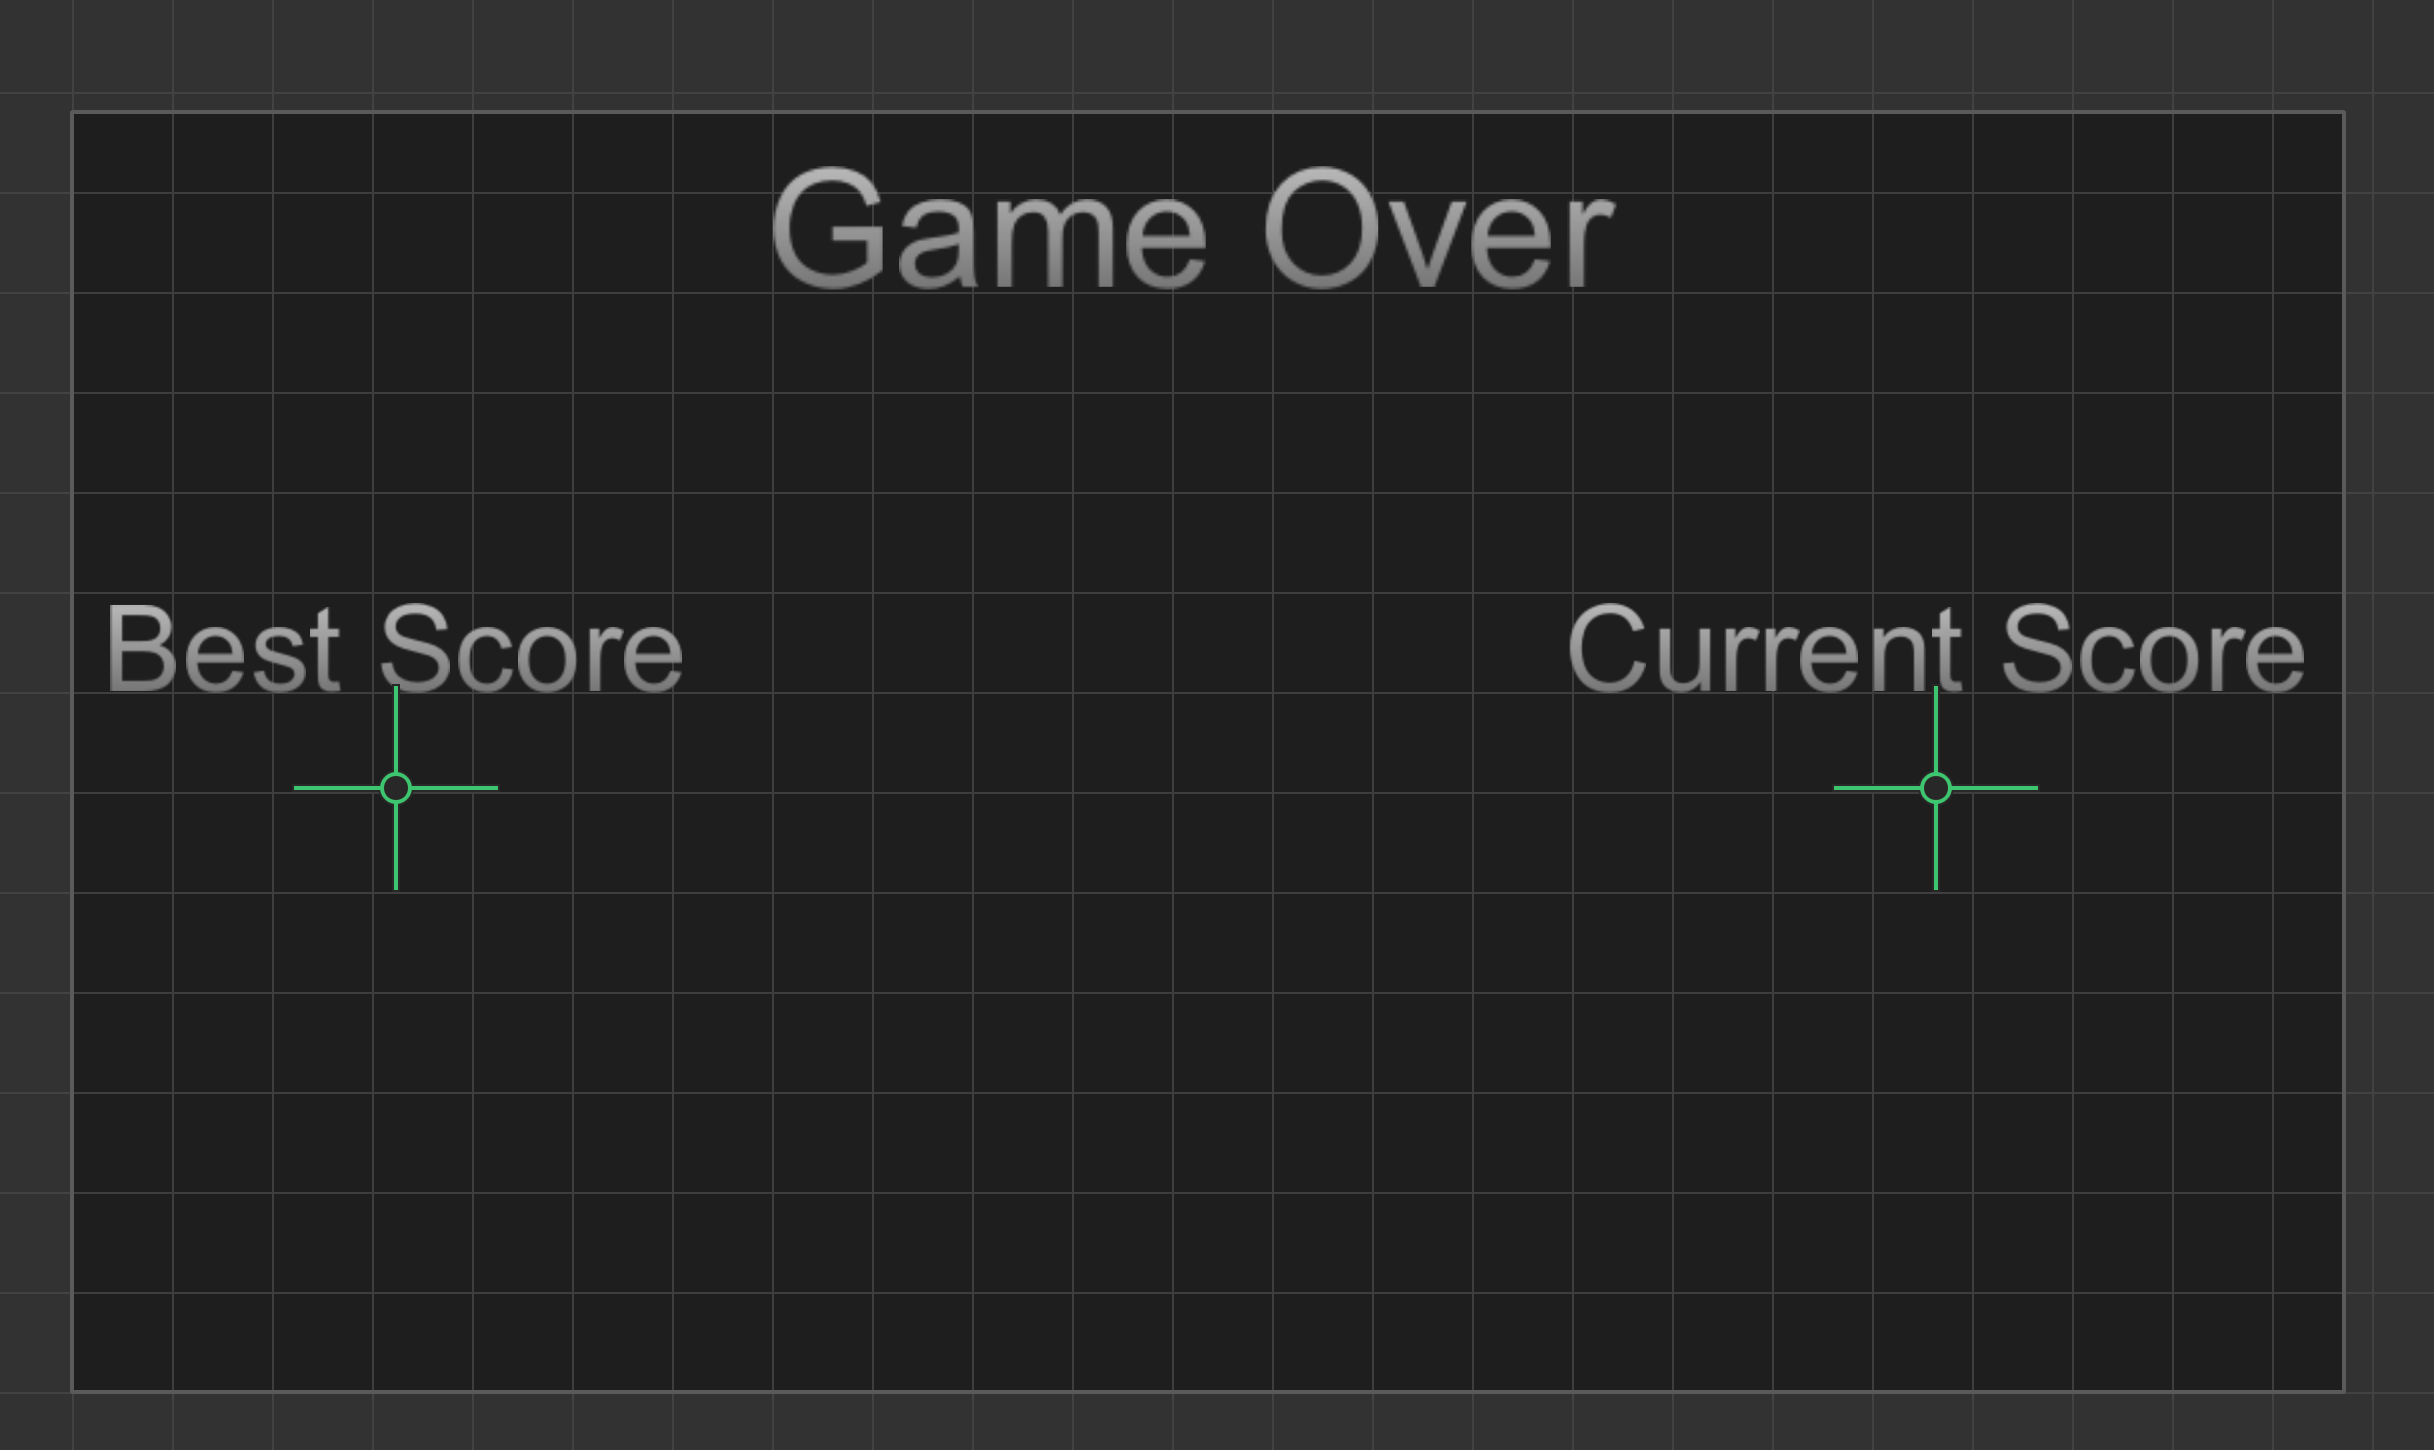
- In the Score Type list, select Points.
- In the UI Editor, select the duplicate Best Score icon and in the Options panel, in the Name field, type Best Score Amount.
- In the UI Editor, select the duplicate Current Score icon and in the Options panel, do the following:
- In the Name field, type Current Score Amount.
- In the Amount list, select Current.
- To make the game restart when players interact with the screen, do the following:
- In the Asset panel from the Buttons category, drag a Navigation button to the center and drag the corners to resize it so that it covers the entire screen.
- In the Options panel, in the Name field, type Restart.
- In the Function drop-down list, select Restart.
The Game Over UI screen should look similar to the one shown below.
<image>
- On the Navigation bar, click Mind Map.
- Between the Start node and the 3D World node, click the connector and drag it away to disconnect the nodes.
- From the Node panel, drag the UI Screen node to the grid and place it between the Start and the 3D World nodes.

- In the Options panel, in the Name field, type Main Menu UI.
- On the Start node on the Mind Map, click the Load output and drag a connector to the Load input of the Main Menu UI node.
- Double-click the Main Menu UI node to open its UI workspace.
- In the Asset panel, from the Labels category, drag the Default Font label to the top of the grid and center it.
- In the Options panel, do the following:
- In the Name field, type Main Menu Title.
- Set both Scale axis values to 1.5.
- In the Text field, type the name of your game, for example, My First Buildbox Game.
- In the Outliner, click the Main Menu Title label and press S on the keyboard.
A duplicate label appears underneath. - In the Options panel, do the following:
- In the Name field, type Tap to Play Title.
- Change both Scale axis values to 1.
- In the Text field, type Tap to Play.
- In the Asset panel, from the Buttons category, drag the Navigation Button to the UI Editor and place it anywhere on the screen.
- Drag the corners of the Navigation Button to cover the entire UI screen.
- On the Navigation bar, click Mind Map.
- On the Main Menu UI node, click the Navigation Button input and drag a connector to the Load input of the 3D World node.

- On the Buildbox menu bar, select Run > Preview and play your game.
Congratulations! You’ve built your first game. Now that you’ve learned the key tasks required to get started on your own, the sky is your limit! We are looking forward to seeing your games hitting the top charts!


