Start and End Points – Buildbox 3 Manual

By |

Start and End Points

Every scene has a set of start and end points that determine the length and direction of a scene.

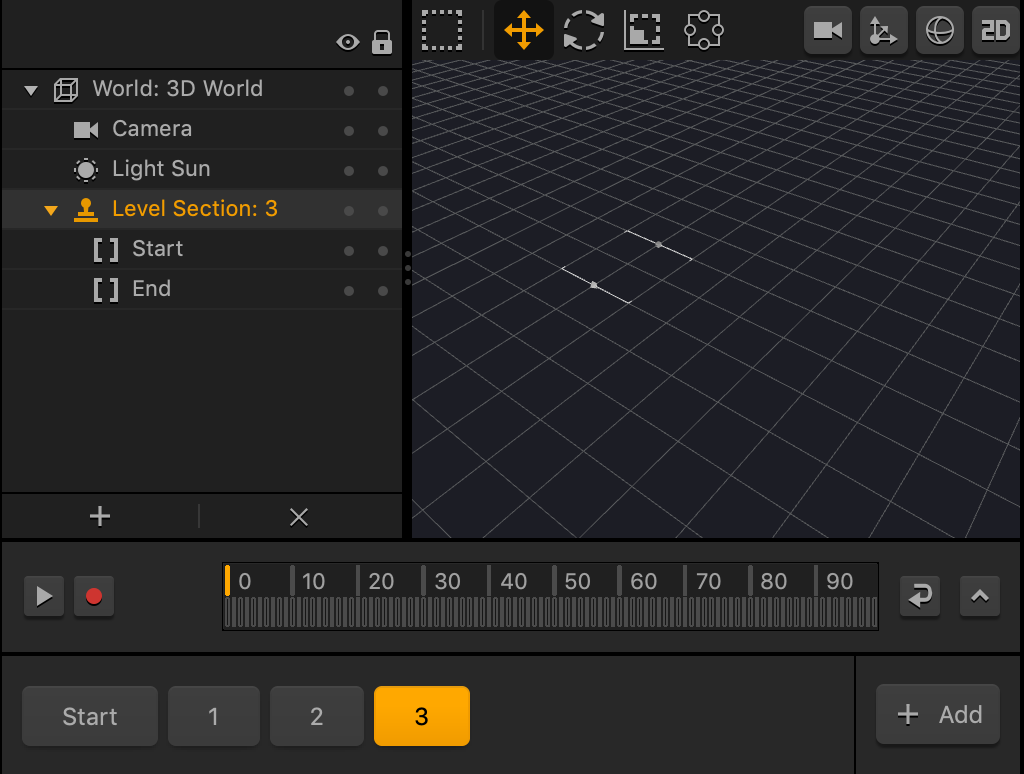
In the image below, the left point is the Start point, and the point on the right is the End point.

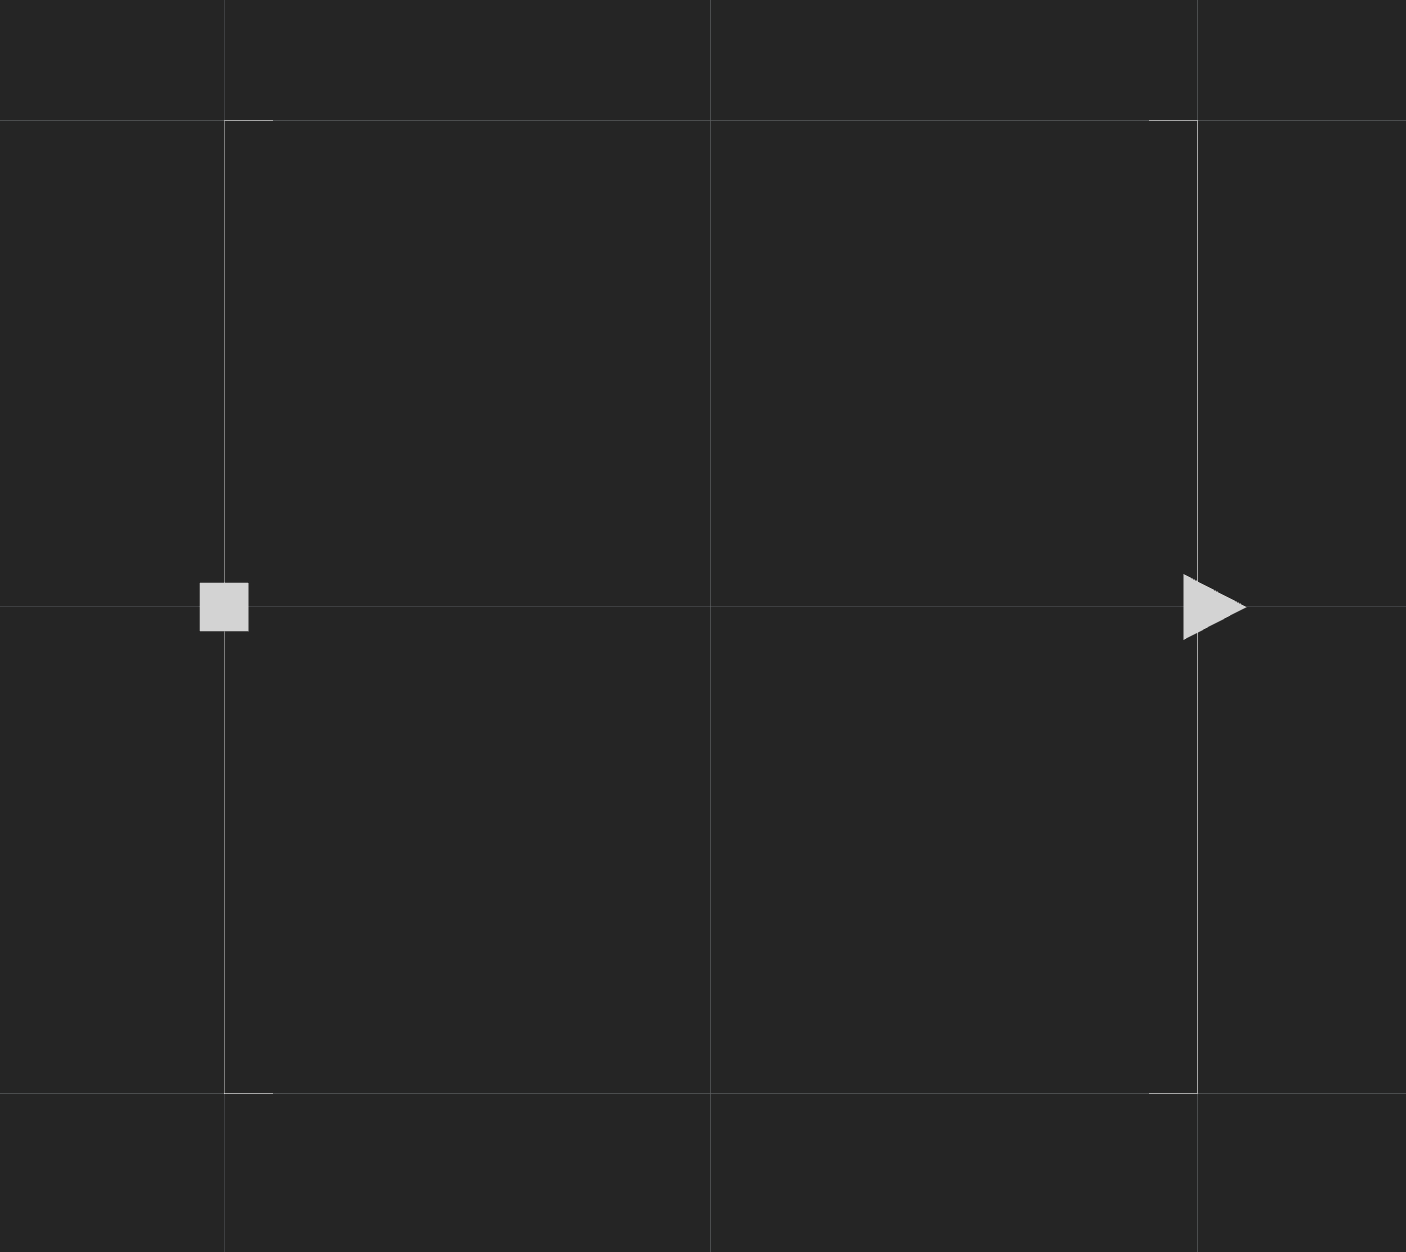
Each scene is connected through their start and end points. When a player reaches the end point of one scene, they will enter the next scene at its start point.

To extend the length of your scene, do the following:

  1. In the Outliner panel, select the End point.
    Three colored axis arrows appear around the End point in the Scene Editor.
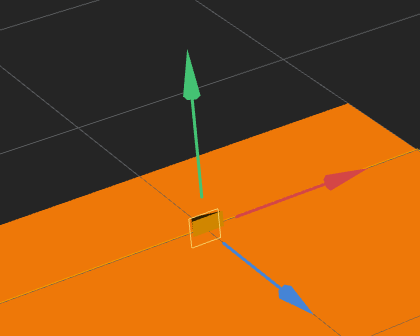
  2. In the Scene Editor, drag the blue arrow forward to extend the length of your scene.
  3. Repeat the above steps for the Start point. Drag the blue arrow backward.

Create a Project – Buildbox 3 Manual

By |

Create a Game Project

There are two ways of creating a project in Buildbox:

  • Creating a new game from scratch. For example, see Making a Simple Game.
  • Using a guided wizard that walks you through the process.

To create a project:

  1. On the Getting Started screen, click Create New at the top left.
    A page with two options is displayed.
  2. Depending on your preference, do either of the following:
    • To be guided through the process, click Create Individual and follow the on-screen instructions.
    • To create a game from scratch, click 2D Game or 3D Game.
      A new project loads with two nodes on the Mind Map: the Start node and either a 2D World or 3D world, depending on your selection.

      1. On the Buildbox menu bar, select File > Project Settings to open the Project Settings window.
      2. In the Full Game Name field, type a name for your game.
      3. In the Orientation drop-down list, choose the appropriate orientation, and click OK.
      4. Start building your game by adding levels, creating characters, enemies, UI screens, and so on.
  3. To save your project, do the following:
    1. On the Buildbox menu bar, click File and select Save As.
    2. Choose a location and type a name for your project.
    3. Click Save.

After the project is created, a BBDOC file will be created on your computer with the name of your game, and its name will also appear in the Open Recent section on the Getting Started screen.

For exporting and ad monetization, see Export a Game Project and Ad Monetization.

Adding Scenes – Buildbox 3 Manual

By |

Add a Scene to a World

A scene is a section within a World (game level). If needed, see Glossary.

To add a scene to a 3D World:

  1. On the Mind Map, double-click the World node where you want to add a scene.
  2. In the World workspace, in the Scene Selector at the bottom, click the Add button on the far right.

    To duplicate an already existing scene, click it and press D on the keyboard. For more details on managing scenes, see Scene Selector.

    A new scene appears highlighted as a sequentially numbered button in the Scene Selector and as a Level Section with the same number in the Outliner, with the Start and End points displayed in the Scene Editor.

  3. If needed, in the Options panel on the right, type a custom name for the scene.
  4. Add the necessary assets to the new scene, define the desired logic, and test the scene.

Adding Game Levels – Buildbox 3 Manual

By |

Add a Game Level

A game level is a 2D World or 3D World in the game that contains all assets within a game and can be organized into sections called scenes. So basically to add a game level, you need to add a World. If needed, see Glossary.

To add a game level:

  1. On the Mind Map, from the Node panel on the left, drag the 3D World icon to the Mind Map grid.
    You can also right-click anywhere on the Mind Map grid and select Add New World or duplicate and existing World by pressing D on your keyboard. For details, see Adding, Editing, and Deleting Nodes.

    A new disconnected purple 3D World node appears on the Map.

  2. Depending on your game design, connect the node as appropriate, to the Start, UI, or Random node. For example, to ensure that the new game level is loaded at the start of the game, on the Start Node, click the Load output and drag a connector to the Load input of the newly added 3D World node.
  3. Double-click the new 3D World and add the necessary scenes and assets to it.


Adding Music and Sound Effects – Buildbox 3 Manual

By |

Add Music and Sound Effects

You can add an MP3 file from your computer to a game in one of the following ways:

  • To the Start node on the Mind Map. The selected music will be added to the entire game.
  • To individual UI nodes on the Mind Map. The music or sound will be played only when the selected UI screen is displayed.
  • To an asset by using the Sound content node in the Node Map.
  • To individual buttons when the player taps and or releases them. For details see UI Buttons.

Drag New Files

  1. Select the appropriate node.
  2. In the respective Options panel, drag an MP3 file from the Finder to the Sound or Music field.
    The file will be added to the selected node or asset.
  3. If you want the music to be played continuously, select the Looped checkbox.

The file you drag will be also added to the audio assets of this project, which means you can select it anywhere else in the project as explained below.

Select Previously Added Files

  1. Select the appropriate node.
  2. In the respective Options panel, mouse over the Music or Sound field, and click the Edit icon.
  3. Select the MP3 audio file you need from the drop-down list.
  4. If you want the music to be played continuously, select the Looped checkbox.