Brainevents – API Reference

By |

Brainevents

Brainevents activate gameplay features and logic in a sequential order that is determined by the object or player action. See more at the Brainevents documentation page.

Function Description
addBrainEventCallback(name, function)

Adds a callback function to trigger when the Brainevent is triggered. An event can only have one callback attached to it at a time. If addBrainEventCallback() is used on an event that already has a callback, it will replace the existing one with the new one.

currentEvent()

Returns the name of the current or most recent event. If there is no such event, returns an empty string.

hasEvent(name)

Returns true if the entity has an event of the given name, or false if not.

removeBrainEventCallback(name)

Removes the callback attached to the given Brainevent. Remember, each event can only have one callback associated with it.

setEvent(name)

Triggers the event passed as a parameter, also setting it as the entity’s current event. If no data is passed, the event will pass a boolean true value.


addBrainEventCallback(name, function)

Adds a callback function to trigger when the Brainevent is triggered. An event can only have one callback attached to it at a time. If addBrainEventCallback() is used on an event that already has a callback, it will replace the existing one with the new one.

Parameters

string name – the name of the event function the callback function to execute when the event is triggered

if (this.entity().hasEvent('MyEvent')) {
    this.entity().addBrainEventCallback('MyEvent', function() {
        log('In MyEvent Callback!');
        return true;
    });
}

↑ Back to top


currentEvent()

Returns the name of the current or most recent event. If there is no such event, returns an empty string.

Returns

string – the name of the current event

↑ Back to top


hasEvent(name)

Returns true if the entity has an event of the given name, or false if not.

Parameters

string name – the name of the event

Returns

boolean – true if the entity has the event, false if not

↑ Back to top


removeBrainEventCallback(name)

Removes the callback attached to the given Brainevent. Remember, each event can only have one callback associated with it.

Parameters

string name – the name of the event

↑ Back to top


setEvent(name)

Triggers the event passed as a parameter, also setting it as the entity’s current event. If no data is passed, the event will pass a boolean true value.

Parameters

string name – the name of the event
data (optional) value passed to the event of data type boolean, number, or string

this.entity().setEvent('AttackEventName');

↑ Back to top

Background Music – API Reference

By |

Background Music

The BackgroundMusic class can be used to control the Background Music of a UI Screen Node.

Static Function Description
play(sound, looped)

Sets the audio track of the Background Music and plays it.

stop()

Stops the Background Music.

setVolume(volume)

Sets the volume of the Background Music, range 0 (muted) to 1 (max).

volume()

Returns the volume of the Background Music, range 0 (muted) to 1 (max).


play(sound, looped)

Sets the audio track of the Background Music and plays it.

Parameters

Sound sound – The new audio to play as Background Music. Sound is a Script node attribute.
boolean looped – Optional. Set the Background Music to loop if true, or stop after one play if false.

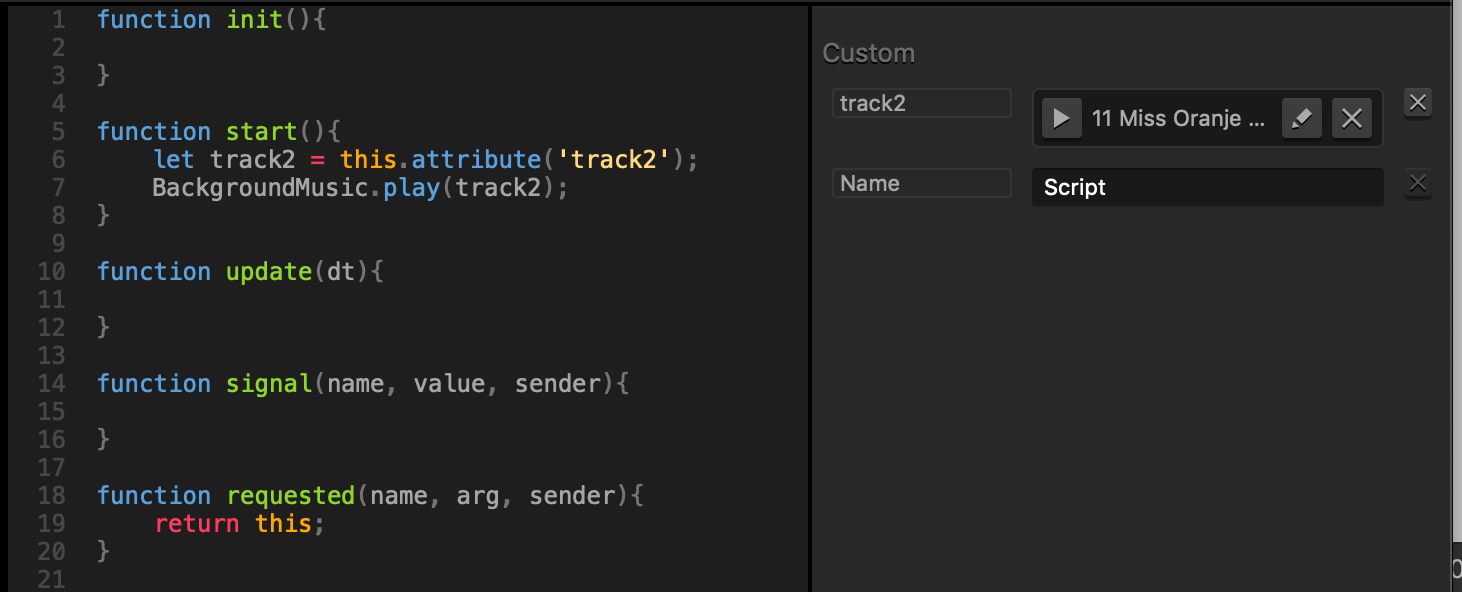
function start(){
     let track2 = this.attribute('track2');
     BackgroundMusic.play(track2);
}


A screenshot showing the Sound attribute used in the code example.

↑ Back to top


stop()

Stops the Background Music.

↑ Back to top


setVolume(volume)

Sets the volume of the Background Music, range 0 (muted) to 1 (max).

Parameters

number – the new volume of the Background Music

↑ Back to top


volume()

Returns the volume of the Background Music, range 0 (muted) to 1 (max).

Returns

number – the volume of the Background Music

↑ Back to top

Did you find this page useful?

Please give it a rating:

Please provide some feedback!

This is very helpful to us.

Tell us how we can improve this post?

Linking JavaScript Files – API Reference

By |

Linking JavaScript Files

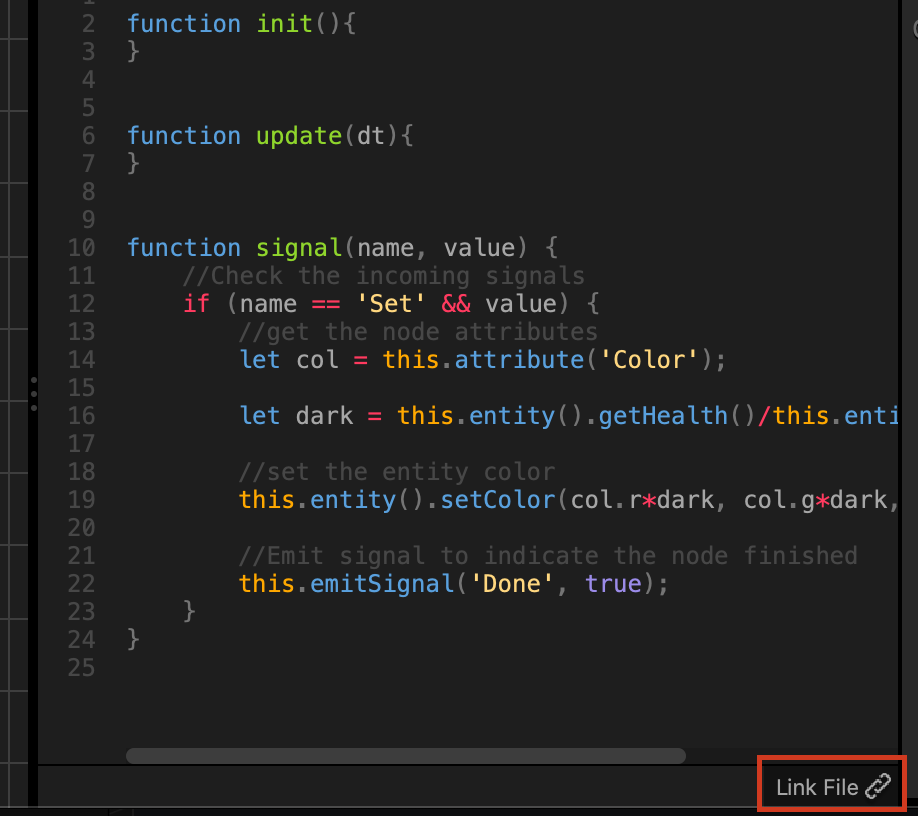
The Buildbox JavaScript panel allows you to link a custom node script to a JavaScript file on your computer, allowing you to use an external text editor to update and change your custom node script. Whether you update the file in the Buildbox JavaScript panel or external editor, it will be updated in both locations

To access the JavaScript panel, on an asset’s node map, double-click a node or click its edit icon.

To link a file to the JavaScript panel, click Link File at the bottom-right of the JavaScript panel, and depending on whether you need to export the file from or import it to Buildbox, choose one of the following procedures below.

Export to File & Link
  1. Select Export File & Link. The Save As window appears.
  2. Select the location where you want to save the file.
  3. Name the file and click Save.

A JavaScript file with the custom node script is now created locally on your computer and is linked to your custom node inside Buildbox.

Import from File & Link
  1. Select Import from File & Link.
  2. On your computer, navigate to the JavaScript file that contains your custom node script.
  3. Click Open.

The script from your JavaScript file appears in the Buildbox JavaScript panel and is linked to your local file.

To avoid breaking the link to your JavaScript file, avoid moving or renaming the JavaScript file on your computer, or deleting the linked node in Buildbox,

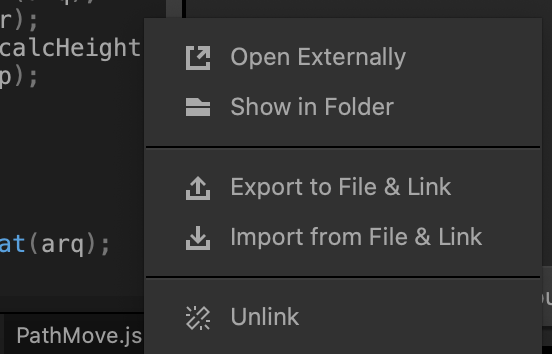
After you link a JavaScript file to a node, click the icon at the bottom right of the JavaScript panel to view the following options:

Option Description
Open Externally Opens the linked JavaScript file using your default script editor.
Show in Folder Opens the folder that contains the linked JavaScript file.
Export to File & Link Creates and saves a JavaScript file that contains your custom node script locally on your computer and links the file to the Buildbox JavaScript panel.
Import from File & Link Imports and creates a link to a JavaScript file from your computer to the Buildbox JavaScript panel.
Unlink Unlinks the JavaScript file from the Buildbox JavaScript panel. The updates will no longer be synchronized.

Did you find this page useful?

Please give it a rating:

Please provide some feedback!

This is very helpful to us.

Tell us how we can improve this post?

Sound – API Reference

By |

Sound

The Sound Node plays an mp3 file.

Function Description
isPlaying()

Returns true if the sound is currently playing, false if not.

setVolume(value)

Sets the volume of the sound, from 0-1. The sound must already be playing before you set the sound with this function, and must be looped or non-overlapping.

volume()

Returns the volume of the sound if it is playing, from 0-1.


isPlaying()

Returns true if the sound is currently playing, false if not.

Returns

boolean – true if the sound is playing, false if not

↑ Back to top


setVolume(value)

Sets the volume of the sound, from 0-1. The sound must already be playing before you set the sound with this function, and must be looped or non-overlapping.

Parameters

number value – the volume of the sound

↑ Back to top

let fadein = false;
let mySound;
let volume = 0;

function start() {
	// start the fade in at the start of the scene
	fadein = true;
	mySound = this.entity().component("My Sound");
}

function update(dt) {
	// stops adjusting volume once volume goes over 1
	if (fadein && volume <= 1) {
		// check if the sound is playing
		if (mySound.isPlaying()) {
			// set the volume, and then increase the volume for the next update loop
			mySound.setVolume(volume);
			volume += 0.001;
		}
	}
}

volume()

Returns the volume of the sound if it is playing, from 0-1.

Returns

number - the volume of the sound

↑ Back to top

Did you find this page useful?

Please give it a rating:

Please provide some feedback!

This is very helpful to us.

Tell us how we can improve this post?

LevelSector – API Reference

By |

LevelSector

The LevelSector class represents a Scene Selector “level” at the bottom of the screen in a 3D World. You can get the LevelSector that an Entity exists in with this.entity().level().

Function Description
isRemoved()

Returns true if the level has been removed, false if not. This can be used to make sure you’re not accessing a level that has been unloaded before you try using it (which would cause errors).

name()

Returns the name of the level.


isRemoved()

Returns true if the level has been removed, false if not. This can be used to make sure you’re not accessing a level that has been unloaded before you try using it (which would cause errors).

Returns

boolean true if the level is removed, false if not

↑ Back to top


name()

Returns the name of the level.

Returns

string the name of the level

↑ Back to top

Did you find this page useful?

Please give it a rating:

Please provide some feedback!

This is very helpful to us.

Tell us how we can improve this post?

Custom Nodes – API Reference

By |

Custom Nodes

A node is a piece of functionality that exists within a Node Map. If you have an idea for a custom node, you can make one yourself and share it online as a .bbnode file with JSON formatting.

As of release 3.4.1 you can now create a custom node (or group of nodes) and right click > export! This .bbnode or .bbgroup file can then be dragged into any node map to be reused, no code required. Nodes that are exported this way cannot be edited in a text editor.

To create a custom node, you need a basic understanding of JSON formatting and a text editor of your choice. To modify a pre-existing node, see Customizing Nodes.

Writing your own Custom Node

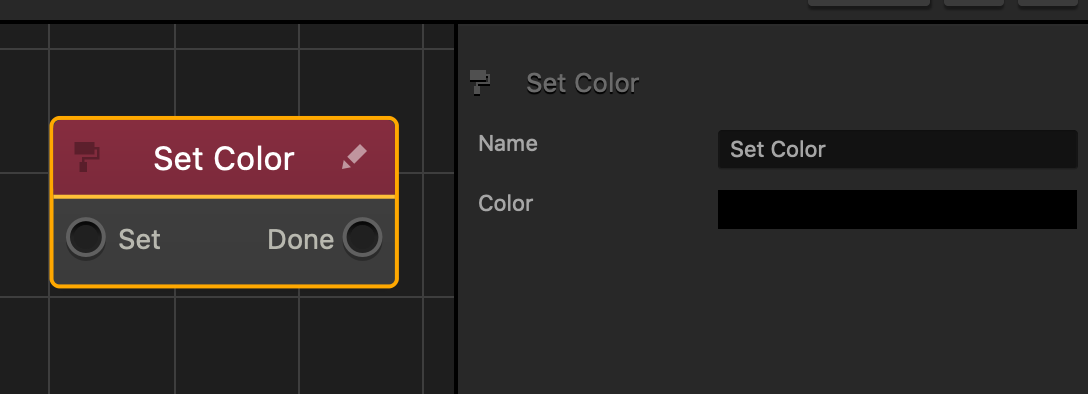
Let’s look at a simple example – the “Set Color” node. Here’s the full .bbnode file:

{
	"name" : "Set Color",
	"attributes": [
		{
			"name" : "Set",
			"type" : "Boolean",
			"connection" : "Input",
			"editable" : false		
		},
		{
			"name" : "Done",
			"type" : "Boolean",
			"connection" : "Output",
			"editable" : false		
		},
		{
			"name" : "Color",
                        "type" : "Color",
			"connection" : "None",
			"editable" : true
		}

	],
	"script":"
        function init(){
        }


        function update(dt){
        }


        function signal(name, value) {
            //Check the incoming signals
            if (name == 'Set' && value) {
                //get the node attributes
                let col = this.attribute('Color');
                
                //set the entity color
                this.entity().setColor(col.r, col.g, col.b, col.a);
                
                //Emit signal to indicate the node finished
                this.emitSignal('Done', true);
            }
        }
    "

}

This results in the following node and attributes:

Now let’s look at it line by line.


name

"name" : "Set Color",

This defines what name this node will have.


attributes

"attributes": []

This array defines what attributes the node will have in the attributes sidebar. It also details any input or output connections the node will have. Please note that the Fields and Possible Values here are all cAsE sEnSiTiVe!

Field Description Possible Values
name Required. The name of the attribute or connection. Any string
*do not give two attributes in the same node the same name!
type Required. What data type the attribute contains. Asset
Animation
Boolean
Color
Dropdown
Mesh
Number
Slider
Text
Vector2D
Vector3D
connection Required. Whether this attribute is an input or output connection. Input
Output
None
editable Required.
Attribute: Whether this attribute is visible & editable in the attribute sidebar.
Connection: Whether the name of this connection can be altered.
true
false
essential Optional (defaults to false). If this field is set to true, then this attribute will be displayed on the Entity’s attribute sidebar when clicked in the asset window. You are marking this attribute as important enough to be accessible from the world view instead of just the entity’s mind map. true
false
hasVariance Optional (for number or vector attributes only). If this field is set to true, then this attribute will display a variance field next to its value. (see Wave node documentation for an example) true
false
self Optional. If you’d like your node to be able to be referenced by other nodes without using signals, set this to true to make the purple connection circle visible. (See requested() for more information) “self”: { “visible” : true }
“self”: { “visible” : false }
value Optional field used to define a default value for the attribute. For instance, your Number type attribute could have a default value of 100 with “value”: 100.
Value is required for a Dropdown type attribute because all possible values are pre-defined.
Dropdown Example from Advanced Move node:

"value": {
    "default": "kReplace",
    "options": {
        "Replace": "kReplace",
        "Add": "kAdd",
        "Multiply": "kMultiply"
    }
}

Example for a Vector3D attribute (leaving the X and Z values blank with null):
“value”: [null, 20, null]

sliderMin
sliderMax
sliderStepSize
sliderDefaultValue
Required fields for a Slider type attribute. sliderMin and sliderMax define the range of the slider, sliderStepSize defines the increment of the slider, and sliderDefaultValue defines the initial value of the slider. Example of a Slider attribute:

{
    "name": "My Slider",
    "type": "Slider",
    "connection": "None",
    "editable": true,
    "sliderMin": 0,
    "sliderMax": 10,
    "sliderStepSize": 2,
    "sliderDefaultValue": 2
}

script

"script":"

Anything you put in this string will be inserted into the Script section of the Node. Since it’s all defined within a string, make sure to use single quotes (‘) instead of double quotes (“) to avoid terminating the string early.

If you save your .bbnode file as a .json file and use a program that has syntax highlighting (such as Visual Studio Code), this section will highlight with errors. This is because normal JSON doesn’t allow multiline strings; this is an area where the .bbnode format differs from JSON.

Here’s another script example, this time from the Jump node. This code snippet is entirely contained within the “script”: ” … ” section of the Jump.bbnode file.

    //Input Signal variables
    let _enabled = true;

    //Node attribute variables
    let _jumpLimit;
    let _jumpForce;

    //working variables
    let _physics;
    let _jumpCount = 0;

    function init(){
        //get the node attributes
        _jumpForce = this.attribute('Jump Force');
        _jumpLimit = this.attribute('Jump Limit');
    
        //Get and check the Physics status of this entity
        _physics = this.entity().physics();
        if(_physics && _physics.type() != 'kDynamic'){
            warning('Jump Node only works with [Dynamic] bodies. Enabling by default');

            _physics.setType('kDynamic');
        }
    }

    function start(){

    }

    function update(dt){

    }

    function signal(name, value){
        //Check the incoming signals
        if(name == 'Jump' && value){
            //check we have dynamic physics on the entity
            if(_physics){
                //check here if the signal to jump again is valid
                //we need to check we are with the jump limit
                if(_jumpLimit == 0 || _jumpCount < _jumpLimit){
                    //calculate the jump force to be applied
                    let vel = _physics.linearVelocity();
                    if(_jumpForce.x != null){
                        vel.x = _jumpForce.x;
                    }
                    if(_jumpForce.y != null){
                        vel.y = _jumpForce.y;
                    }
                    if(_jumpForce.z != null){
                        vel.z = _jumpForce.z;
                    }
                    
                    //apply the jump velocity
                    _physics.setLinearVelocity( vel.x, vel.y, vel.z );

                    //track the jump count
                    _jumpCount++;
                }
            }
        }
        else if(name == 'Reset' && value){
            //Signal to reset the jump so we just reset the 
            //jumpcount variable
            _jumpCount = 0;
        }
    }

Import a Node

To import a node into BuildBox, drag it from your file explorer into the mind map of the Entity you’d like to add it to. Voilà!

Troubleshooting

If you drag your .bbnode into the mind map and nothing happens, that probably means there’s a typo somewhere.

– Make sure that each attribute includes all the required fields.
– Make sure that you have no trailing commas.
– A JSON Validator will give you errors based on the Script section, because as noted above, JSON doesn’t normally allow multiline strings. You can try pasting your .bbnode contents into a JSON Validator and then deleting the script section to look for errors elsewhere.

Did you find this page useful?

Please give it a rating:

Please provide some feedback!

This is very helpful to us.

Tell us how we can improve this post?

Label Node – API Reference

By |

Label Node

Function Description
globalDepth()

Returns the depth of the Label in a 2D World.

isRemoved() Returns true if the Label is removed, false if not.
opacity()

Returns the opacity of the label.

position()

Returns the position of the label.

setGlobalDepth(value)

Set the depth of the Label node in a 2D World.

setOpacity(value)

Sets the opacity of the label.

setPosition(x, y)

Sets the position of the label.

setText(value)

Sets the text for the label.


globalDepth()

Returns the global depth of the Label node. Depth decides which object is on top in a 2D World. A higher value will be above a lower number in the Scene.

Returns

number value – The global depth of the Label

↑ Back to top


isRemoved()

Returns true if the Label is removed, false if not.

Returns

boolean true if Label is removed, false if not

↑ Back to top


opacity()

Returns the opacity of the label. Ranges from 0 (invisible) to 255 (fully opaque)

Returns

number the opacity of the label

↑ Back to top


position()

Returns the position of the label.

Returns

Vec2 the {x, y} position of the label.

↑ Back to top


setGlobalDepth(value)

Sets the global depth of the Label node. Depth decides which object is on top in a 2D World. A higher value will be above a lower number in the Scene.

Parameters

number value – The global depth of the Label

↑ Back to top


setOpacity(value)

Sets the opacity of the label. Ranges from 0 (invisible) to 255 (fully opaque)

Parameters

number value – The opacity of the label

↑ Back to top


setPosition(x, y)

Sets the position of the label.

Parameters

number x – the x coordinate position
number y – the y coordinate position
number z – the z coordinate position (optional)

↑ Back to top


setText(value)

Sets the text for the label.

Parameters

string value – The string that will be displayed by the label.

↑ Back to top

Did you find this page useful?

Please give it a rating:

Please provide some feedback!

This is very helpful to us.

Tell us how we can improve this post?

Spot Light – API Reference

By |

Spot Light

The Spot Light is a way to add additional light sources to your game.

the sp

Function Description
color()

Returns the color of the Light in RGB (Red, Green, Blue) format.

cutOffAngle()

Returns the cutoff angle of the Spot Light, in degrees.

intensity()

Returns the intensity of the Light.

isRemoved() Returns true if the Light is removed, false if not.
isVisible()

Returns true if the light is visible, false if not.

position()

Returns the Light’s position coordinates relative to its parent.

range()

Returns the range of the Light.

remove()

Remove the light from the Scene.

rotation()

Returns the rotation of the Light in degrees.

rotationQuat()

Returns the rotation of the Light in quaternion.

setColor(color)

Sets the color of the Light.

setCutOffAngle(value)

Sets the cutoff angle of the Light, in degrees. This changes how wide or narrow the Spot Light is.

setIntensity(value)

Sets the intensity of the Light.

setPosition(x, y, z)

Sets the new position relative to the Light’s parent. If the Light has no parent, this sets the world position of the Light.

setRange(value)

Sets the range of the Light.

setRotation(x, y, z)

Sets the rotation value of the Light, in degrees.

setRotationQuat(value)

Sets rotation value in Quaternion.

setVisible(value)

Sets the visibility of the Light; true if the Light is visible, false if not.

setWorldPosition()

Sets the Light’s position coordinates in the world (absolute position).

worldPosition()

Returns the Light’s position coordinates in the world (absolute position).


color()

Returns the Light’s color in RGB (Red, Green, Blue) format. The minimum value is 0 and the maximum is 1 (think of it as the 0-255 scale divided by 255). For example, {r:0, g:0, b:0} is black and {r:1, g:1, b:1} is white.

Returns

Vec3 {x, y, z} color pigment of the Light.

let light = this.scene().findFirst("Spot Light");
log(light.color().x); // result: the red component of the light's color.

↑ Back to top


cutOffAngle()

Returns the cutoff angle of the Spot Light, in degrees.

Returns

number the cutoff angle of the Spot Light


intensity()

Returns the intensity of the Light.

Returns

number The intensity of the Light. Range is 0-1000.

↑ Back to top


isRemoved()

Returns if the Light is removed.

Returns

boolean true if the Light is removed, false if the Light is not.

↑ Back to top


isVisible()

Returns if the Light is visible.

Returns

boolean true if the Light is visible, false if the Light is not.

↑ Back to top


position()

Returns the Light’s position relative to its parent. If the Light has no parent, the result of this function will be no different than worldPosition.

Returns

Vec3 {x, y, z} relative coordinates of the Light.

↑ Back to top


range()

Returns the range of the Light. The range is how far the light reaches.

Returns

Number The range of the Light.

↑ Back to top


remove()

Remove the Light from the Scene.

↑ Back to top


rotation()

Returns the rotation of the Light in degrees.

Returns

Vec3 The {x, y, z} rotation value of the Light, in degrees.

↑ Back to top


rotationQuat()

Returns the rotation of the Light in Quaternion.

Returns

Quaternion The rotation value in Quaternion.

↑ Back to top


setColor(color)

Sets the color of the Light. Expected range of {r, g, b} is 0-1.

Parameters

Vec3 color – the {r, g, b} color

↑ Back to top


setCutOffAngle(value)

Sets the cutoff angle of the Light, in degrees. This changes how wide or narrow the Spot light is.

Parameters

number value – the cutoff angle to be used

↑ Back to top


setIntensity(value)

Sets the intensity of the Light.

Parameters

Number value – the intensity of the Light, ranging from 0-1000.

↑ Back to top


setPosition(x, y, z)

Sets the new position relative to the Light’s parent. If the Light has no parent, this sets the world position of the Light.

Parameters

number x – X coordinate in 3D space
number y – Y coordinate in 3D space
number z – Z coordinate in 3D space

↑ Back to top


setRange(value)

Sets the range of the Light.

Parameters

Number value – the range of the Light

↑ Back to top


setRotation(x, y, z)

Sets the rotation value of the Light, in degrees.

Parameters

number x – the X rotation of the Light
number y – the Y rotation of the Light
number z – the Z rotation of the Light

↑ Back to top


setRotationQuat(value)

Sets rotation value in Quaternion.

Parameters

Quaternion value – The Quaternion rotation value to be set

↑ Back to top


setVisible(value)

Sets the visibility of the Light; true if the Light is visible, false if not.

Parameters

boolean value – the visibility of the Light.

↑ Back to top


setWorldPosition(value)

Sets the Light’s position coordinates in the world (absolute position).

Parameters

Vec3 value – the {x, y, z} absolute position of the Light.

↑ Back to top


worldPosition()

Returns the Light’s position coordinates in the world (absolute position).

Returns

Vec3 the {x, y, z} world coordinates of the Light

let pos = this.scene().find("Spot Light")[0].worldPosition();
log('X World Position = ' + pos.x);

↑ Back to top

Did you find this page useful?

Please give it a rating:

Please provide some feedback!

This is very helpful to us.

Tell us how we can improve this post?

What’s New JS API

By |

What’s new in Buildbox 3.4 JS API

3.4.3
  • Touch events can be disabled with disableTouch() after they’ve been enabled with enableTouch(). You can see this in action if you drag a new “Is Touched” node out of the Node Library.
3.4.2
3.4.1

3.3.10
  • New name() function added to Linker
  • New setParent() function added to Entity
  • signal() function updated with new source parameter, which contains the output connection that sent the signal.
    • The updated Logger node is an example of how to use the new parameter.
3.3.9
3.3.7
3.3.1

Sun – API Reference

By |

Sun

The Sun is a light source that comes default in every World. It can be accessed by running this.scene().findFirst(‘Light Sun’);.

Function Description
color()

Returns the color of the Sun in RGB (Red, Green, Blue) format. The minimum value is 0 and the maximum is 1 (think of it as the 0-255 scale divided by 255). For example, {r:0, g:0, b:0} is black and {r:1, g:1, b:1} is white.

intensity()

Returns the intensity of the Sun.

rotation()

Returns the rotation of the Sun in degrees.

rotationQuat()

Returns the rotation of the Sun in Quaternion.

setColor(value)

Sets the color of the Sun. Expected range of {r, g, b} is 0-1.

setIntensity(value)

Sets the intensity of the Sun.

setRotation(value)

Sets the rotation value of the Sun, in degrees.

setRotationQuat(value)

Sets the rotation value of the Sun, in Quaternion.


color()

Returns the color of the Sun in RGB (Red, Green, Blue) format. The minimum value is 0 and the maximum is 1 (think of it as the 0-255 scale divided by 255). For example, {r:0, g:0, b:0} is black and {r:1, g:1, b:1} is white.

Returns

Vec3 the color of the Sun

↑ Back to top


intensity()

Returns the intensity of the Sun.

Returns

number the intensity of the Sun. Range is 0-1000.

↑ Back to top


rotation()

Returns the rotation of the Sun in degrees.

Returns

Vec3 the {x, y, z} rotation value of the Sun

↑ Back to top


rotationQuat()

Returns the rotation of the Sun in Quaternion.

Returns

Quaternion the Quaternion rotation value

↑ Back to top


setColor(value)

Sets the color of the Sun. Expected range of {r, g, b} is 0-1.

Parameters

Vec3 value – the {r, g, b} color

↑ Back to top


setIntensity(value)

Sets the intensity of the Sun.

Parameters

number value – the intensity of the Light, ranging from 0-1000

↑ Back to top


setRotation(value)

Sets the rotation value of the Sun, in degrees.

Parameters

Vec3 – the {x, y, z} rotation value

↑ Back to top


setRotationQuat(value)

Sets the rotation value of the Sun, in Quaternion.

Parameters

Quaternion – the Quaternion rotation value

↑ Back to top

Did you find this page useful?

Please give it a rating:

Please provide some feedback!

This is very helpful to us.

Tell us how we can improve this post?