
Did you know that you can make money with Buildbox?
Buildbox is one of the best tools to use to turn your creativity and love of games into a fun side hustle. Our powerful no-code software enables anyone with an idea to make a game that they can monetize and publish to the app store. No previous coding, programming, or design skills are necessary.
In this guide, we’ll show you how to use Buildbox to make money in five different ways. We’ll cover everything from app monetization strategies to selling your own assets and templates in the Buildbox Shop!
Top 5 Ways to Make Money Using Buildbox
Whether you’re a beginner or an experienced game developer, you can make money using Buildbox. Here are five ways to get started!
- Ads: You can integrate advertisements into your games and earn money through impressions or clicks on the ads. With Buildbox’s built-in monetization system, Adbox, this is easy to do. But don’t worry. We’ll walk you through the entire process step-by-step later on in this guide.
- In-app purchases: You can add in-app purchases to your games, such as removing ads, buying virtual currency, or extra lives, and you’ll earn money from players who choose to make these purchases.
- Selling your games on app stores: You can publish your games on popular app stores and charge a fee for downloading or unlocking certain game features.
- Selling assets: You can set up shop in the Buildbox Shop to sell your original game assets.
- Selling templates: You can also create a base game and sell them as a template so other Buildbox users can modify them.
It is important to note that making money with your games requires significant effort, time, and marketing and promotional activities to make them visible to potential players. Remember that success in any of these monetization methods will depend on the popularity and quality of your games and your ability to market and promote them effectively.
Earn With Ads: A Step-by-Step Guide
Our monetization system, Adbox, makes it easy to monetize your games with ads. We recommend placing ads on the Main Menu or the Game Over screen to make the experience more engaging for your players. Inserting banners or interstitial ads into your game is a fast and simple way to earn revenue with Buildbox.
Here’s how to get started:
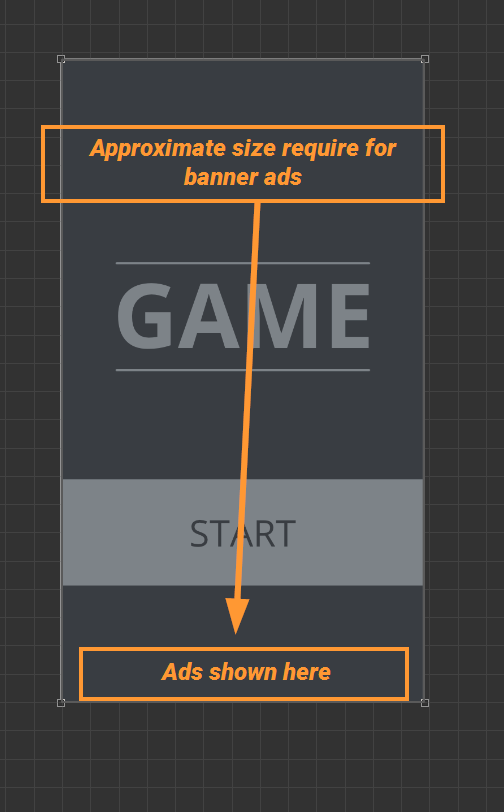
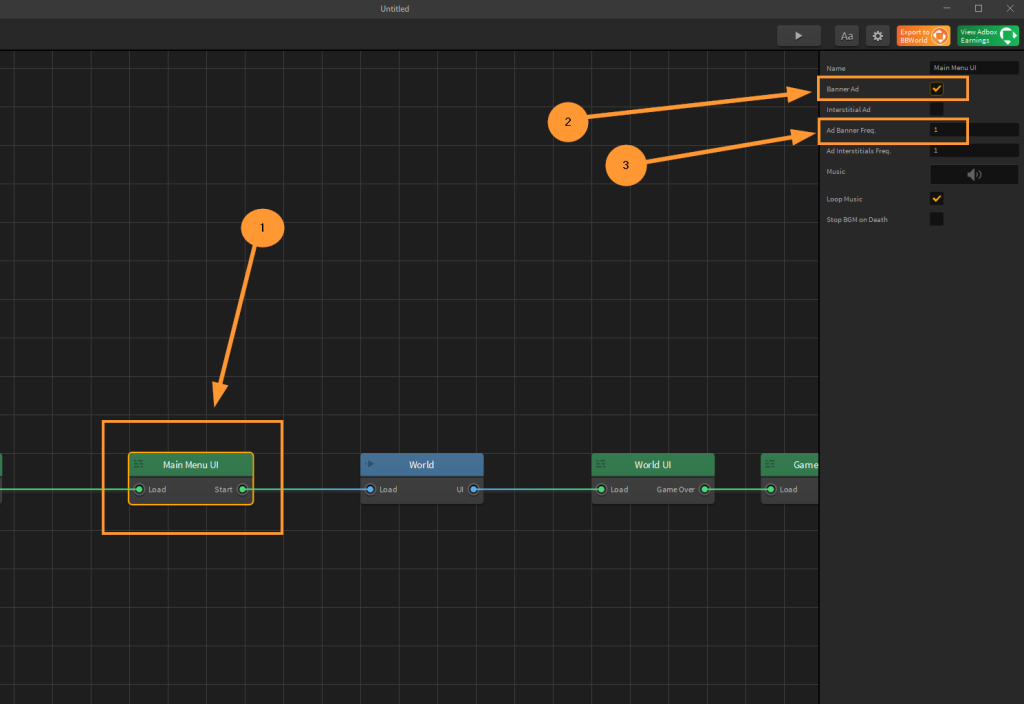
Step 1: Open up your Buildbox project and navigate to the Mind Map. When adding Banner ads to a Main Menu, Pause or Game Over screen, please allow unused space at the bottom of the screen for the banner ad to show (as seen in the picture below). If a banner ad covers any game text or buttons, it may be rejected when published to the App Store or Google Play Store.
As shown in the picture below, first highlight the Main Menu node, then check the ‘Banner Ad’ box, and third, set the ad frequency. A “1” will allow ads to show every time the Main Menu is displayed. A “2” in the Ad Banner Frequency section will allow a banner ad to appear every second or every time the Main Menu is displayed. A “3” will allow a banner ad to appear every third time the Main Menu screen is displayed, and so on.
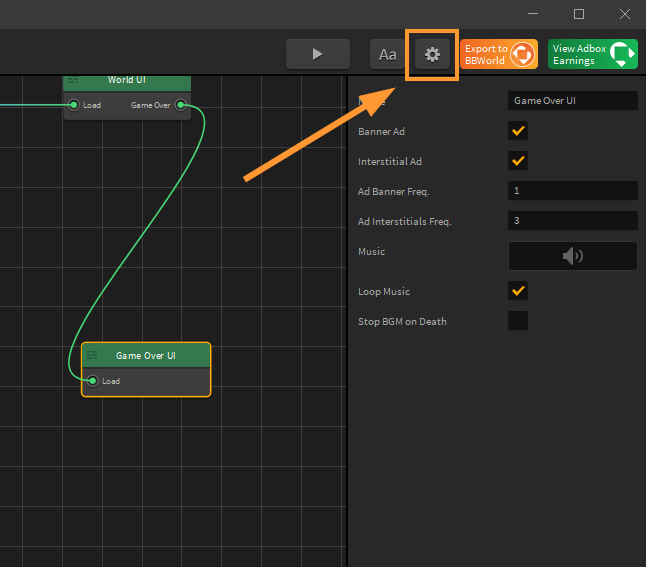
Step 2: Let’s now open the settings page. In Buildbox Classic, click the settings icon at the top right corner (as shown in the image below).
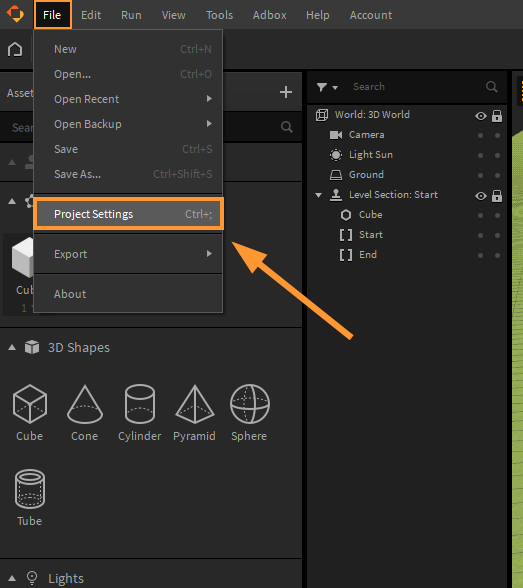
In Buildbox 3, open the file menu, then click “Project Settings’ (as shown in the image below).
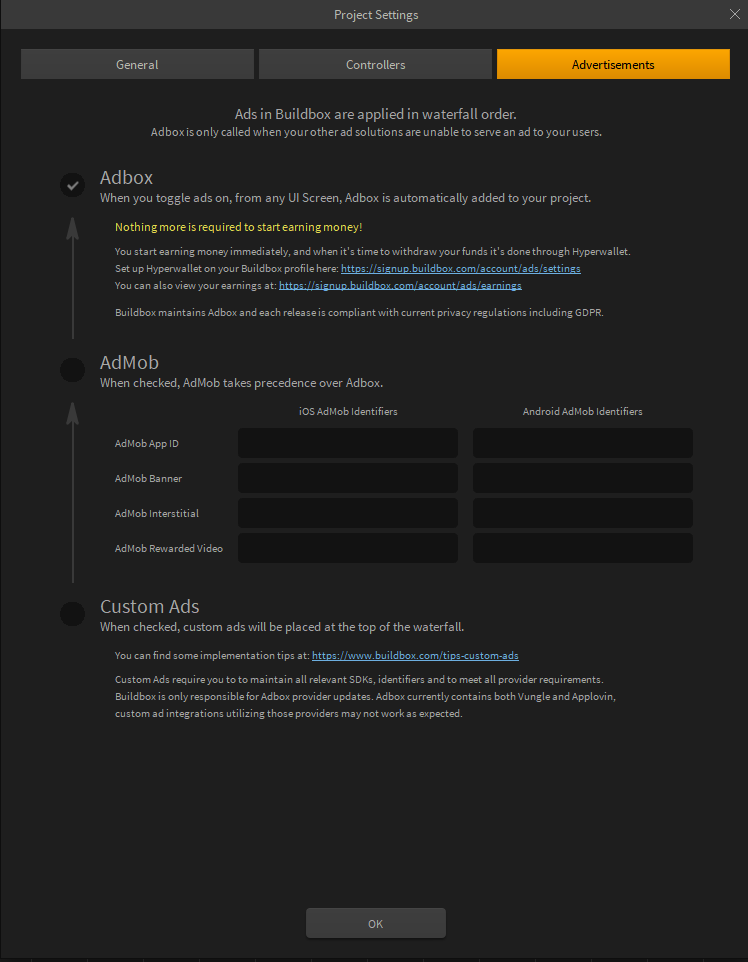
Adbox is automatically added to your project when you toggle ads from any UI screen. For Buildbox Classic, open the settings page, and click the “Advertisements” tab located at the top left of the settings page. If using Admob ads, please add a check to the Admob section, then fill in all four fields.
For Buildbox 3, open the settings page, then click the SDK tab at the top right. Click the “+Add” button and choose Adbox. Nothing more is required to start earning money. Your game can earn money once it’s been published and when it’s time to withdraw your funds, it’s done through Hyperwallet.
Set up Hyperwallet on your Buildbox profile here: https://signup.buildbox.com/account/ads/settings
You can also view your earnings at: https://signup.buildbox.com/account/ads/earnings
Earn Money With Buildbox Using the “Remove Ads Feature”
Another great way to monetize your games is to add in-app purchase options like the ability to remove ads. When users pay to remove ads from the game, they provide the developer with a direct payment for their work. This can be particularly valuable for the game developer who creates free-to-play games that rely on ads for revenue.
The “Remove Ads” option increases player satisfaction too. By offering the option to remove ads, you can create a more enjoyable user experience, increasing engagement and positive reviews.
It can also help to encourage user retention. Users willing to pay to remove ads are often more invested in the game and likely to continue playing over time. This can lead to higher levels of engagement, increased in-app purchases, and a more dedicated player base.
The “Remove Ads” option can be a win-win for both the game developer and the user, providing a source of revenue for the developer and an improved gameplay experience for the user.
The following steps will show how to add the “Remove Ads” feature to your Buildbox game.
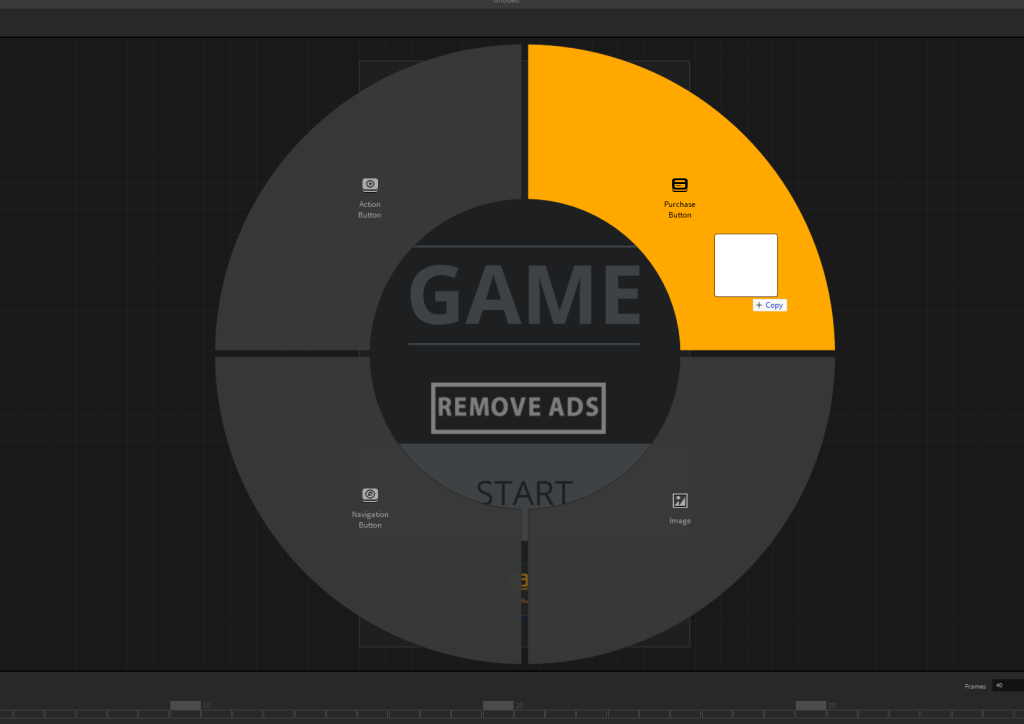
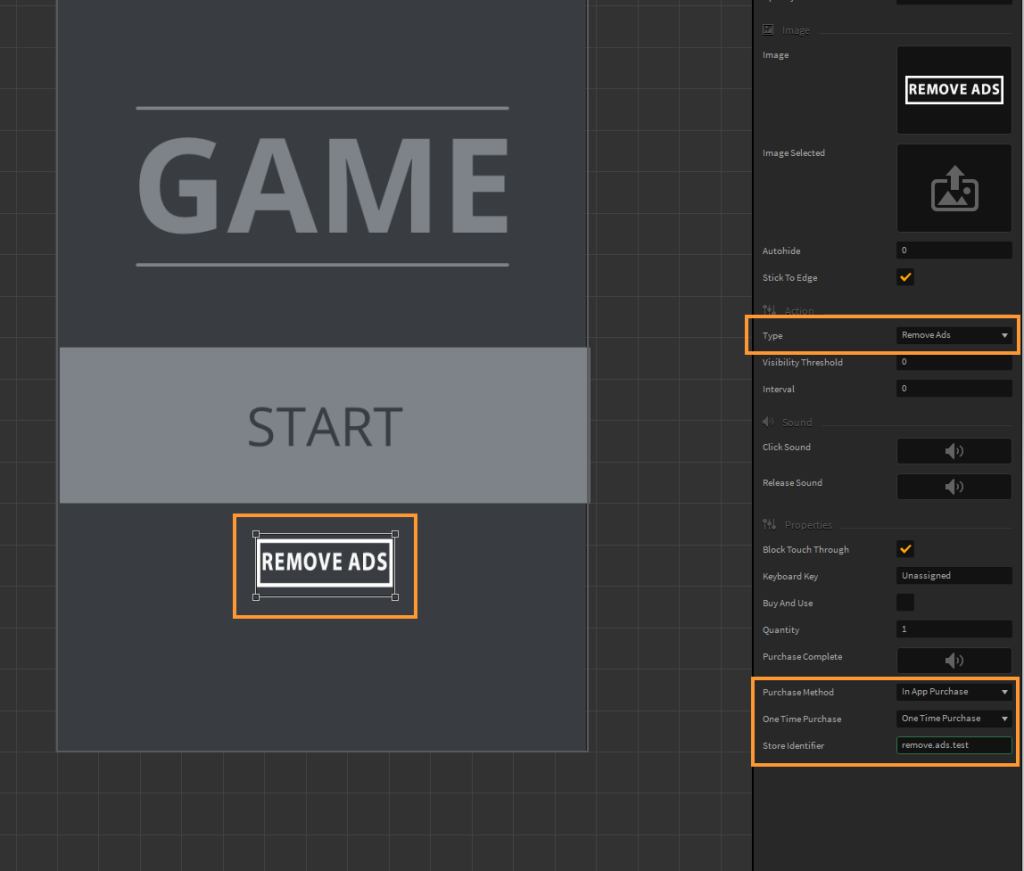
Step 1: Open your game’s main menu UI and open the list of buttons from the asset panel on the left, then drag in a purchase button. You’ll need to add an image to the purchase button. You can also drag in a custom Remove Ads image and add it as a purchase button.
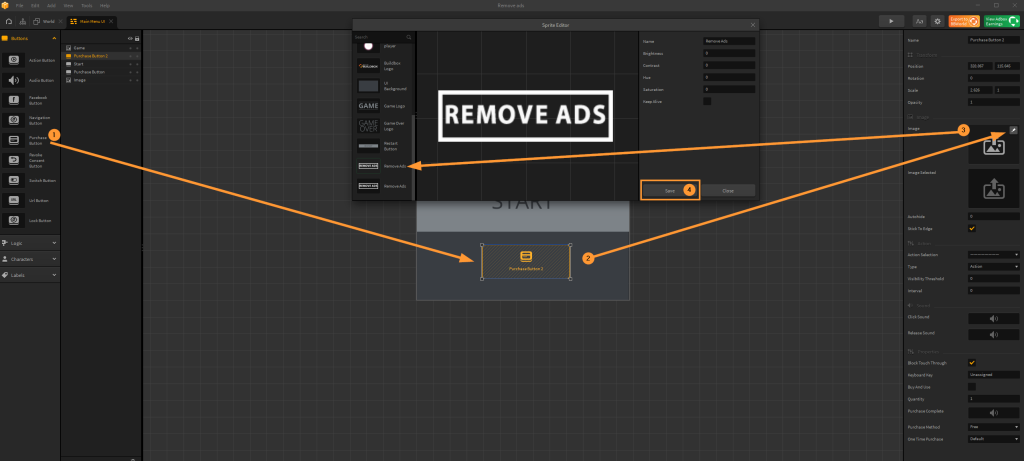
Step 2: In the options panel on the right side, change the action ‘Type’ to ‘Remove Ads,’ ‘Purchase Method’ to “In-App Purchases,” ‘One Time Purchase’ to “Default.” In the ‘Store Identifier’ section, you should enter the same store ID that will be used in the Developers Console. For example… “Remove ads.”
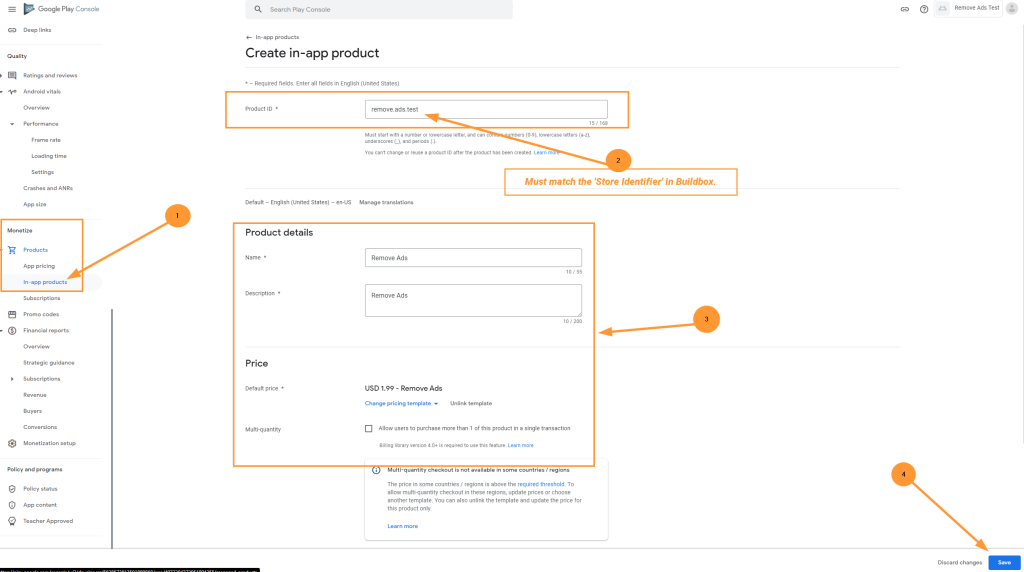
Step 3: After your game is completed and you’ve created the “Remove Ads’ function in your game, you can export to Android. Create an .aab exported file in Android Studio. Upload that file to the Google Play Dev Console. Once your game has been uploaded to the Dev Console, you can head to the ‘Monetize’ section at the bottom left of the page. Open the “Products” drop-down menu and select “In-app products.” Fill in all required fields. The ‘Product ID’ should match what was entered for the ‘Store Identifier’ in Buildbox.
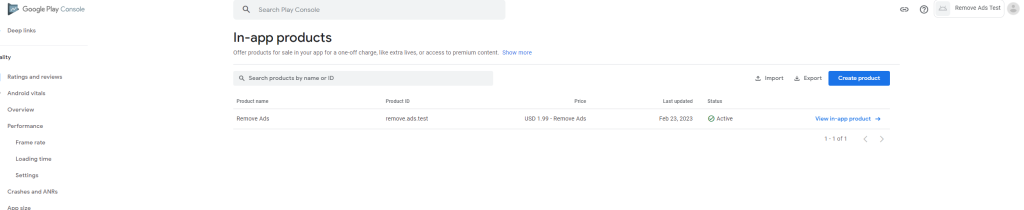
Once the remove ads IAP is set up, it should appear on the list, similar to the image below.
Publishing an Ad-Free Game for a Price
Publishing an ad-free game for a price is a business model that involves charging users a one-time fee upfront to access the game without any ads. This method is another way to make money and can benefit game developers in several ways.
When users pay for an ad-free game upfront, the developer earns revenue directly from each sale. This can be a more reliable source of income than relying on advertising revenue, which can fluctuate depending on factors such as user engagement and advertiser demand.
Enhanced reputation: Offering a high-quality game with no ads can help improve the developer’s reputation. Users are likely to appreciate the effort and investment that goes into creating a game with no ads, which can lead to positive reviews, recommendations, and increased user retention.
Publishing an ad-free game for a price can be a beneficial business model for game developers who prioritize revenue, user experience, and reputation. By offering a game with no ads, developers can potentially improve engagement and retention among their target audience while generating reliable revenue streams.
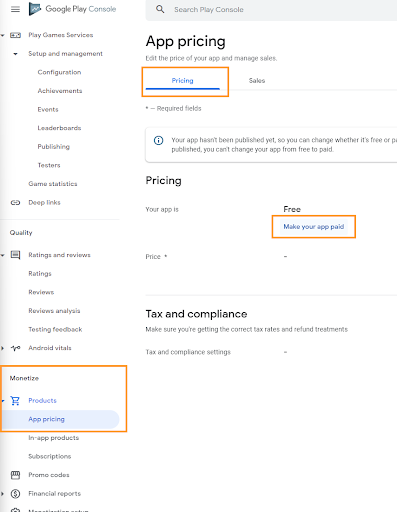
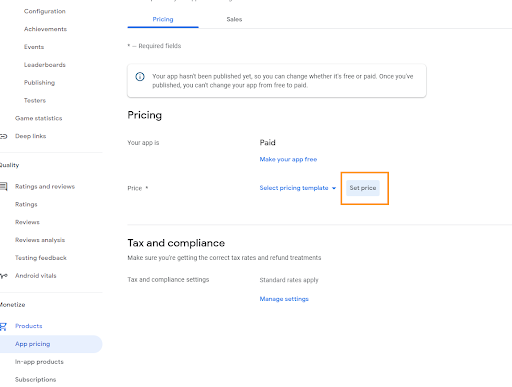
Once your game has been uploaded to the Google Play Dev Console after being exported from Buildbox, then Android Studio, you’ll need to select ‘App pricing’ from the ‘Products’ menu in the Monetize section on the bottom left of the page. Under Pricing, click the “Make your app paid” link.
Then click the “Set price” button.
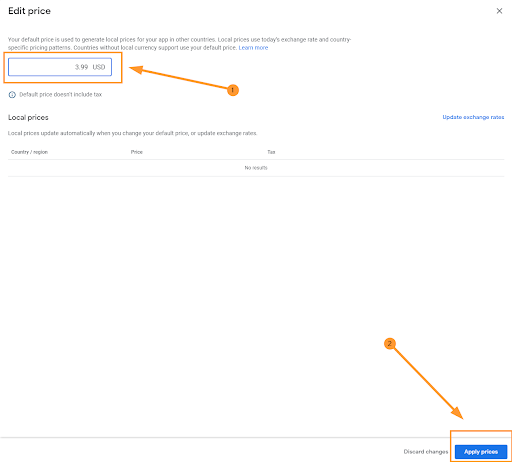
This brings you to a new page where you can set the price for your game. Enter the price of your choice, then press the “Apply prices” button located at the bottom right of the page.
Selling Assets
If you’re an illustrator, graphic designer, game artist, or simply someone who enjoys creating game assets, becoming a Buildbox Shop seller is a great way to make money with Buildbox. You can set your own price and earn every time someone buys your game art to use in their project. All of the game assets you sell will be available inside Buildbox 3’s asset library for creators in the community to purchase.
Here’s how to sell your game assets:
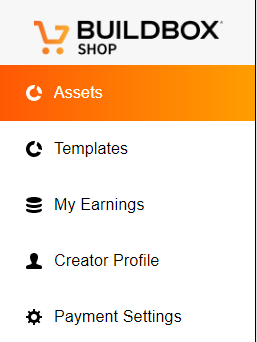
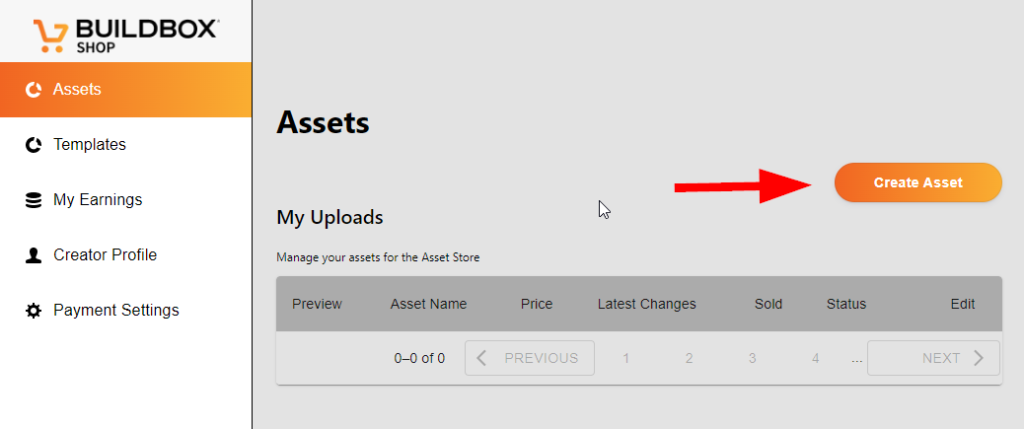
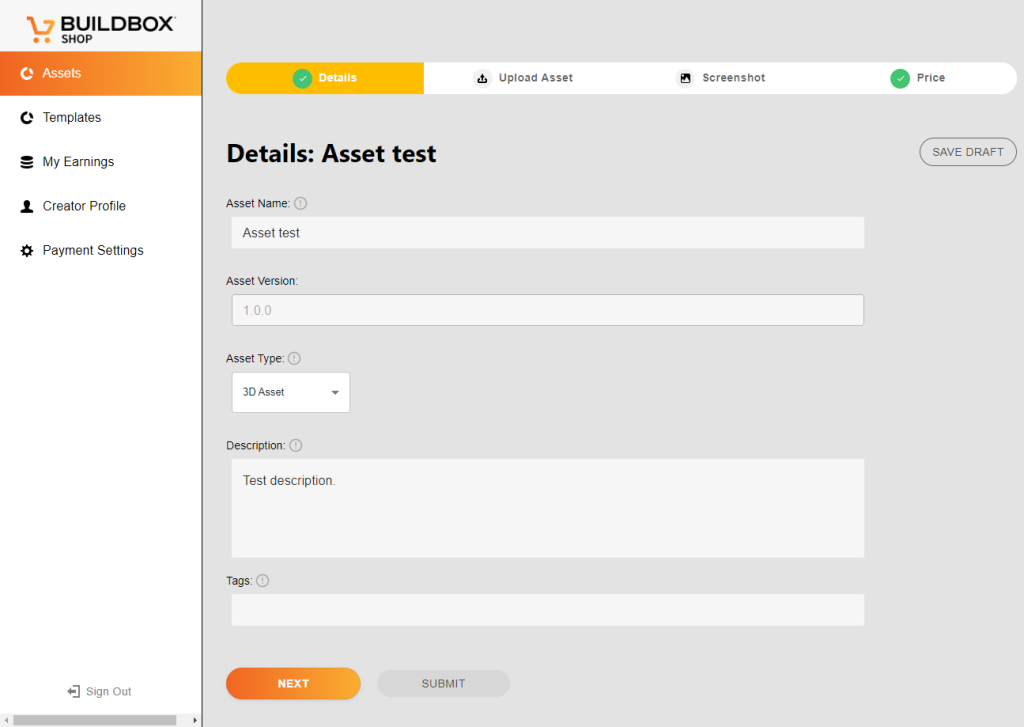
Step 1: Go to https://shop.buildbox.com/dashboard and go to Assets.
Step 2: Click the Create Asset button.
Step 3: Fill in all necessary fields. *Note that submission may get rejected if description does not match what is in your template.
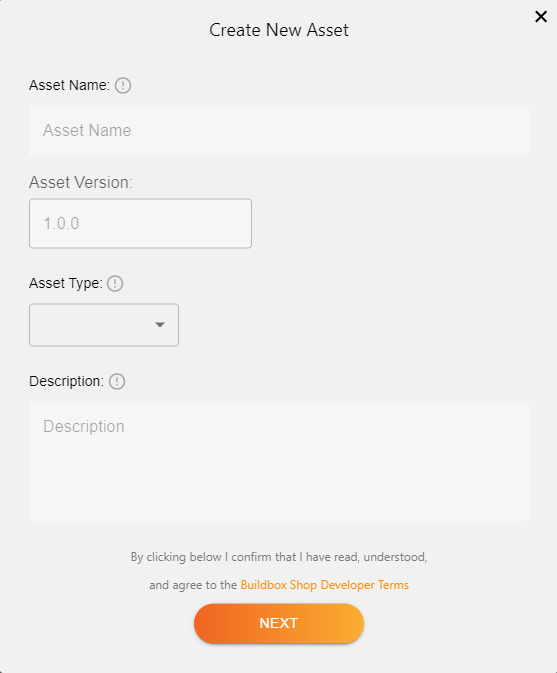
Step 4: Enter more detailed information and put tags so users will be able to find your assets.
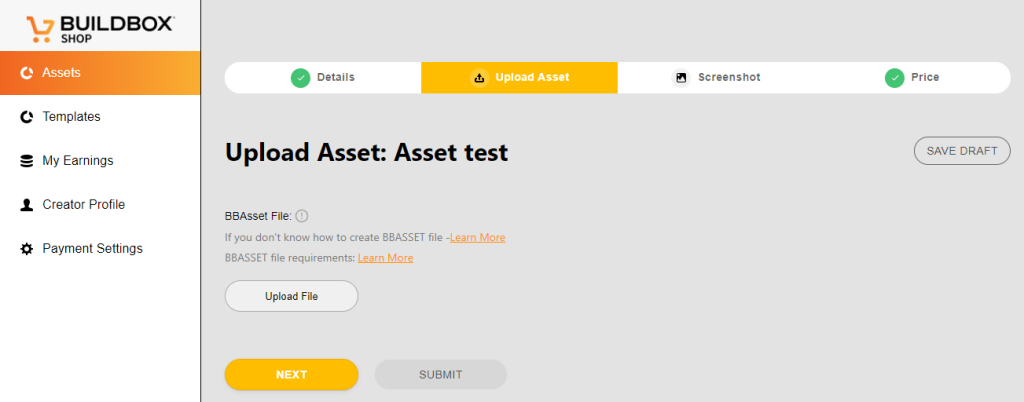
Step 5: Upload your asset. *Max file size is 2GB.
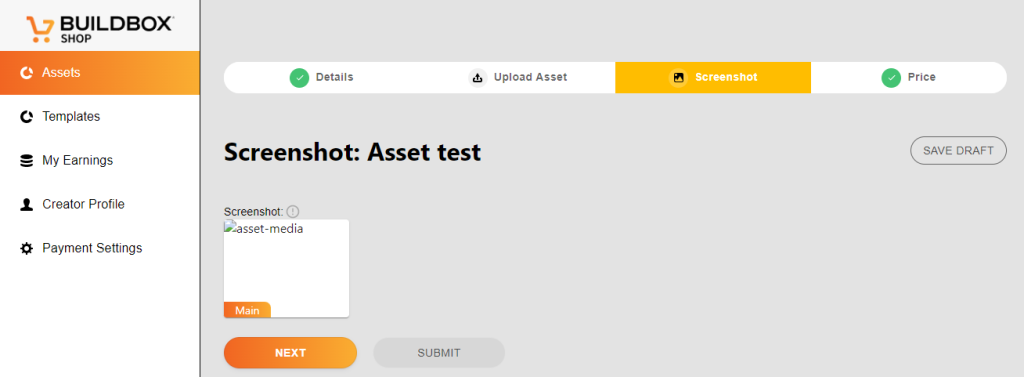
Step 6: Upload your screenshots.
- For a 2D Asset we suggest using a front view to best show it off.
- For a 3D Asset we suggest using an isometric view to best show it off.
- Max File Size: 5 MB
- Dimensions: 520×400 px
- Formats: PNG, JPG, GIF
The system automatically pads your image so use as much of the 520×400 as you can.
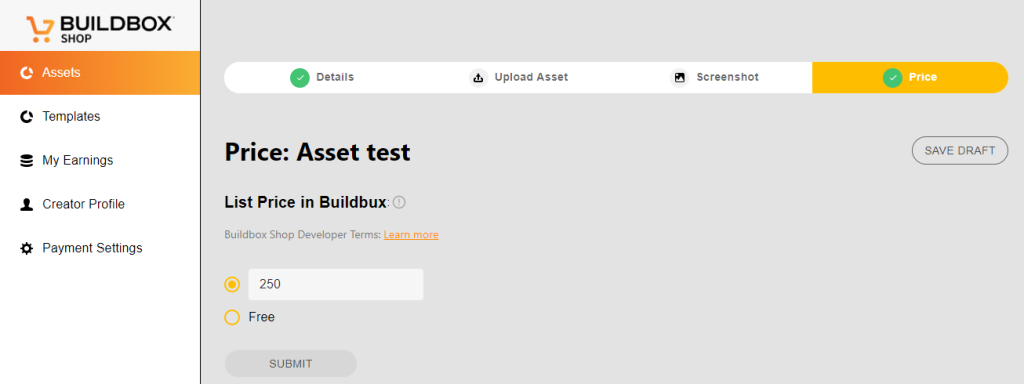
Step 7: Set your price.
*Assets are typically sold for anywhere between 25 and 1000 Buildbux. Simple Assets that consist of a basic 3D model or 2D image are usually sold for under 100 Buildbux. If the Asset contains animations they are usually sold for more than 100 Buildbux. Assets with complex Smart Asset functionality with pre-built game functionality, they can go up to 1000 Buildbux.
Selling Templates
Another way to earn money is to sell templates on the Buildbox Shop. This is now made easier as all users will be able to access it inside Buildbox.
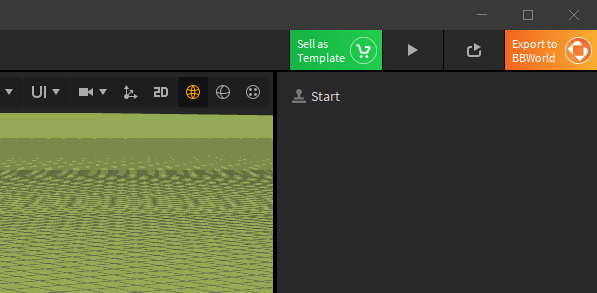
Step 1: As soon as you are done creating your template, the first step is to click sell as template button.Which will be located in the upper right corner beside the play preview button. This should take you to https://shop.buildbox.com/dashboard.
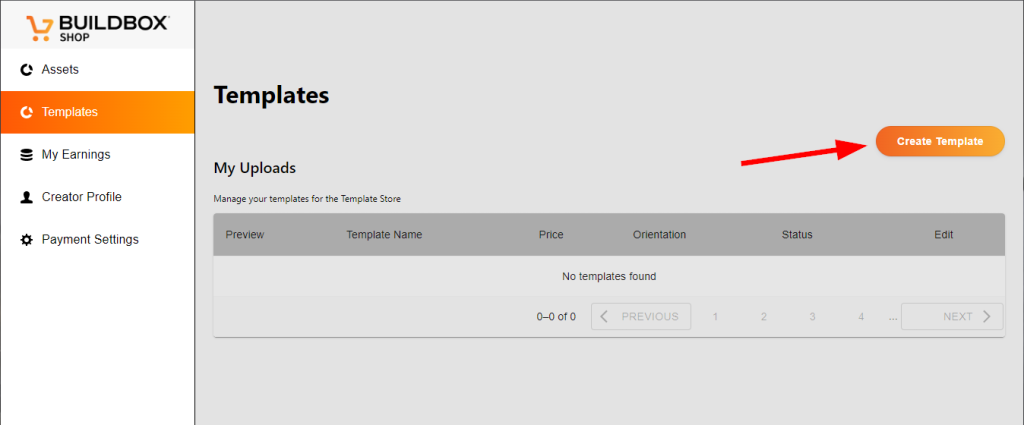
Step 2: Click the Create Template button.
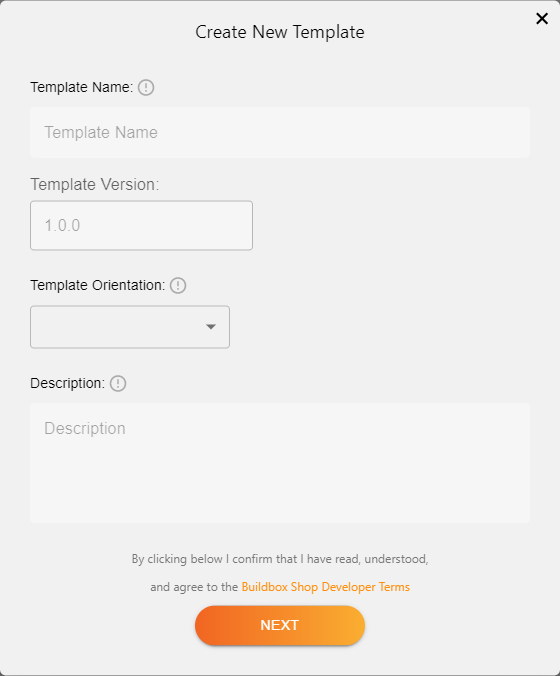
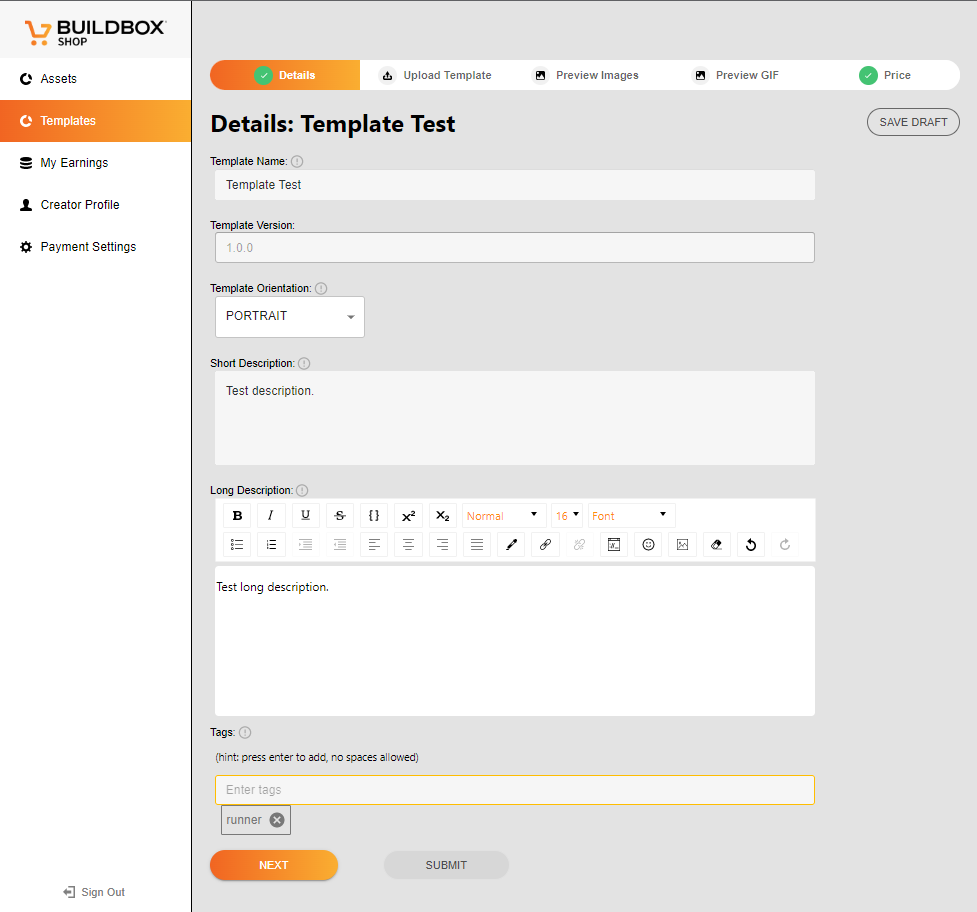
Step 3: Fill in all information then click the next button. *note that submission may get rejected if description does not match what is in your template.
Step 4: Enter more detailed information and put tags so users will be able to find your template.
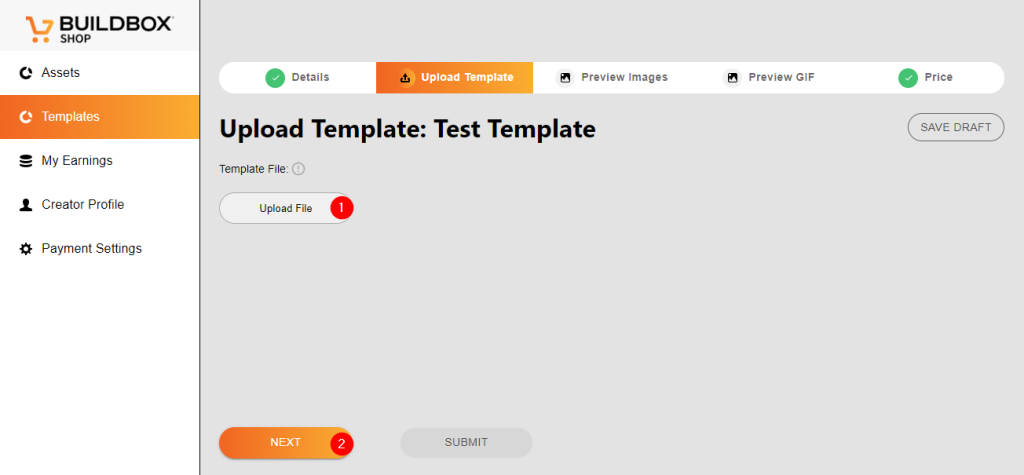
Step 5: Upload your BBDOC. *Max file size is 2GB.
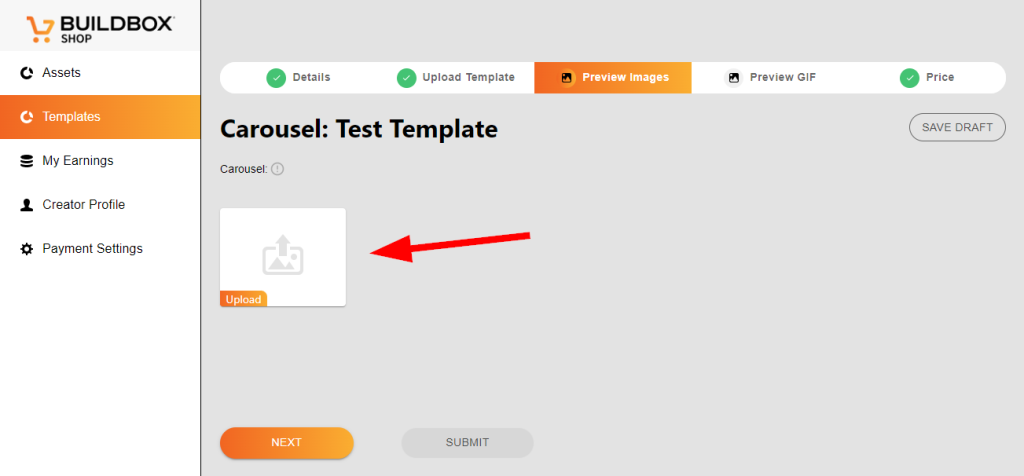
Step 6: Preview images. *When a user taps “More” from the main Buildbox Shop template page, they can flip through your provided images here. We require you to include at least one image, and you can upload a maximum of 10. Accepted image formats include .png or .jpg/.jpeg, and .bmp. Individually carousel images cannot exceed 2mb. The orientation of the images needs to match the orientation of your game (landscape or portrait).
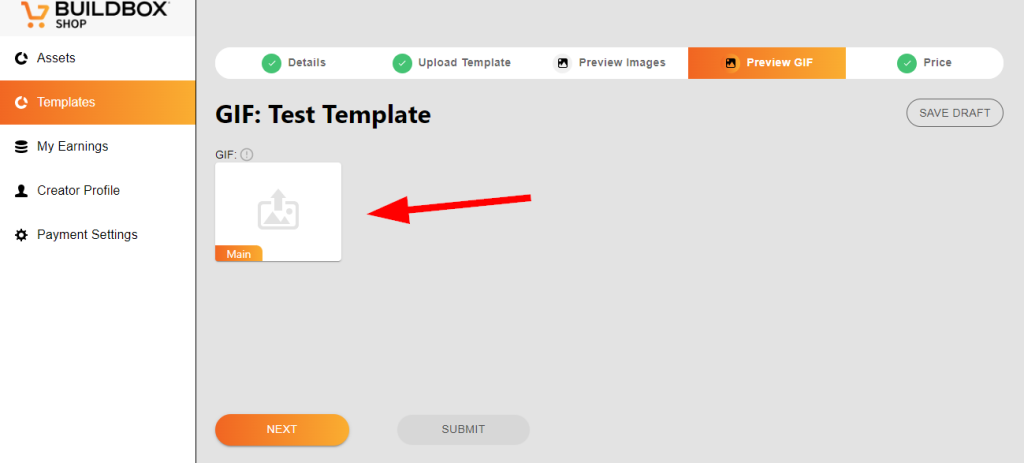
Step 7: Preview GIF. You have two options here. You can upload a standard .png, .jpg/.jpeg, or .bmp to be displayed as the primary image representing your project on the main Buildbox Shop page. Or, you supply an animated .gif or .webp file, and when a user hovers over your template this will automatically animate, showing your template in action. This file cannot exceed 2mb.
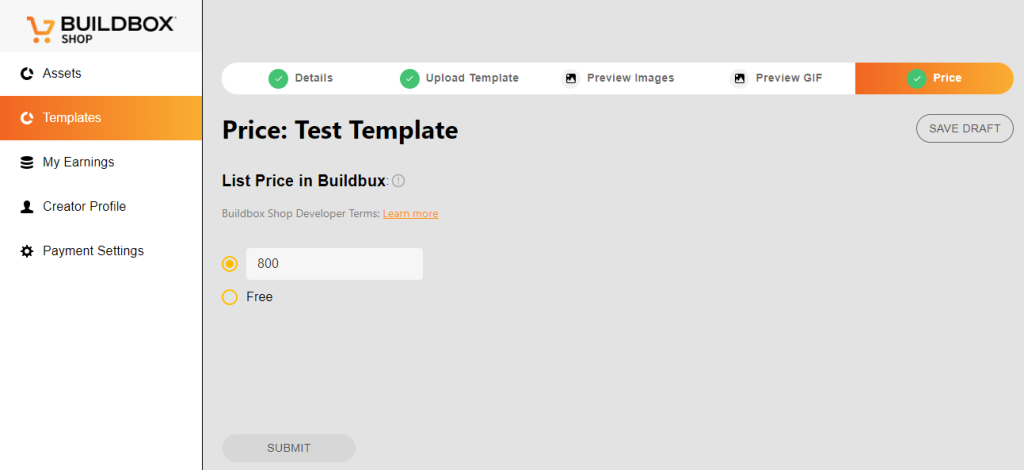
Step 8: Set your price. Buildbux is the native currency of Buildbox. Users purchase Buildbux with real money and purchase all templates from the template store with Buildbux.
You may set the price of your Templates to however many Buildbux you choose, we recommend following these guidelines for the best results.
Templates are typically sold for anywhere between 25 to 1000 Buildbux.
Earning money with Buildbox is easy—there are many ways to do it, so don’t feel like you have to do them all. Experiment with different methods and see what works best for you! We hope this guide has been helpful.
Start earning today!


