Software Requirements
- OS X 10.9 – 10.11
- Xcode 7
Note: BETA versions of Xcode cannot be used for App Store uploads
The Build
This is quite straight forward as long as you have included all details correctly in the game while using Buildbox – ie before export. You need to grab the certificate to use the distribution provisioning profile you have created, compile the game, and then submit to Apple – which can all be done from within Xcode itself.
- Export from Buildbox.
- Open Xcode.
- Open the project in Xcode. You may notice that the project name is PTPlayer. This name has not real effect on the game you upload to the app store. You will see something similar to the following:
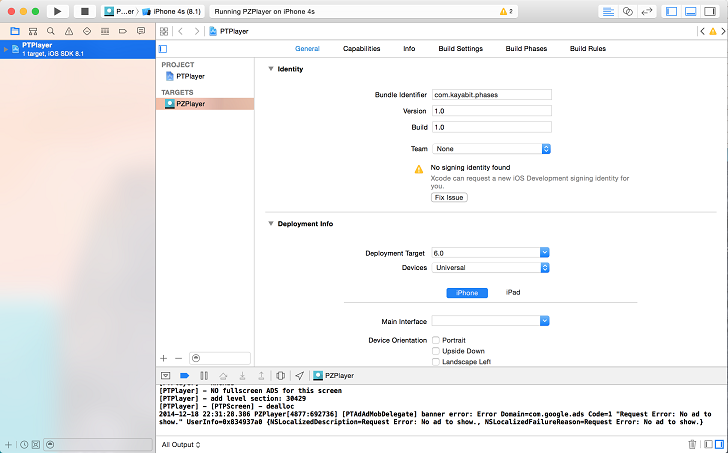
- In the middle of screen, you will see the field Team. Select the account you will be using to upload the game, or Add New if this is your first time. You will get a popup where you can enter in a username and password.
- Directly under this you will probably see a yellow icon – as shown – and a message telling you the signing identity is missing. Press the [Fix Issue] button, and – provided you have created your app ID and distribution profile, this warning will go away.
- These fields are worth noting in particular:
- Version: should match the version you specify in iTunes Connect (and comes from a Buildbox setting).
- Build: you can treat this as a the same as the version, above.
- Deployment Target: This determines what iOS version is needed to download your game. Leave it as set by Buildbox.
Note that at the top of the screenshot – just to the right of PZPlayer – you will see iOS Device. If you have a device plugged into the Mac, and associated with your account, it will instead show the name of that device.
To Test in Simulator
- Click on the button at the top of the screen – just to the right of PZPlayer. From the menu that appears, select the simulator of your choice (there will a list of phones and iPads along with the version of the iOS SDK you can test against).
- Press the play symbol and wait for the simulator to start. Press the screen by using the mouse. You can take screenshots and do other things while the simulator is running by having a quick look at the menu bar.
To Test on a Device
- Plug in your device to test on, and wait for a few seconds.
- Ensure you have a testing provisioning profile setup (a generic profile is recommended).
- Click on the button at the top of the screen – just to the right of PZPlayer. From the menu that appears, select the device you have plugged in. (If you don’t see your device, and only see the generic-sounding “iOS Device” check your USB connection as the device is not being seen by Xcode. This can also be caused by not having your device attached to your development account.)
- Press the play symbol and wait for the game to sstart. Play the game as you normally would on a device (device network communication will happen via the mobile/cell phone network or WIFI and not USB) and note that log messages from the device will appear in Xcode.
To Build for the App Store
- Click on the button at the top of the screen – just to the right of PZPlayer. From the menu that appears, select iOS Device (or the name device you have plugged in).
- Click the Product menu, select Archive. This will build your game, and put it in Xcode’s Organiser, with the just-built game selected:
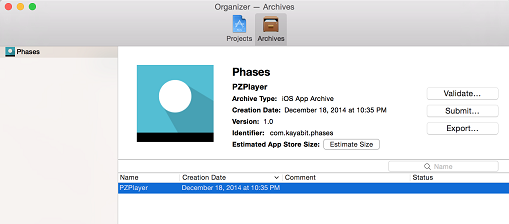
- At this state you can press [Estimate Size] button to check how big Xcode thinks your final game will be. You want your game to be less than 100MB is size for greatest downloads. The estimator is usually about 95% accurate, so it is possible that your estimate is over 100MB and your final submitted game is under, or vice-versa. After submitting the game is the only time to be really sure, as Apple will give you a warning for a large game.
- Provided that the game has been setup in iTunes Connect, you can now upload and validate the game. To Validate, press [Validate] and follow the prompts.
- To submit the game, press [Submit] and follow the easy to follow prompts. Note that submitting will also do a validate, so the previous step is not strictly required.