Once you have compiled your game, you are ready to upload it to iTunes Connect. What is iTunes Conect? It is the App-Store part of the upload process, where your app, screenshots, name and keywords reside.
Basic App Information
- Open this URL in your web browser – http://itunesconnect.apple.com/ – and log in. You may see an yellow exclamation mark at the top of screen – indicating legal agreements you need to sign. Most of these will prevent your games from appearing in the app store, so you will want to follow any instructions shown.
- Click on My Apps.
- Click on the + at the top left of screen, then click on New iOS App and a new dialog will popup over screen.
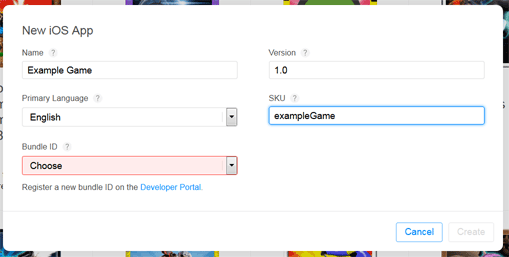
- Enter in the following details:
- Name: Name of the game as it will appear in the app store.
- Primary Language: the language that will be displayed to the user, and used for search, if you have not defined something in the local language. It can not be changed later, and typically this will be “English”
- Bundle ID: Select a game that you have previously defined in the Apple Developer portal.
- Version: a numeric value that should match the version you specified in BuildBox before you exported the game.
- SKU: a unique short name used for your own reporting only – not visible on the App Store.
- Press [Create]
At this point you have an application ID, which can use for recommendation links and the like.
Full App Information & Metadata
This is where you set Game Centre, in-app-purchases (IAPs), keywords, titles and descriptions for all languages. For more detailed information regarding images, sizes, etc you may wish to refer to this page on the Apple developer site.
Find game’s icon, on the main screen of iTunes Connect, and click on it. This will open up the game’s metadata page. Note the language selector on the top right.
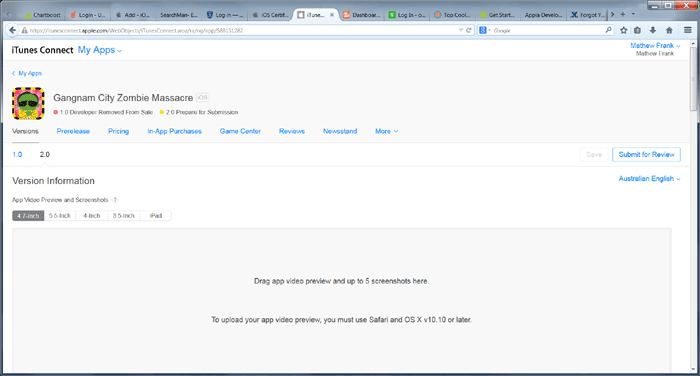
Version Information
The first section of the screen is all about screenshots and video.
- Drag the 4.7 inch screenshots (1334 x 750px) from Explorer/Finder and drop it over the large grey box.
- Click 5.5-inch at the top of the screen, and drag in the 5.5 inch screenshots (2208 x 1242px)
- Click 4-inch at the top of the screen, and drag in the 4 inch screenshots (1136 x 640px)
- Click 3.5-inch at the top of the screen, and drag in the 3.5 inch screenshots (960 x 640x)
- Click iPad at the top of the screen, and drag in the iPad screenshots (1136 x 640px)
- Optionally – on Mac only – drag in a video file for each of the resolutions. Files need to be in mov, m4v or mp4 format., and between 15 and 20 seconds. There are several sizes of video applicable to different devices. If you do one each of these sizes, you will be covered for all screens:
- 1920 x 1080 (iPhone 5 and 6 plus)
- 1200 x 900 (iPad)
- 1334 x 750 (iPhone 6)
- Fill out the following metadata:
- Name: Name as it sill appear in the App Store. Less than 255 characters. Generally the more words the greater the chance that the review team will reject your app. Less words means less keywords and phrases to appear in search. It is generally accepted that words appearing at the beginning of your title have more power, and in general the longer the title itself is, the less power individual words in it will have for search.
- Description: This is where you can sell your game. It does not appear to have a difference in search ranking at this time, so just make his readable and effective. Beware of sounding scammy, or of making unfounded claims, or using trademarks without permission.
- What’s New in This Version: this will appear if you are doing an update to an existing game. Make it sound interesting (but true) as it can make a difference in people bothering to update or install your game. Remember that something like “minor bug-fixes” is not likely to pique people’s interest!
- Keywords: These will never appear in the app store. They are used – in combination with the app name to determine what search terms your game should appear for. Keywords in the app name are more powerful than the words used here. Enter your words as single words, with commas between them. NO spaces.
- Support URL: a link that will appear on the app store for users wanting support from you.
- Marketing URL: as above, but will be the web page you setup that helps sell the game.
- Privacy Policy: as above, but used to link to your privacy policy – if you have one.
General App Information
- Drag your app icon onto the Choose File box under the App Icon box. The icon should be 1024 x 1024 px with no transparency.
- Apple ID is just a handy place to grab the app id for creating links, etc.
- Version should generally be left as-is. It is the displayed version number for the App Store.
- For Category, set “Games” and then set whatever subcategories apply. Secondary category is almost never used.
- Edit the rating so as required for your app. You will l see the “Ages” will adjust as you add sex, drugs, violence and so on. Some categories if selected will prevent you from selling your game on the App Store at all.
- Lastly fill out the Copyright holder name, and contact details. Ignore the Routing App Coverage File for games.
Version Release
It is generally recommended to set this to “Manually Release Version” to give you control on what day you release your game. If you set “Automatically…” then it can appear as soon as the reviewer approves it – which could mean an entry in the new release section just before midnight.
Pricing
If you have set the version release (see above) to “Manually Release” then there is not much you need to change here.
To be sure you release on every app store, click Select All down the bottom of the screen.
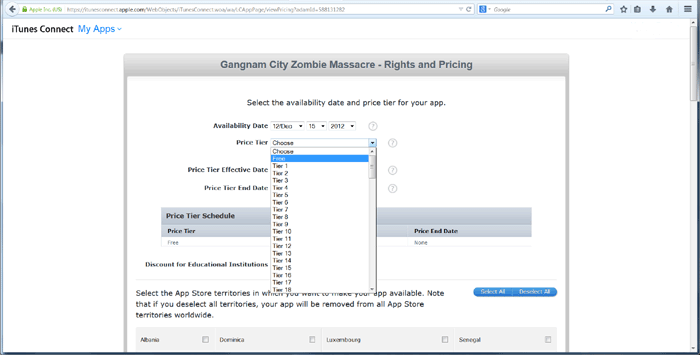
These are the other values you set on this screen:
- Availability Date: when the game will release. Defaults to todays date – which means release as soon as approved.
- Price Tier: This is Apple’s simple way of setting prices in all the various app stores at he same time, without thinking too hard. “Free” is what it sounds like. Tier 1 is $0.99 on the US app store, 2 is $1.99 and so-on until you get to really high prices in the hundreds of dollars. (click View Pricing Matrix for the full details, on the page)
- Price Tier Effective Date: usually set this to “Now” unless you are planning a price change at some date in the future.
- Price Tier End Date: usually set this to “None” to set the price permanently.
- Discount for Educational Institutions: if you have a paid app, and would like schools to be able to buy hundreds of your game for a discount, then you may tick this box. (This actually does happen with kids apps at times!)
When you are done, press [Save]. After the screen reloads, press [Cancel] to leave the screen. I know this sounds strange, however you will not lose anything as long as you have pressed [Save] first.