Now that you know how to make a game app without coding, we’re going to backtrack and reveal some of the best tips and hacks to get the most out of our software. We’ll revisit some of our previous lessons and show you a few new tricks to help take your game to that next level.
In this chapter, you’ll learn a clever tip to get your collision shapes precise. We’ll show you how to give your character an exploding death, so it looks like he shatters into tiny little versions of himself.
We’ll explore some of the other notable features in Buildbox like the menu jump and event observer and show you how you can integrate timers within your gameplay. You’ll also learn a secret tip about making secret worlds unrepeatable.
After you’ve completed this chapter of our manual, we encourage you to join our official forum and Discord channel to learn more about how to make your own game using Buildbox.
Let’s talk about precise collision shapes for our mountain enemies. Way back in chapter 3, when we went over collision shapes, we knew we weren’t being exact with our shapes, and we mentioned making a composite object was our solution.Let’s get a blank scene ready, and let’s drag in different parts of our mountains.
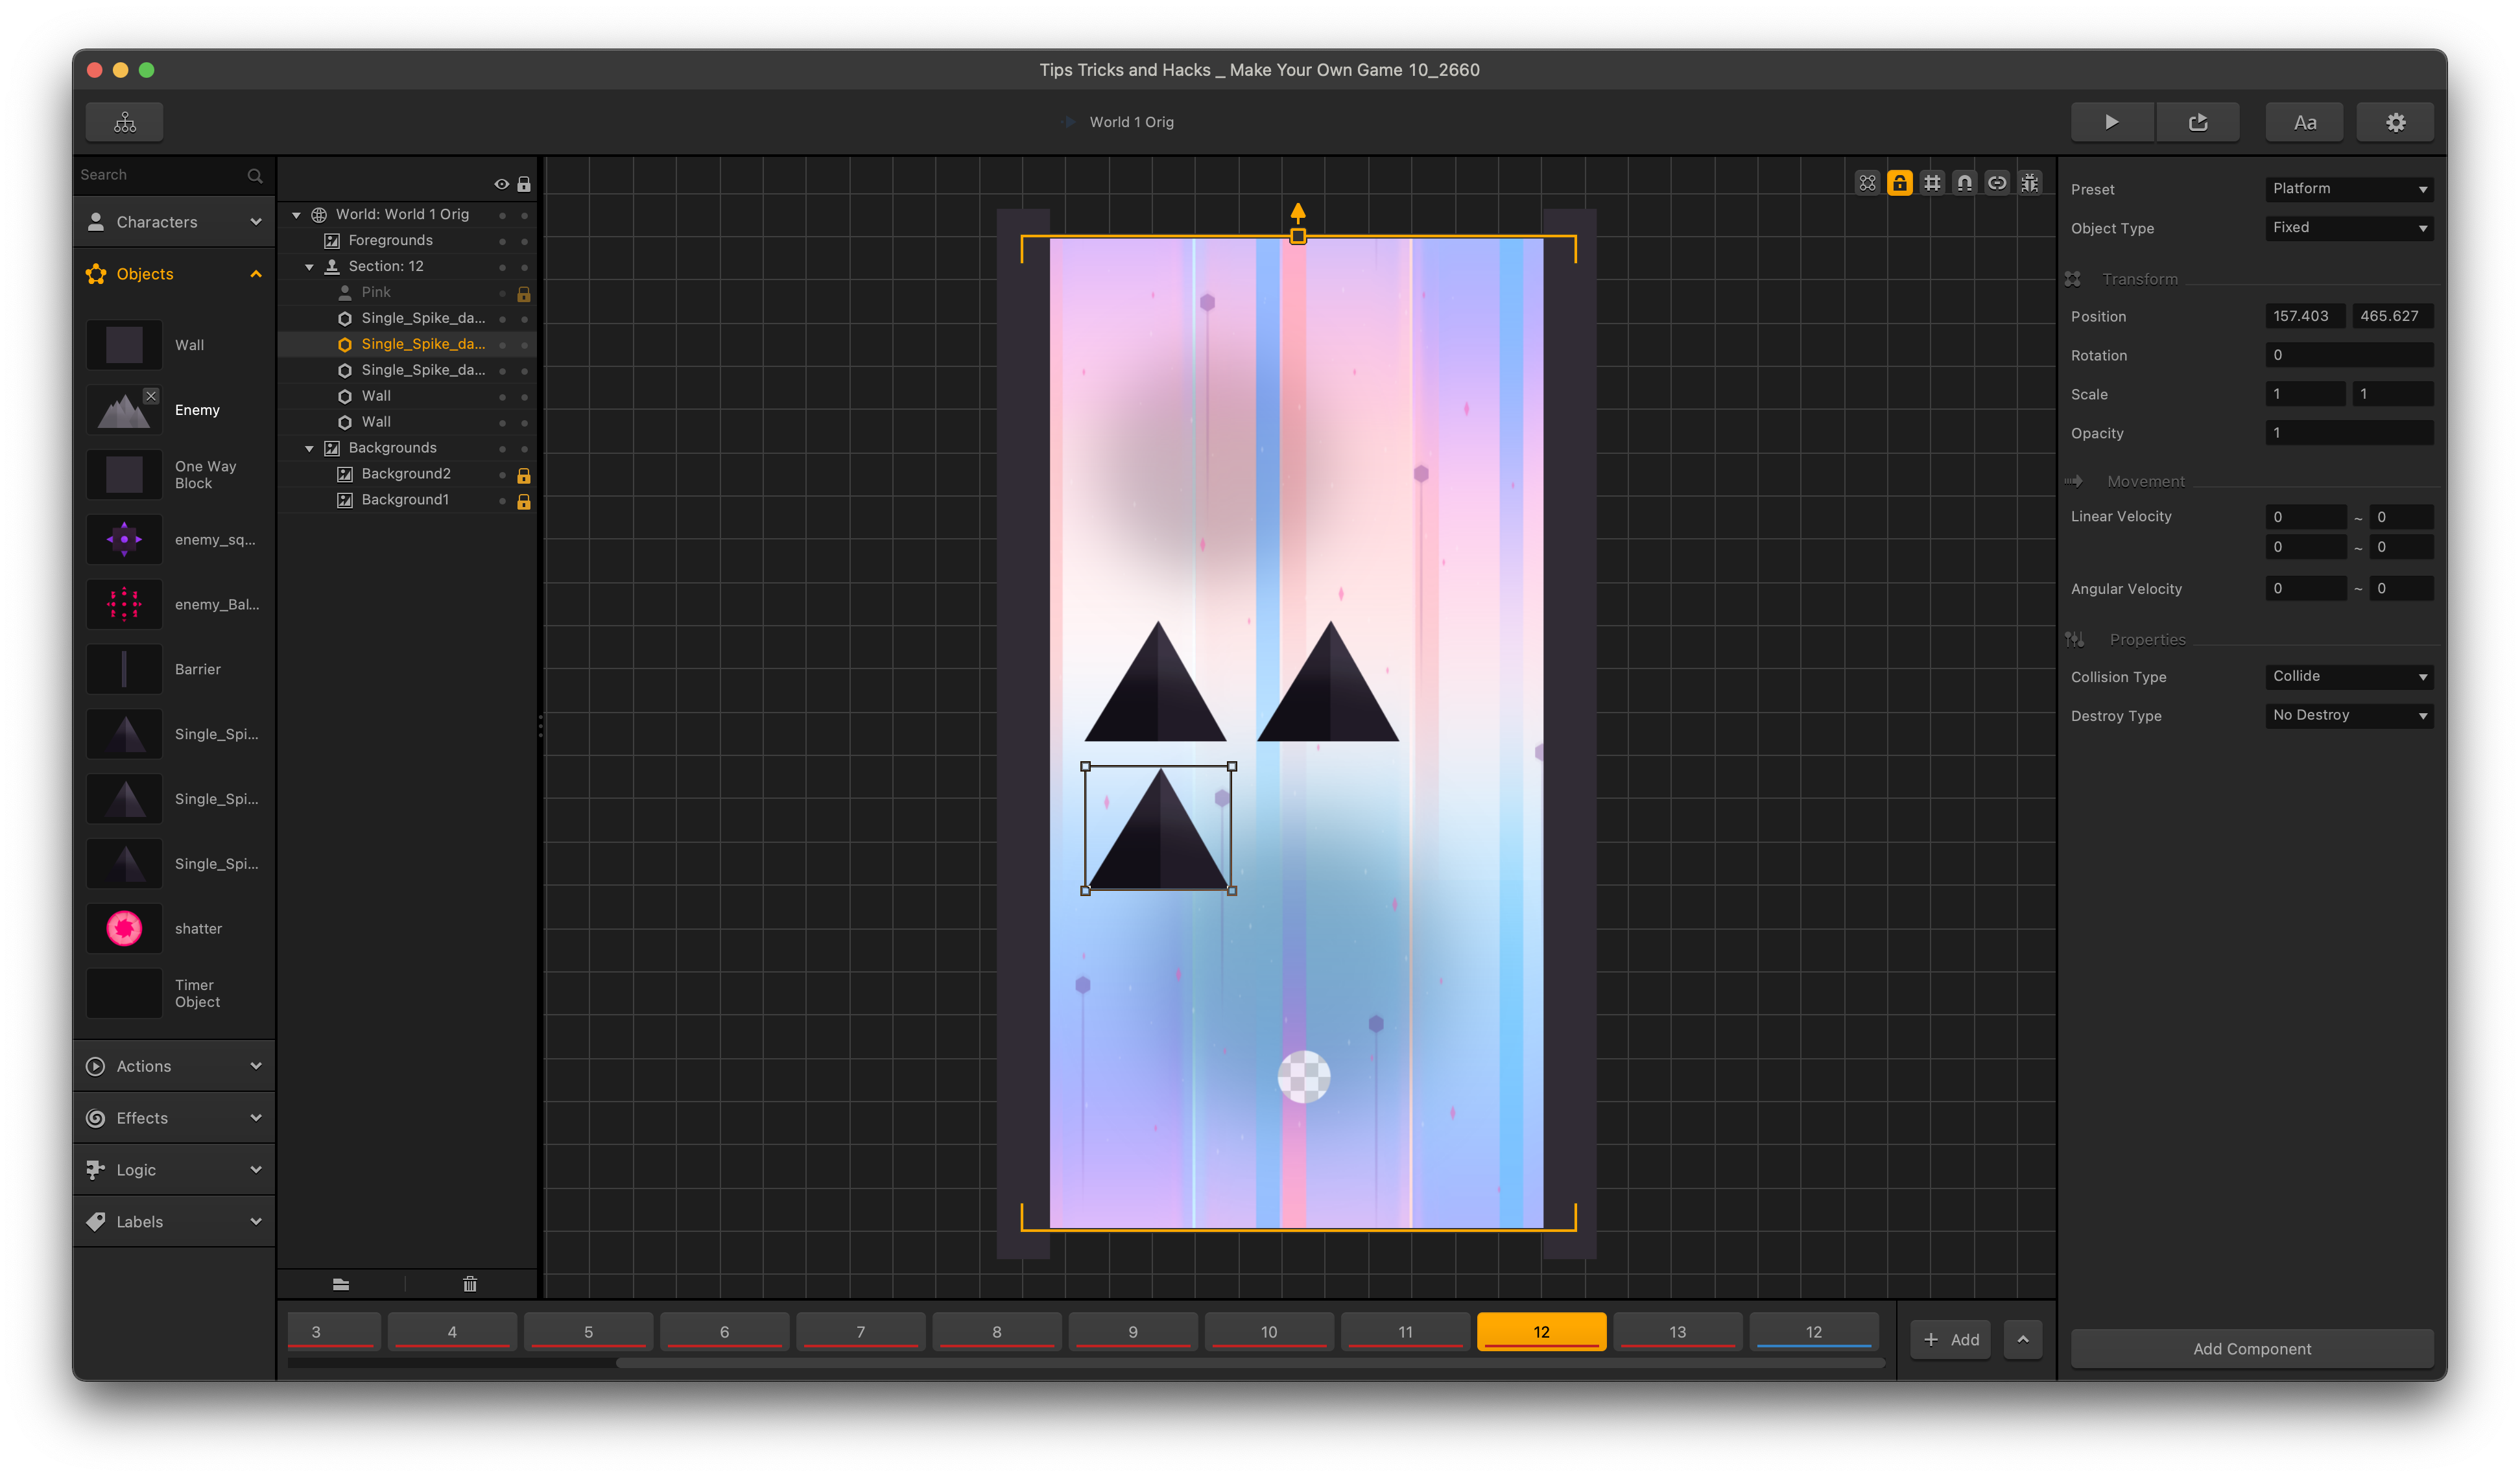
The graphics supplied us with our mountain enemies, but it also supplied us with the enemies broken down into its components. So, let’s drag those in one at a time, and get their collision shapes exact.
Remember to keep in mind our forgiving collision shape philosophy. You can see the advantage here because now we can start to rotate them in new ways, even scaling them differently. And this gives us control over not only better collision shapes, but now we have full control for placement, scaling, and rotation of each individual spike.
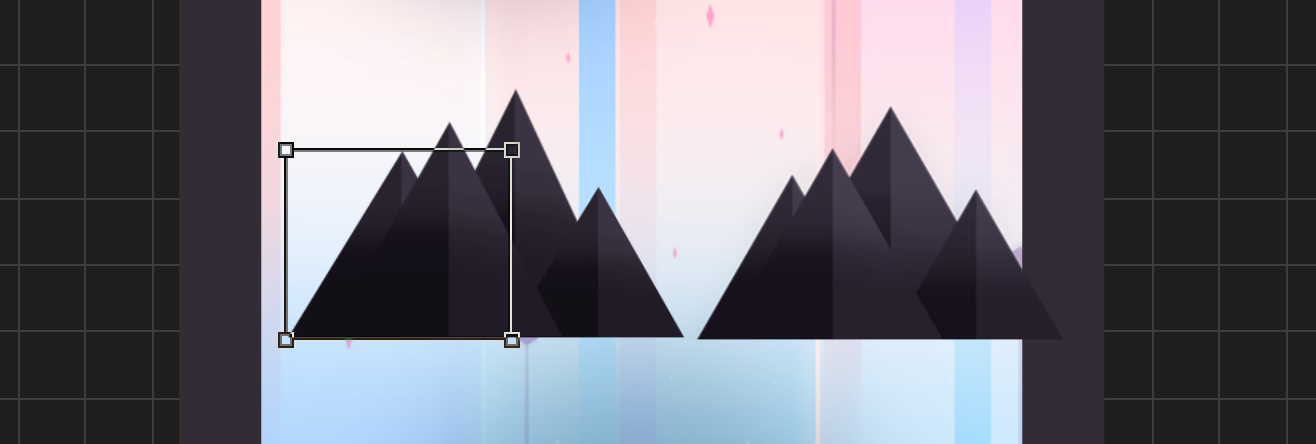
We can also bring in our original enemy mountain like we had it before and let’s move our new shapes to mimic the original rendition.
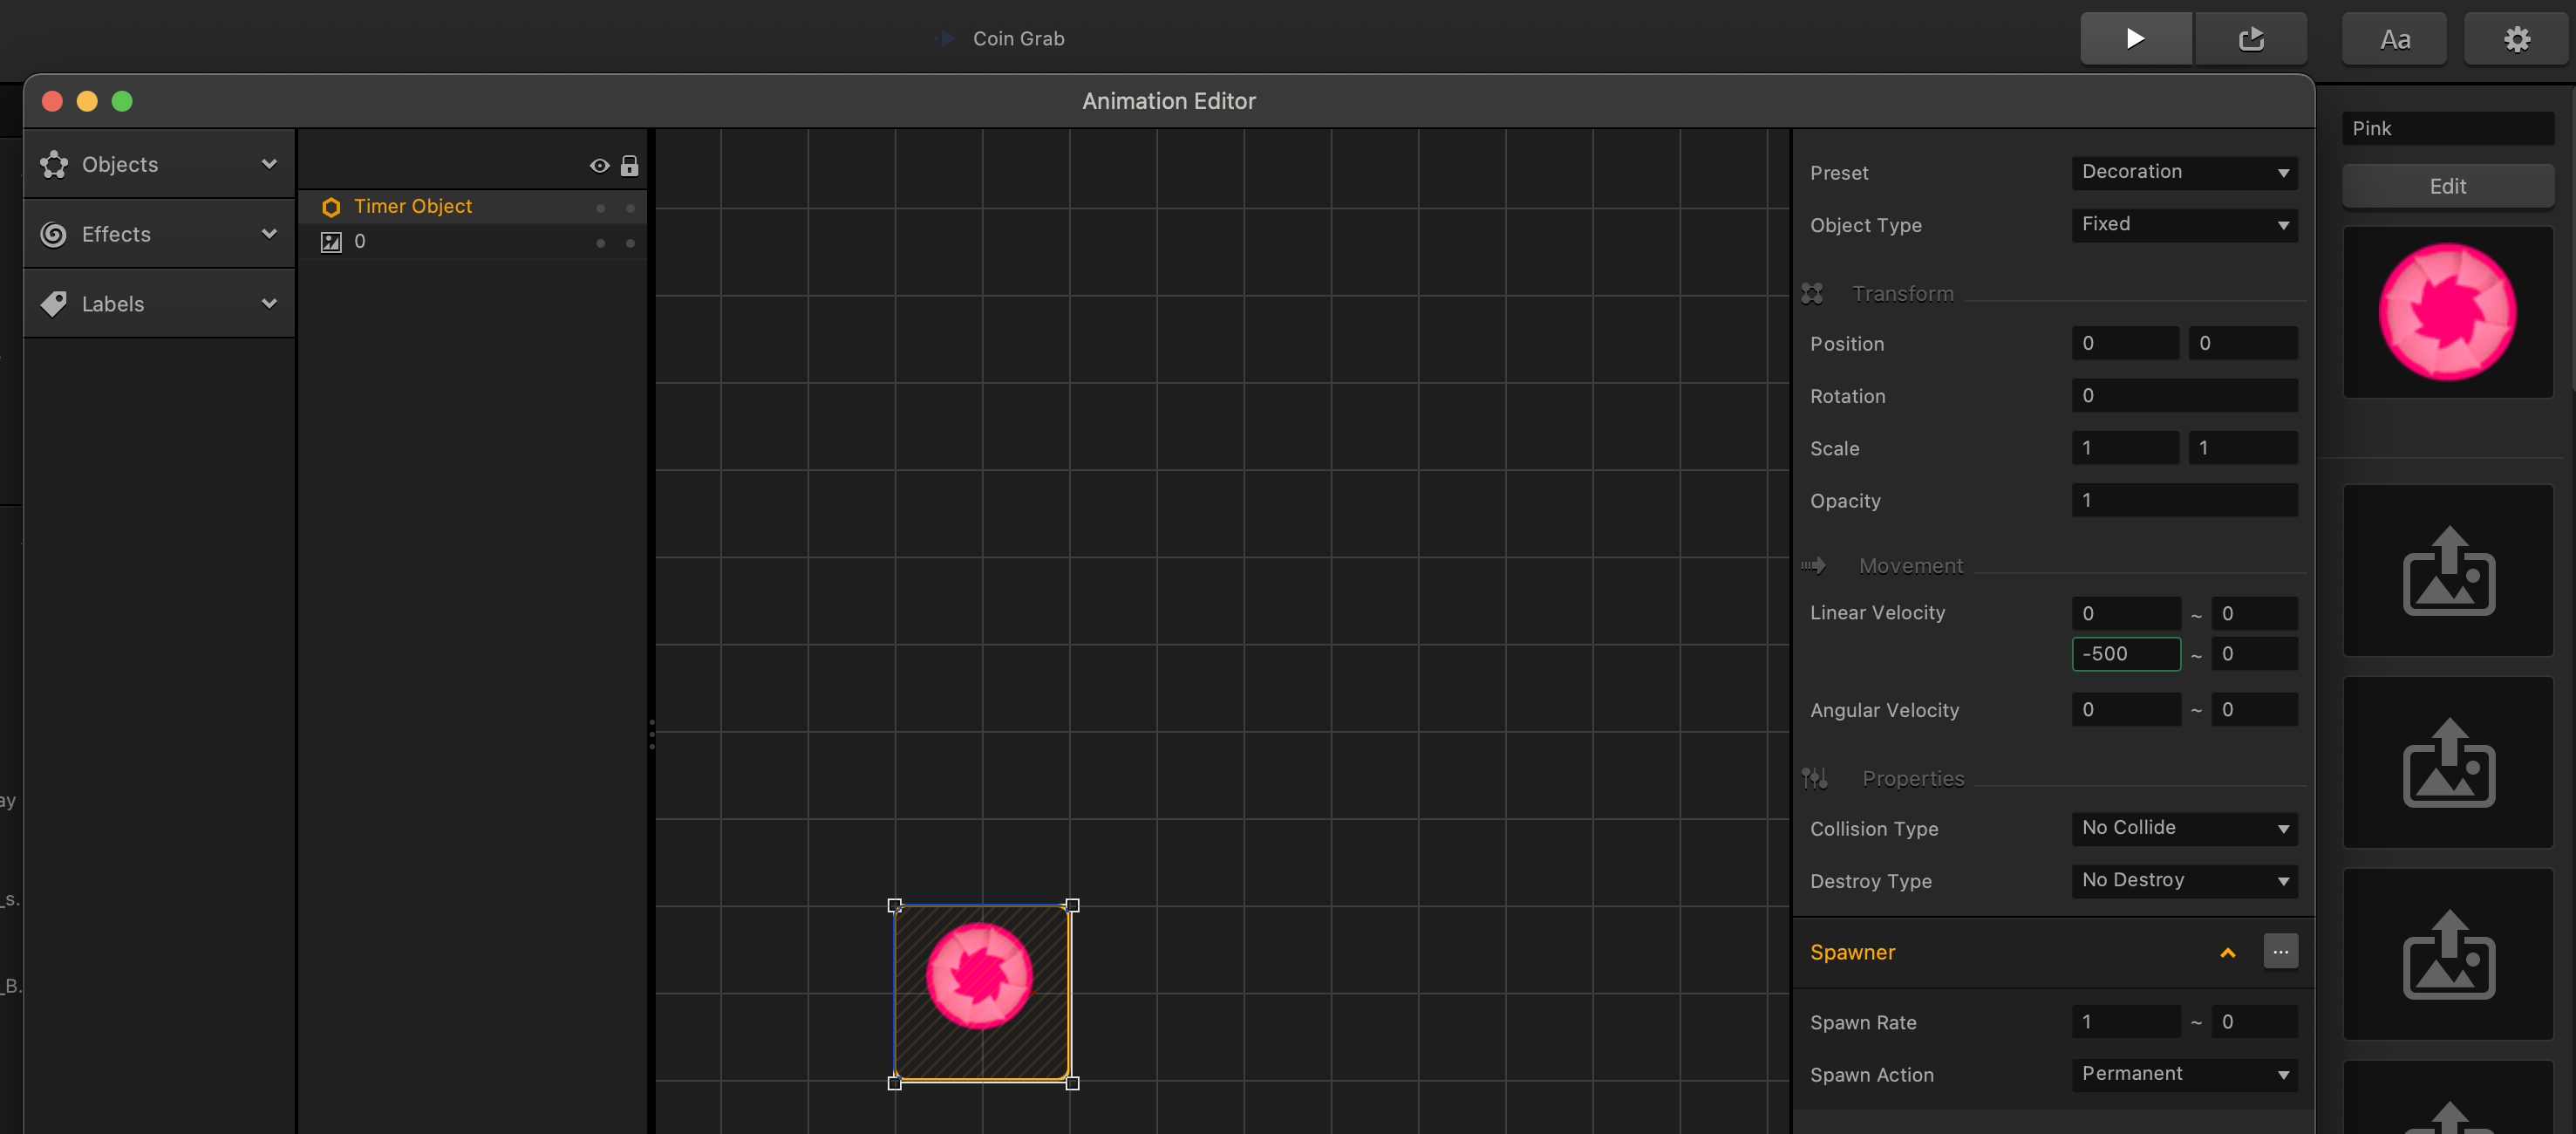
We will now give our character an exploding death so he looks like he shatters into tiny little versions of himself. Just go into any world, and drag in an image of our character onto the object option of the drag and drop wheel. Name it “shatter” and delete it from the scene. We will only be using this for the Defeated Animation of the character.
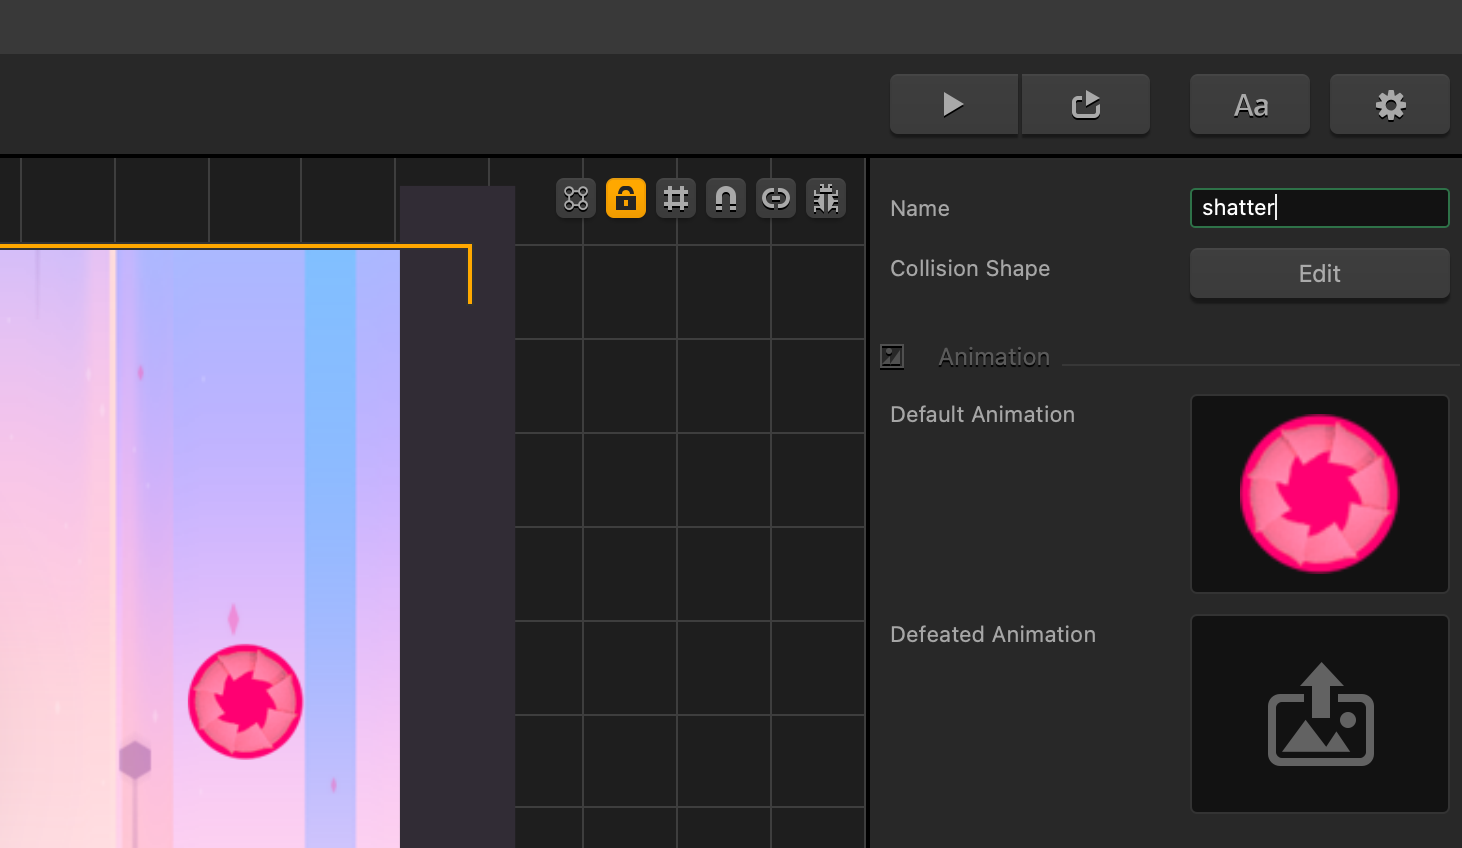
Select our character in the assets panel, and delete the current defeated animation. Go to the character’s options and edit the defeated animation.
Pull our shatter object into the very center of the defeated animation which is position 0,0 and scale it down to 0.15 or any number for a size you think would be best. Set it to be a physics object and give it some movement with 500 in the velocity randomizers. Give it a spawner component with a very large spawner rate like 999. Refer to the settings in the image
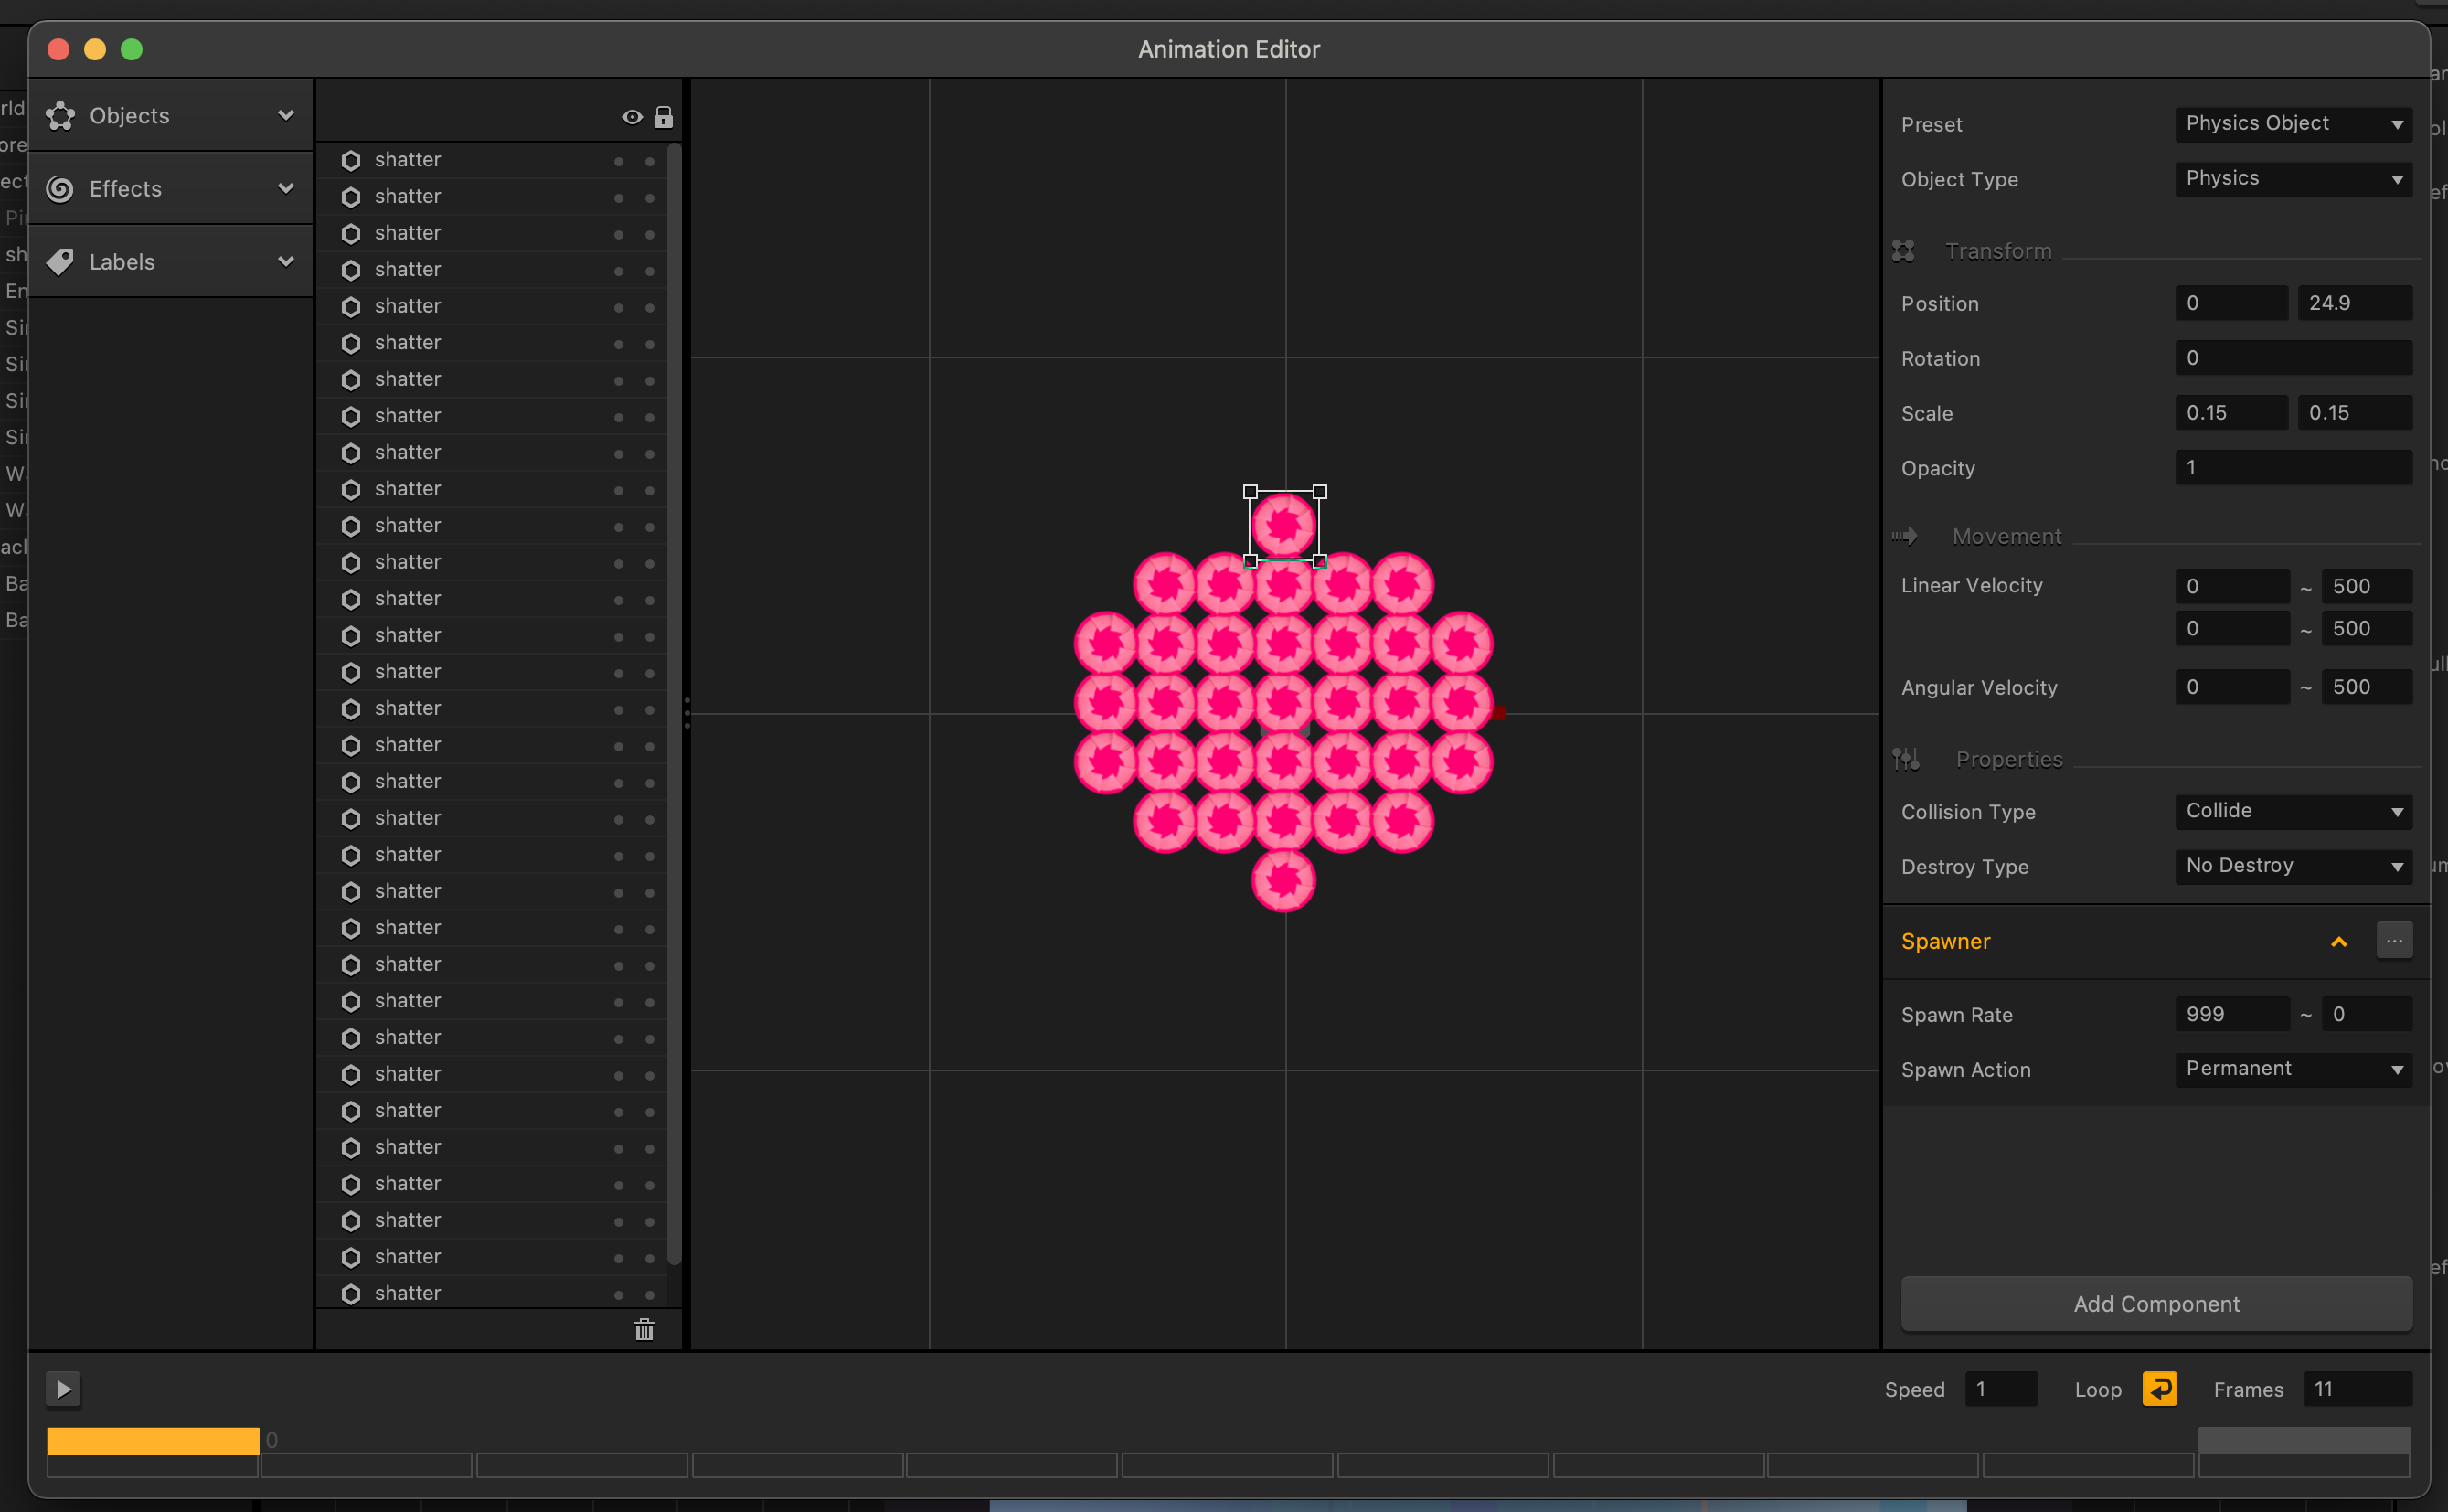
|
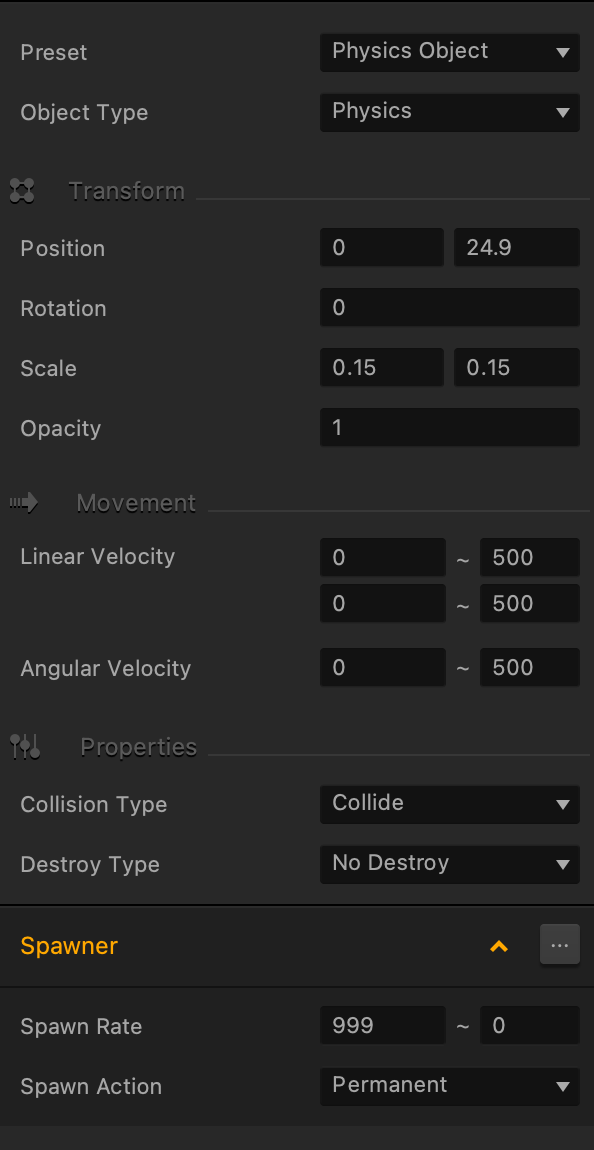
Duplicate the shatter objects and arrange them to form the shape and size of the character. That way, when the character dies, the shatter objects that spawn from the explosion give the illusion that they came from parts of the character.
You could go crazy with the exploding death animation, but keep in mind it has to be able to run on a device. So, make sure to always test your games on a device. Spawning a billion physics objects may give your iPhone or Android phone a hernia so, you might want to balance your animations and effects with playability.
Now, remember those extra worlds we have in the games mind map? Why don’t we put those to good use by creating a secret world for our player to discover?
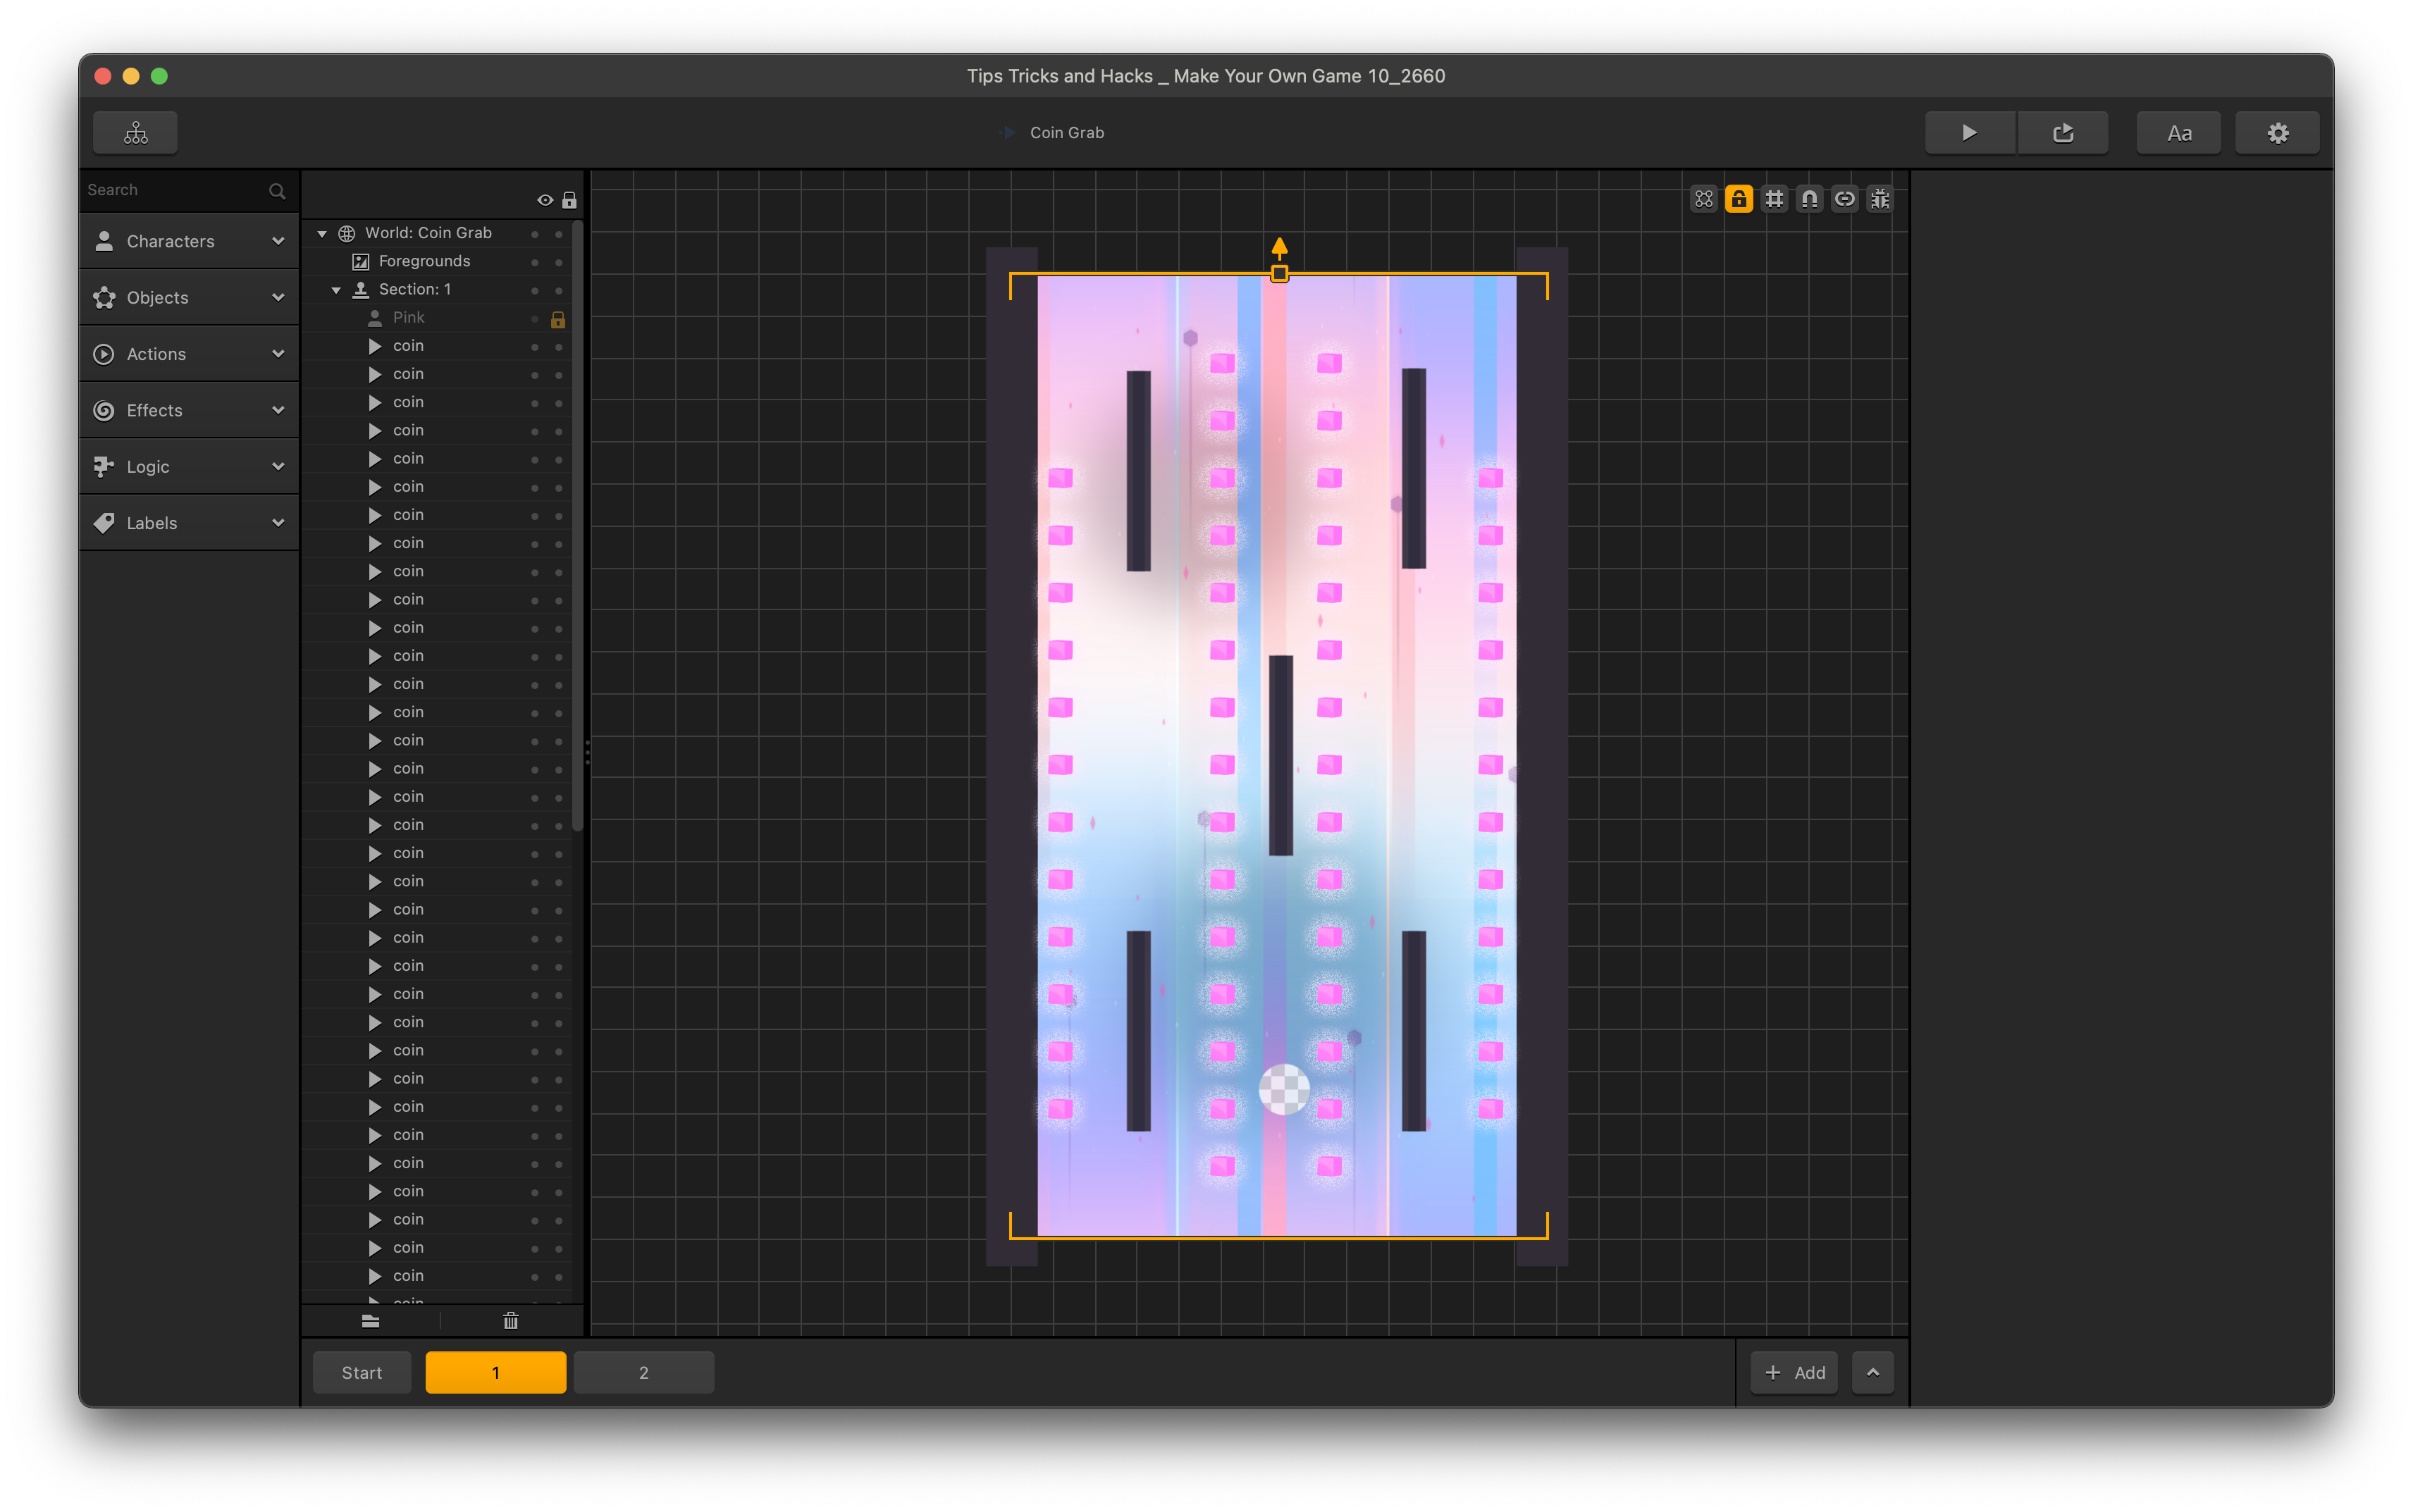
Let’s create a world that has a lot of bumpers for fun and coins to grab for the shop. One that has so many coins to grab in fact, that we don’t want the player to be able to play through it more than once, and exploit grabbing those coins. First, create a secret world with a ton of coins and bumpers.
Next, we’ll find a way so that once the world is discovered and played through, it can never be played through again.
The best world to put the portal leading into the secret world would be the Hard World. This way, it gives the players incentive to play on hard mode. To make this portal work, we will be using the Menu Jump feature.

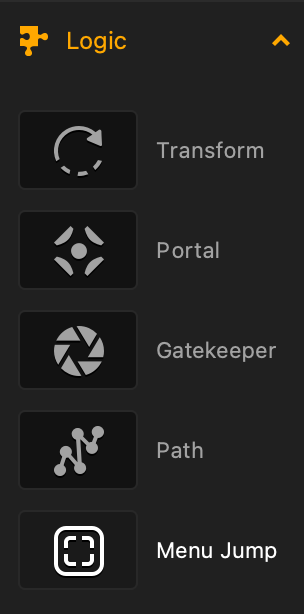
With the menu jump feature you can add bonus or secret levels in your game simply by placing a menu jump logic piece into the scene. Use it to end your game, take players to another world or to an animated cut scene.
Go to the assets panel and grab a menu jump from the logic pieces. Place that menu jump with our marker and label it ‘coin grab’. Leave the settings as is. You can put in graphics on top of the Menu Jump to let players know of its existence. Perhaps a particle emitter? A portal graphic? A door? It’s your call.
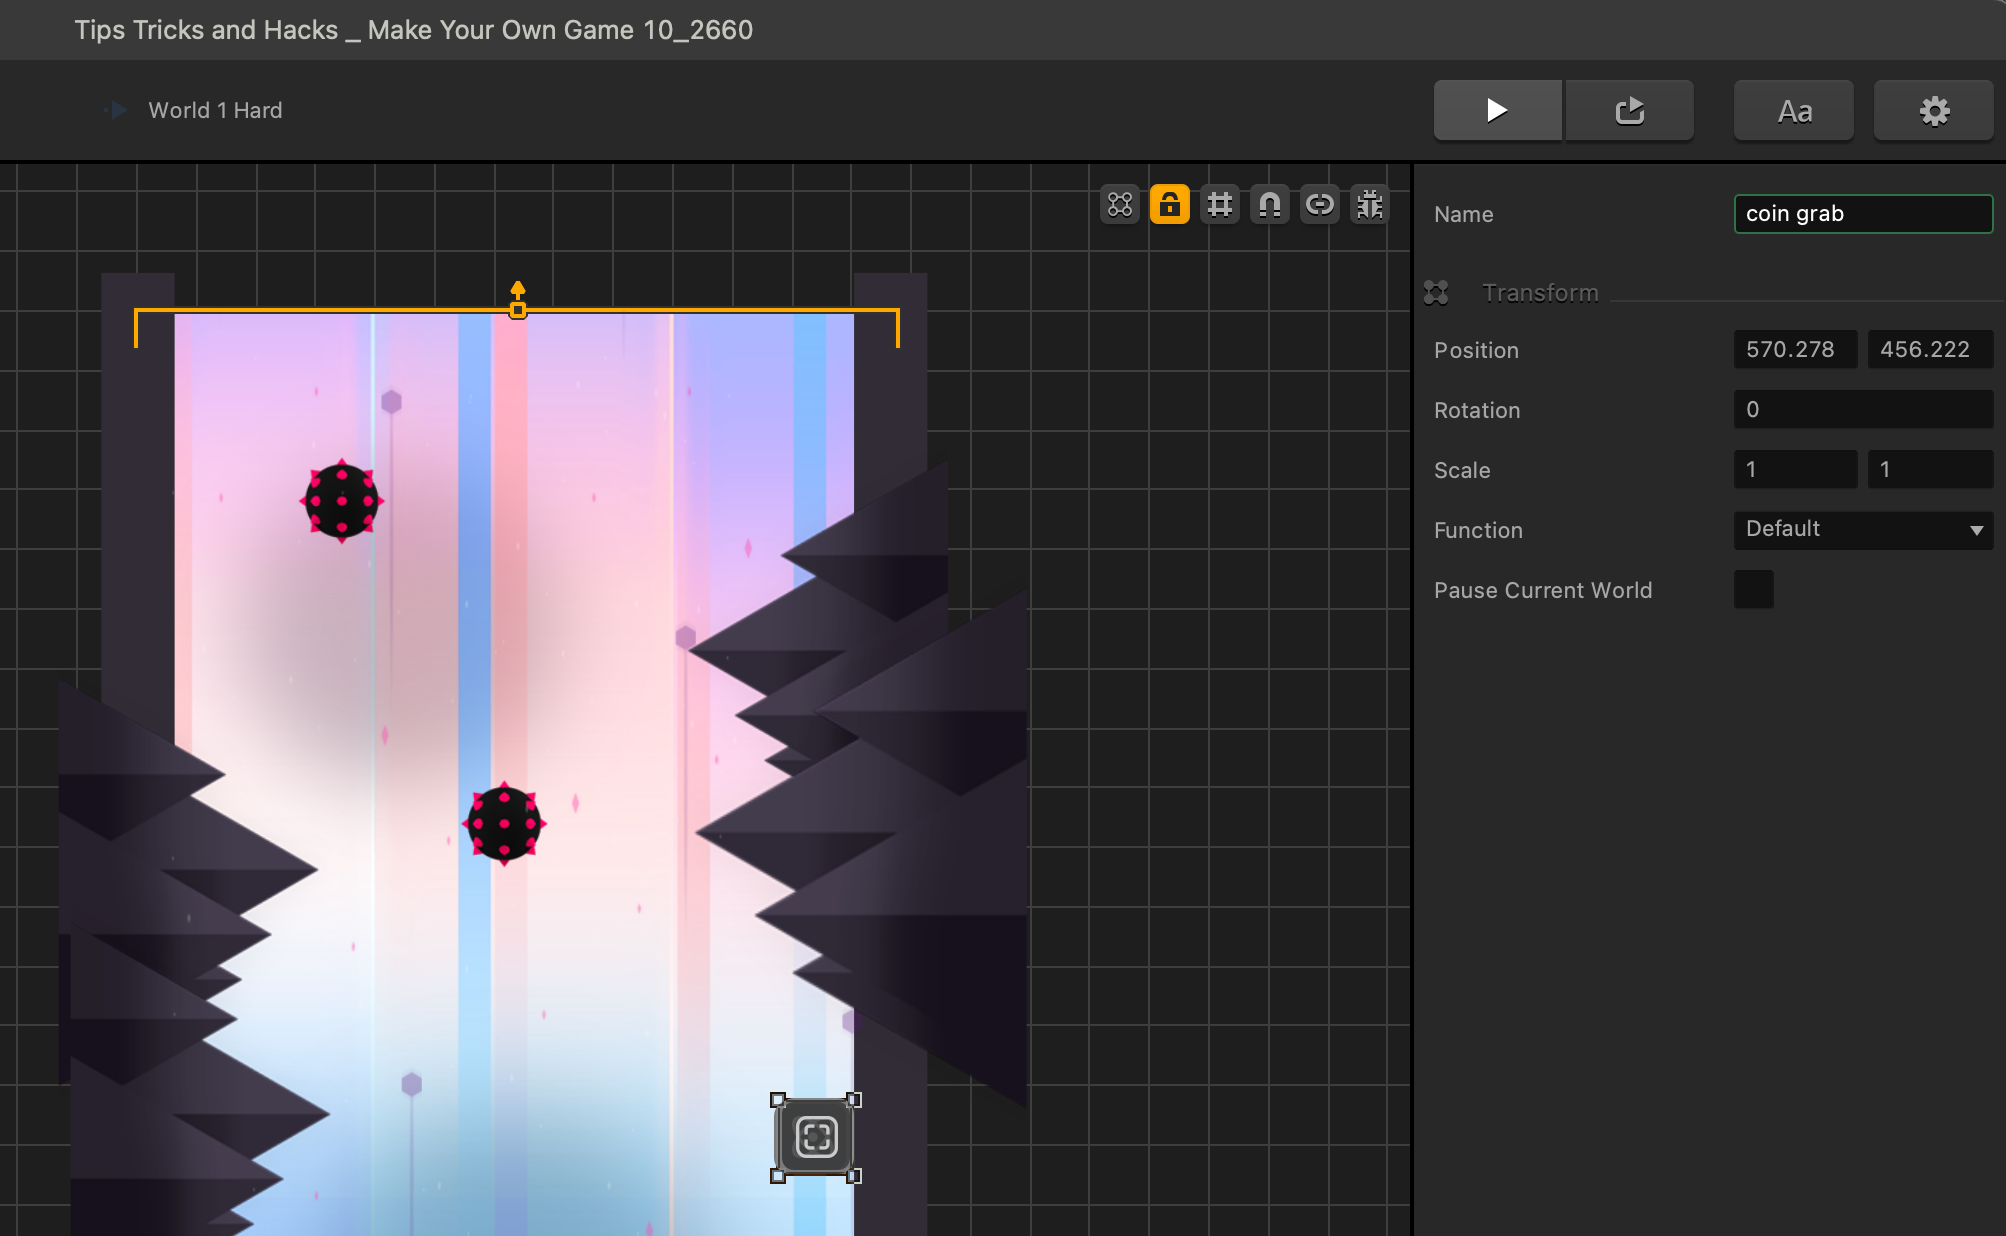
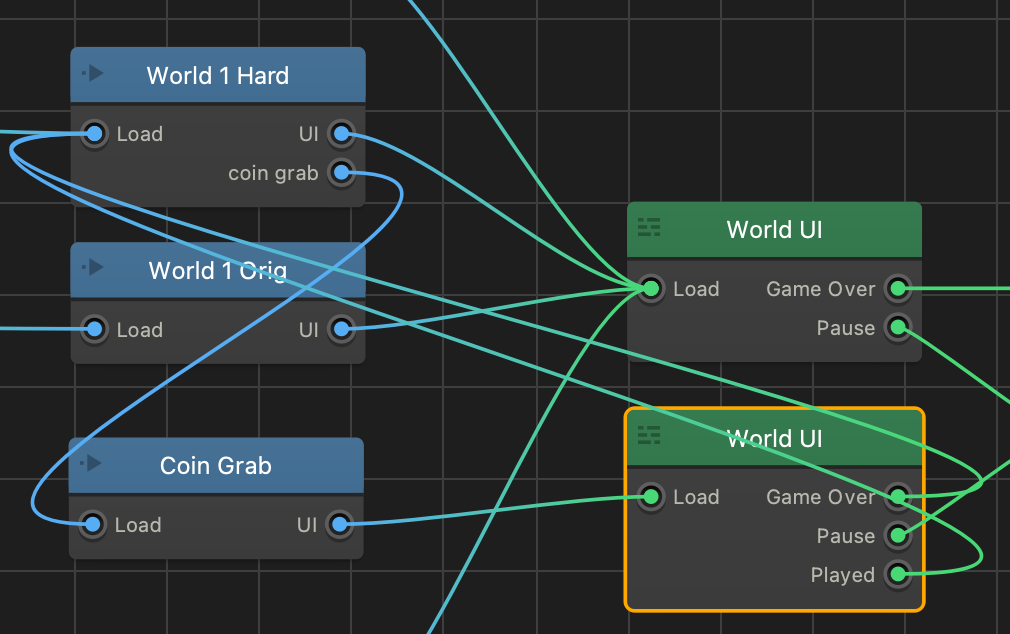
Go back up into the mind map and see our connection in our World 1 Hard node and let’s go ahead and grab and connect the World 1 Hard to the Coin Grab World node.
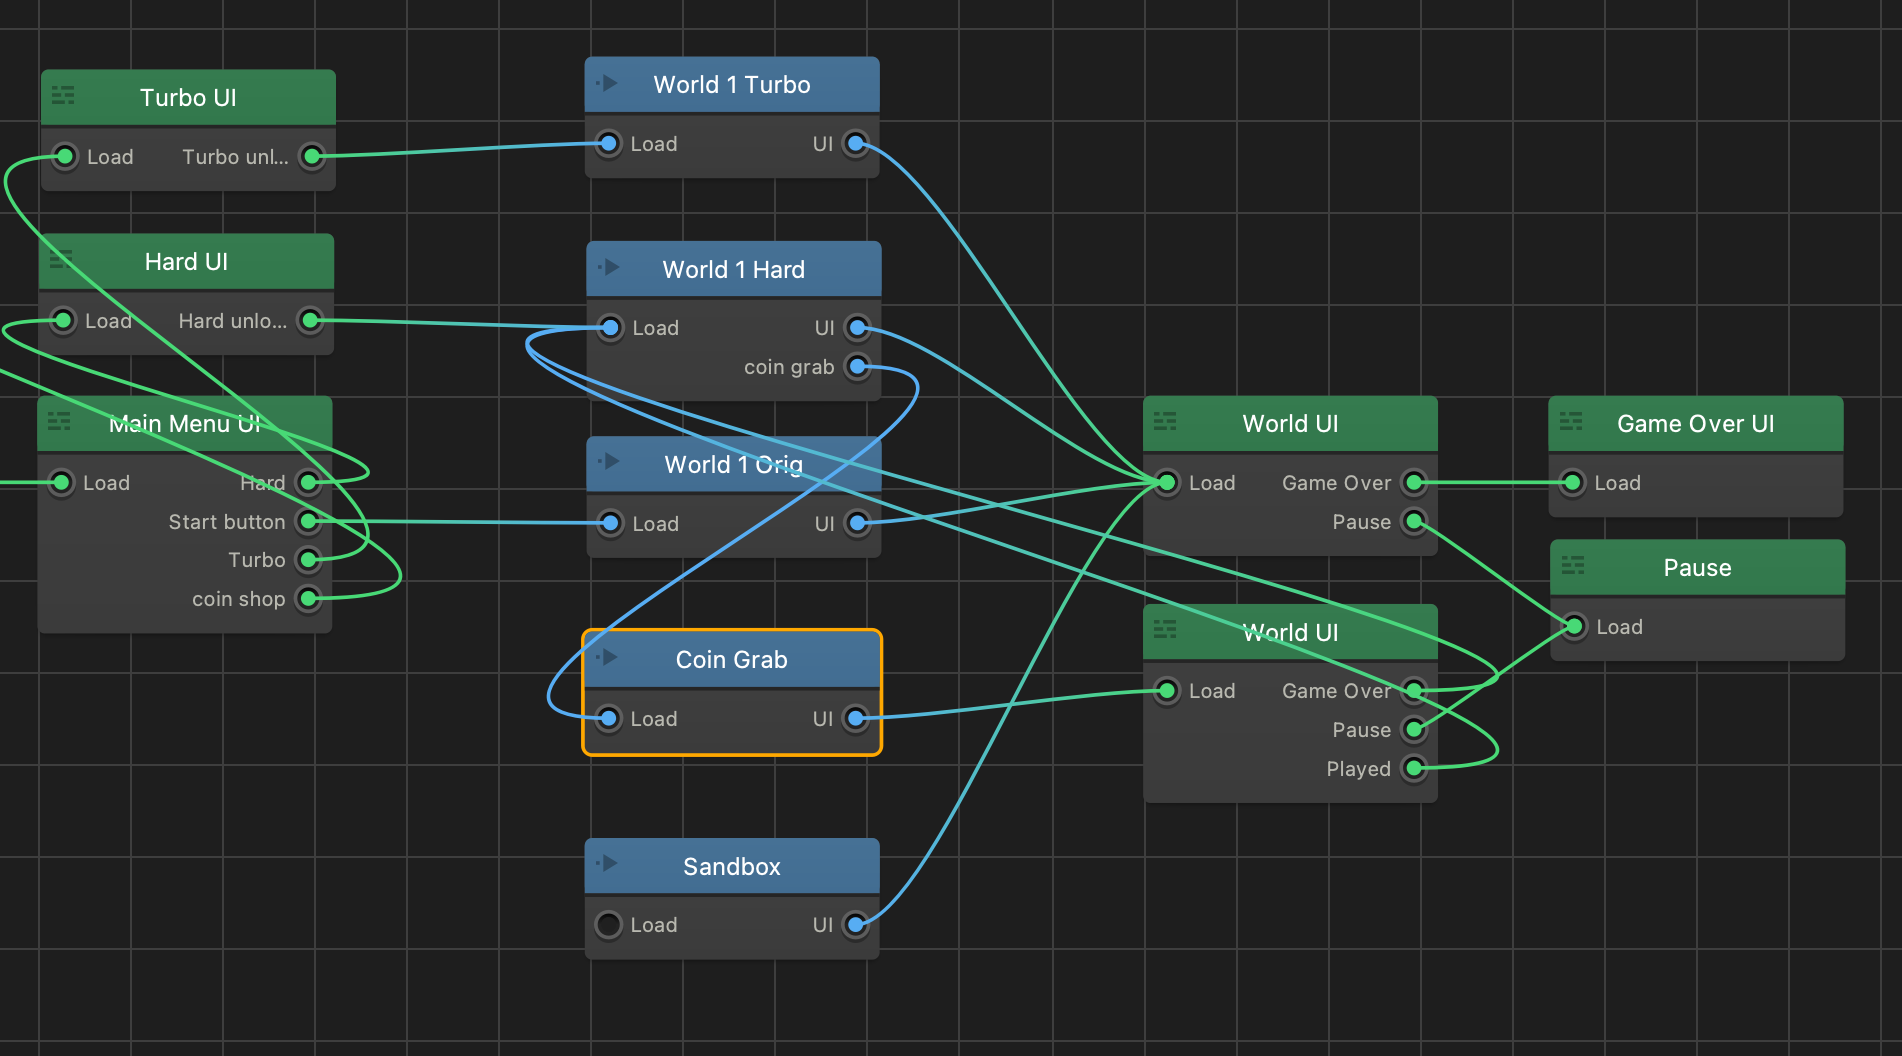
Now, here’s the trick. We want to be able to play that coin grab but we need it to have its own world UI so we can tweak it just a bit. So, let’s duplicate the world UI using S and connect the Coin Grab world to that UI instead of the original.
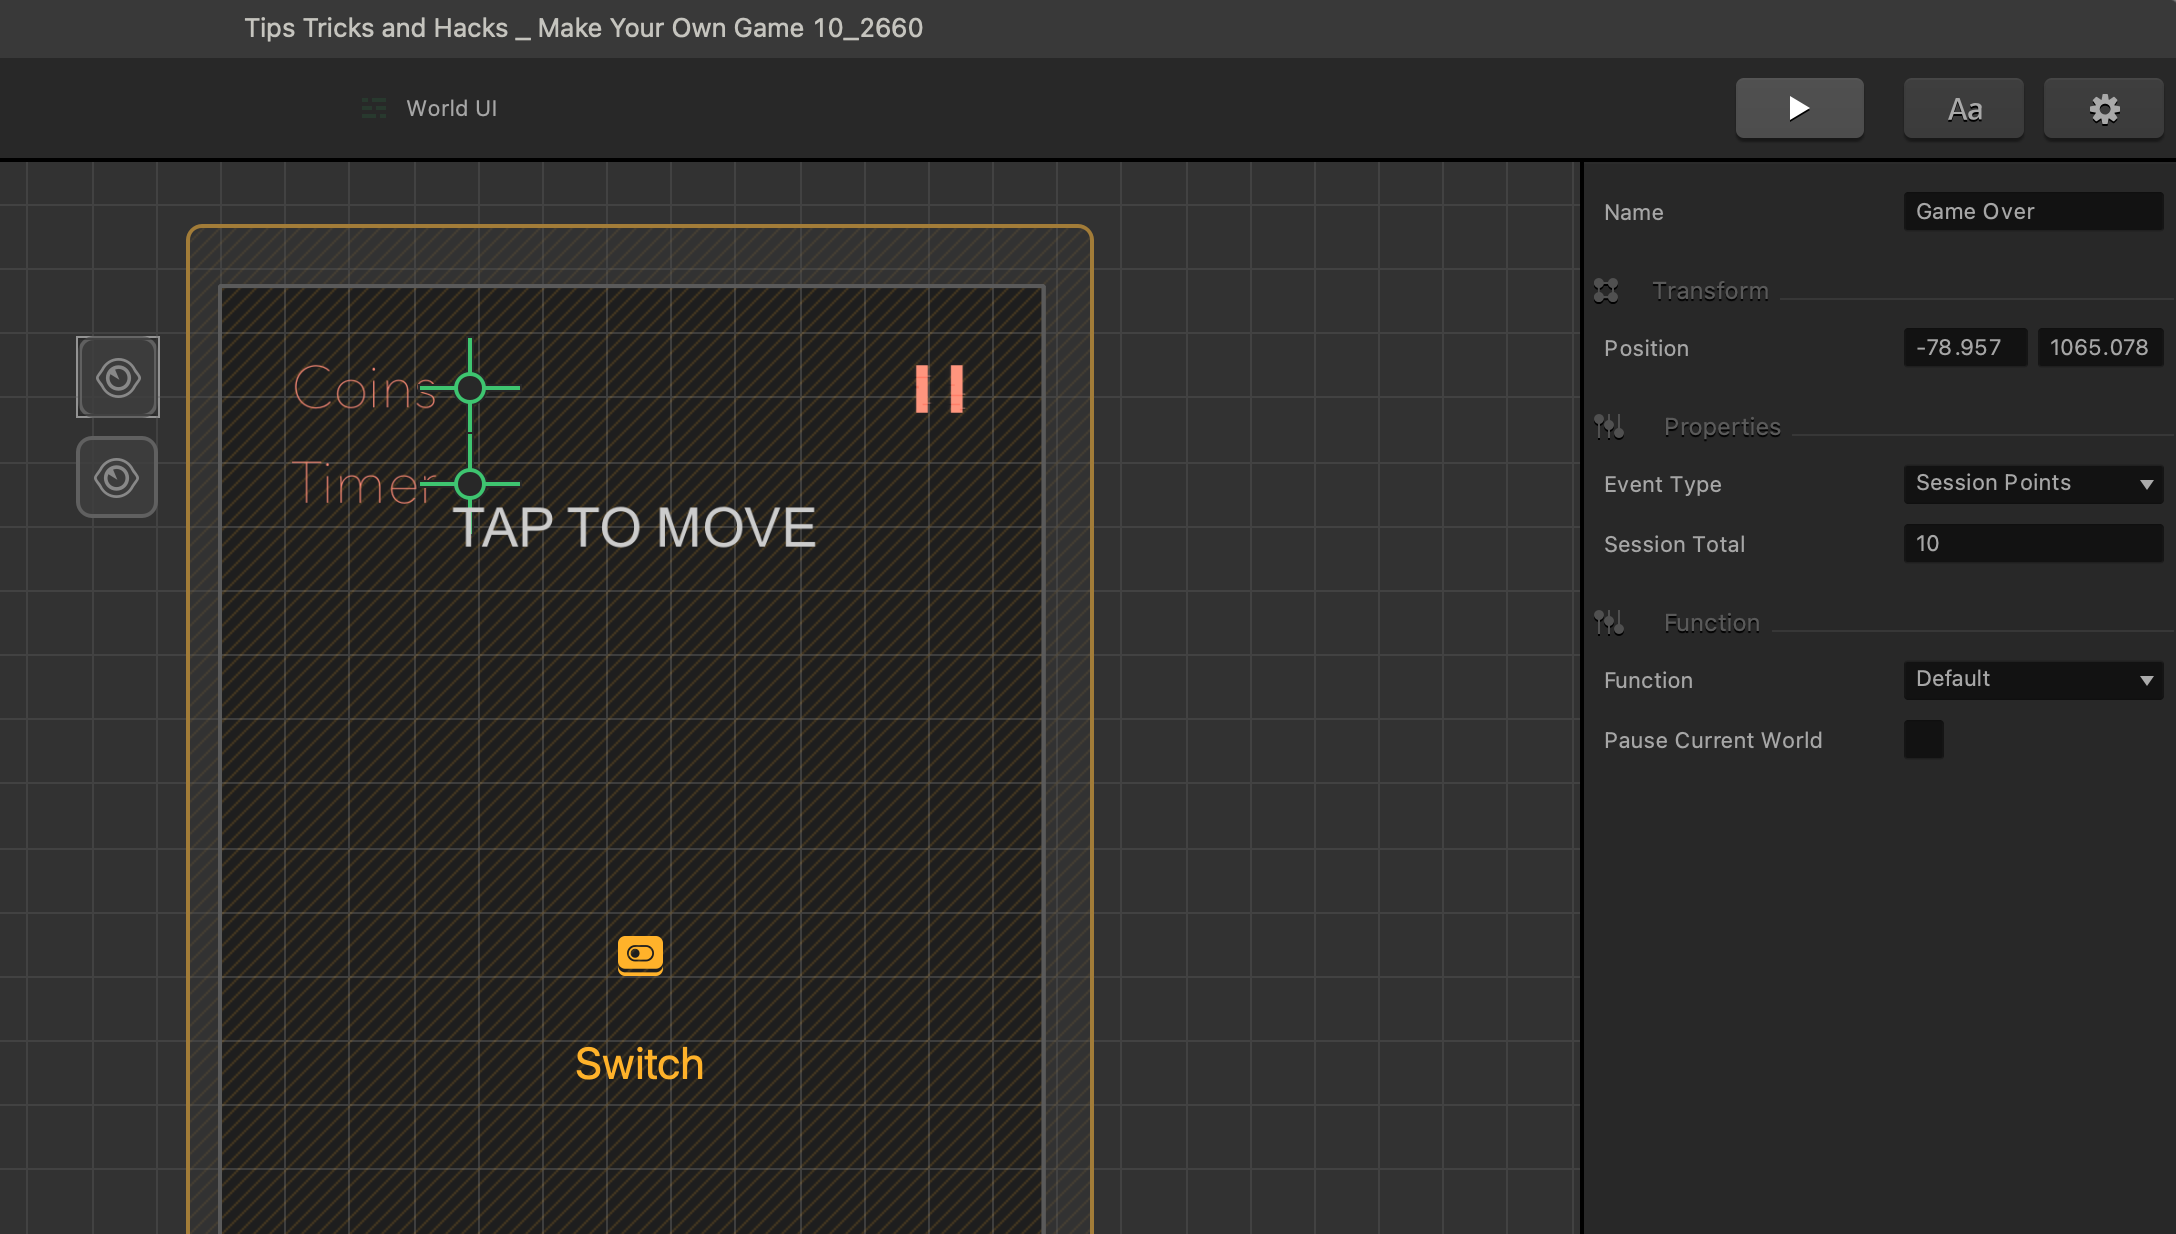
We gave the Coin Grab World its own UI because we want to change its Event Observer. The Event Observer feature automatically monitors your game for specific events. With it you can schedule a countdown or timer to be activated within your game. Make players race against the clock to complete the level in time or kill all enemies
Click on the Event Observer in the new UI. Change the game over observer to read 50 coins, making sure it is set to session. Session means the current play session, so you could set this to 5000 or whatever number fits your game, or you could make this world a certain length, and let them play the whole thing. It’s all up to you but for demo purposes, 50 coins will work well.
Drag a new Event Observer into the UI and set the Event Type to “second play”. Set the name to “Played”.
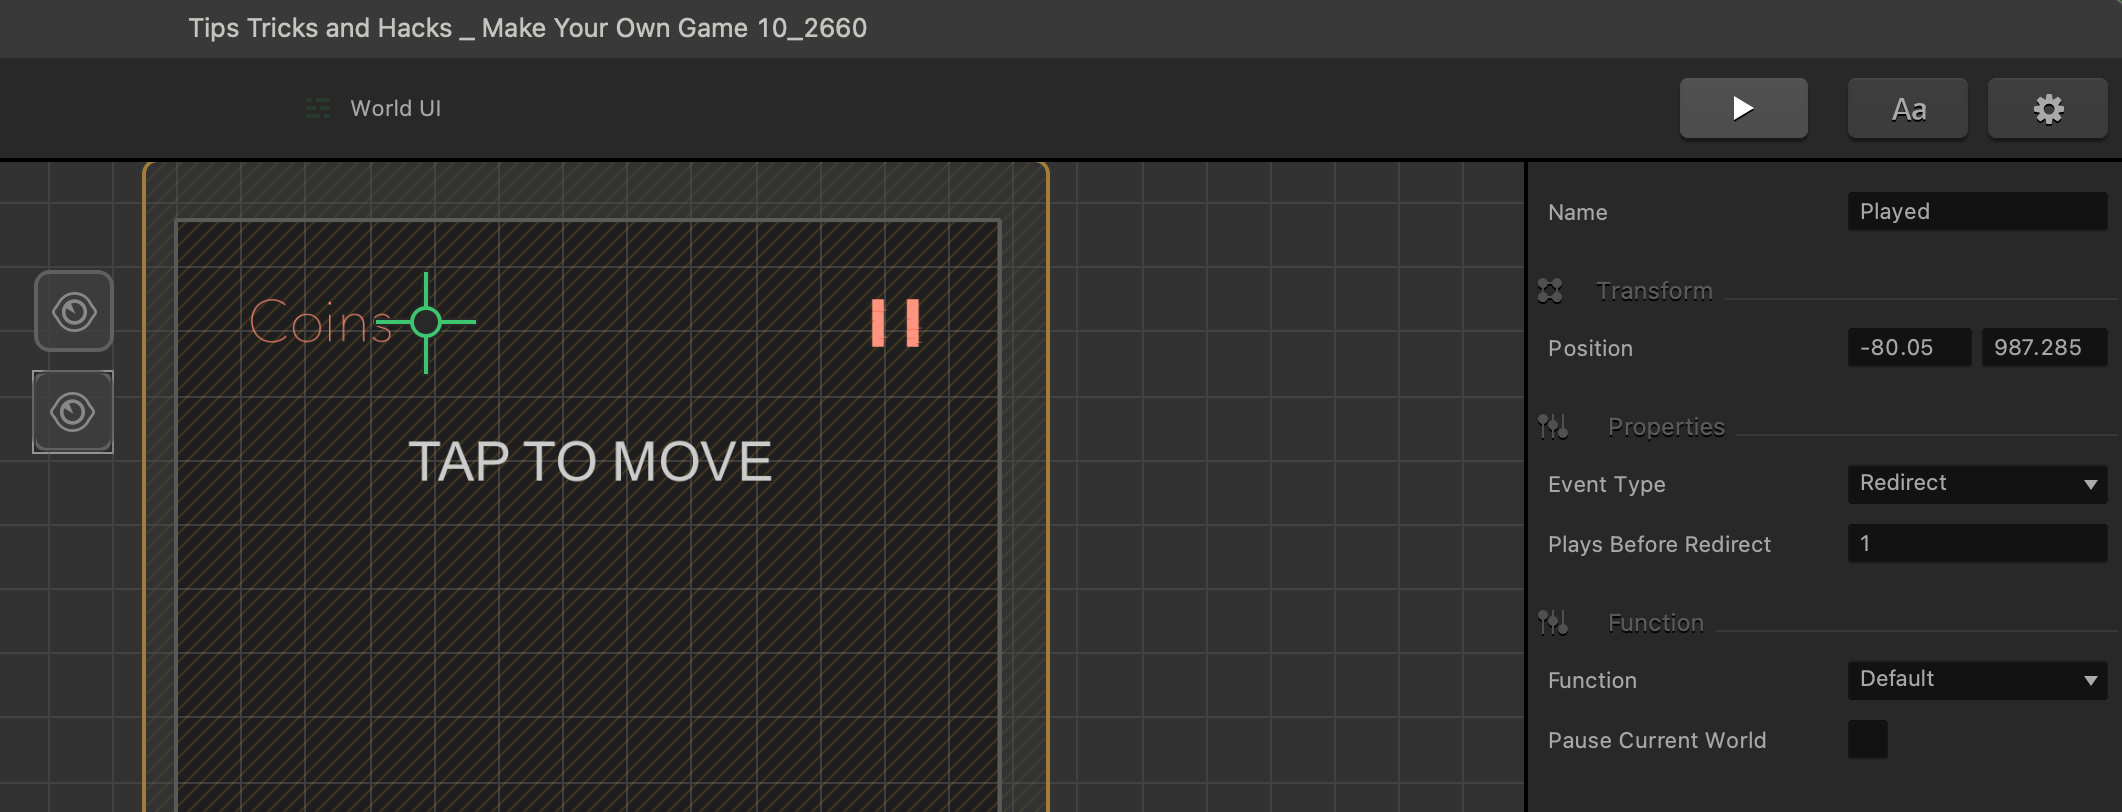
This “second play” event type was originally designed for tutorial menus and tutorial worlds. The first time you play a game, the tutorials will appear and teach the player how to play your game, but when they come back for a second time the tutorials would get skipped. We are going to use it to make sure the world can never be played again using those same mechanics.
Go back into the mind map and connect the event observers back to the World 1 Hard node.
If you test the game, you’ll see that we are now going to the Coin Grab World once, and then we cannot return to the Coin Grab World again.
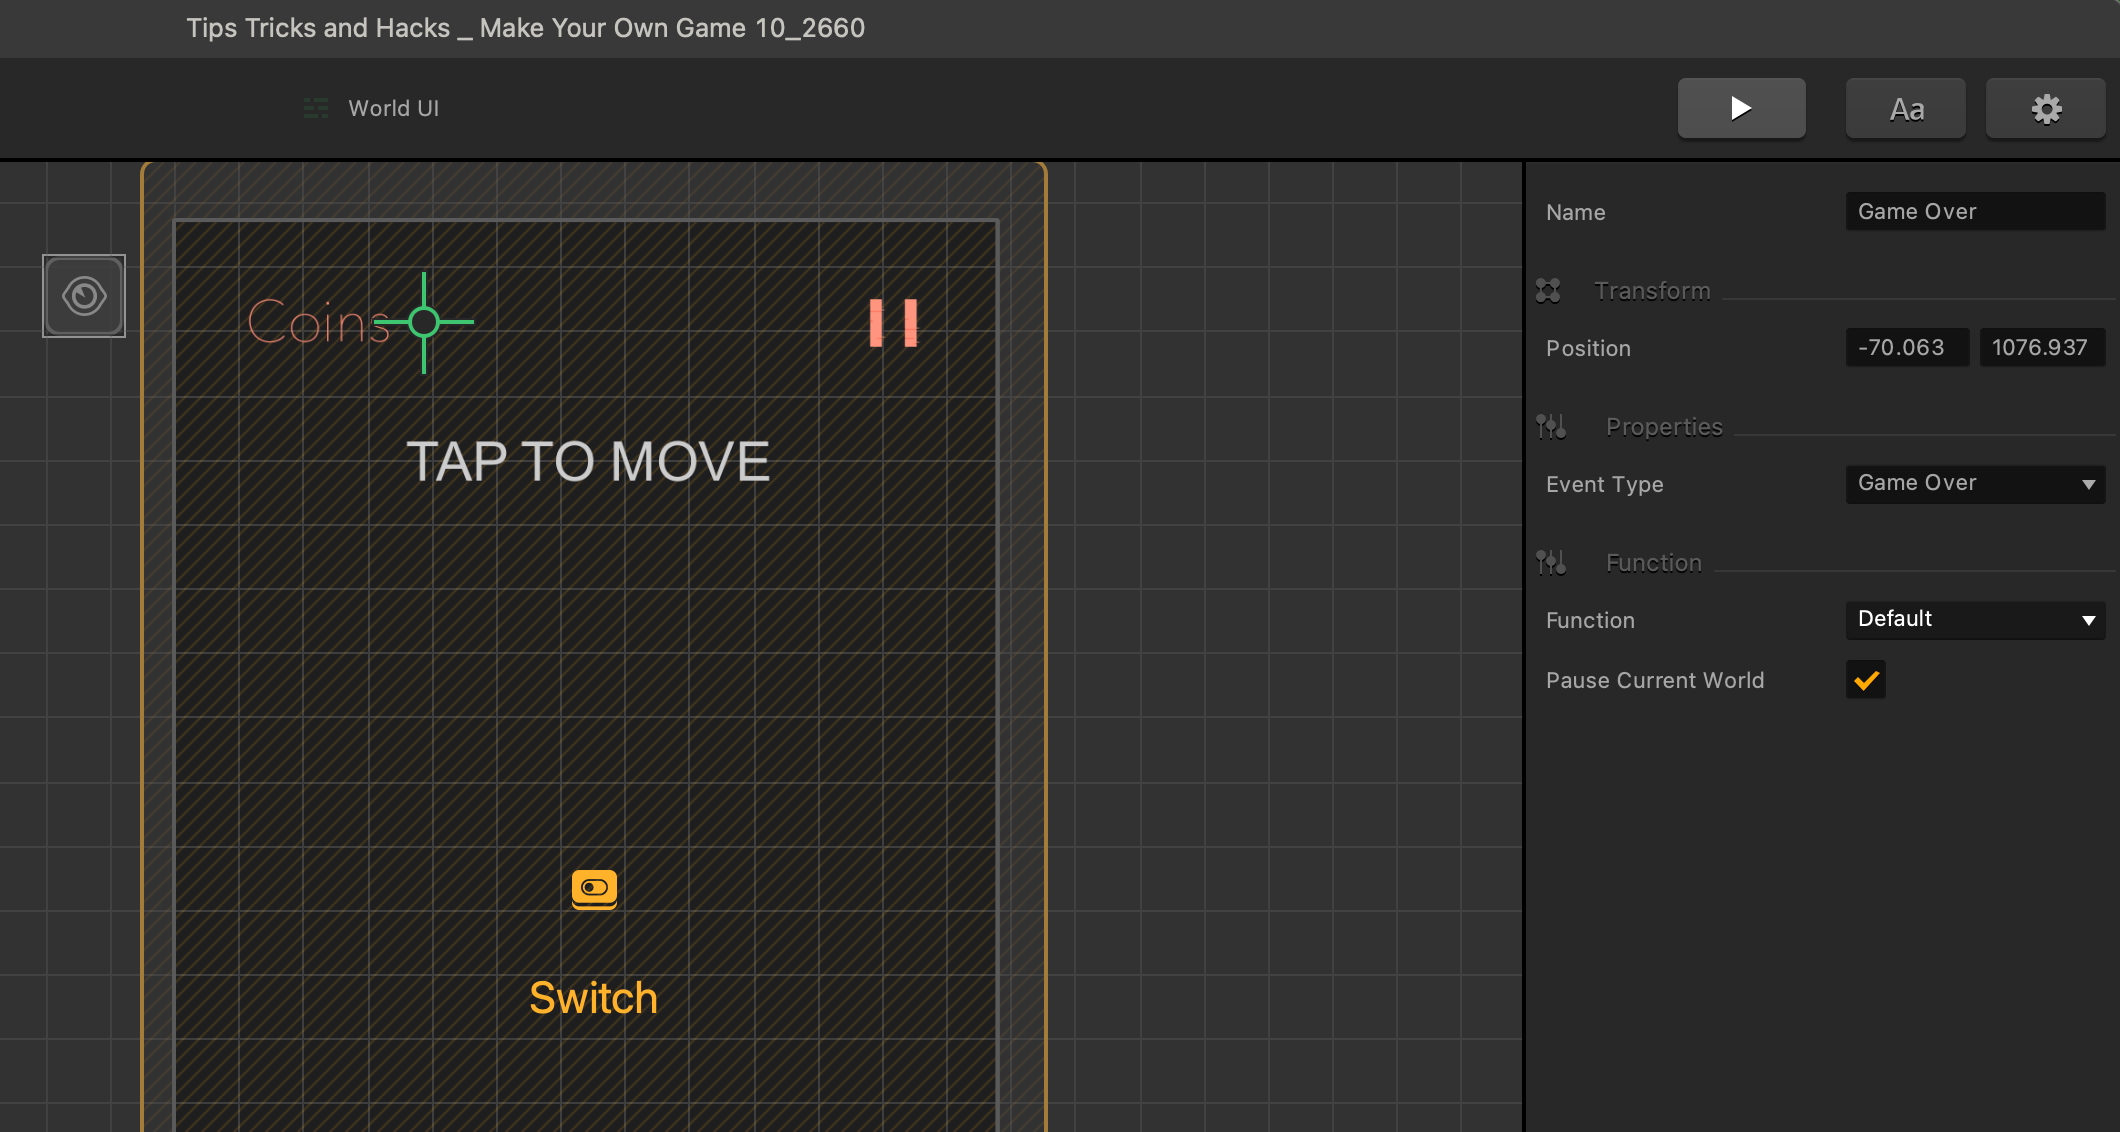
The best way to remove this unappealing feature is to insert a black image to cover both World UIs and set its autohide to 0.1 seconds. This gives that fade in look on every node change which makes the transition more polished.
Okay, let’s look at our final tip, trick, and hack – the timer trick. Let’s say when players went into that secret coin grab, that we only wanted to give them 10 seconds to grab as many coins as they can. This next part, our 100th page, is going to be a little complicated.
Go up into the mind map and get into our original world node. Create a new action, just grab any old graphic, it’s never going to be seen in the game, and drag anything into the action option on the drag and drop wheel.
Rename it “timer action”. Set the coin to 0 and points to 1, not showing either.
Then, delete the default animation of the timer action. Next, create a new object, just grab any old graphic, it’s never going to be seen in the game, and drag anything into the action option on the drag and drop wheel. Delete its default animation too then rename it to “timer object”.
Select the timer action in the scene, and cut it to the clipboard with either ctrl X for PC users or command X for Mac users. Select the timer object in the assets panel and edit the default animation we deleted. Clicking in the animation editor so it has focus, paste our invisible action in with ctrl V or command V, making sure we set its position to 0, 0.
Next, select our character from the assets panel, and edit its default animation. Drag in our timer object in at position 0, 0 and make sure to set to decoration. Give it a high-speed negative y-axis take off so it leaves the scene and gets deleted in the delete threshold once it spawned. Give it a spawn rate of 1 with spawn action set as permanent.
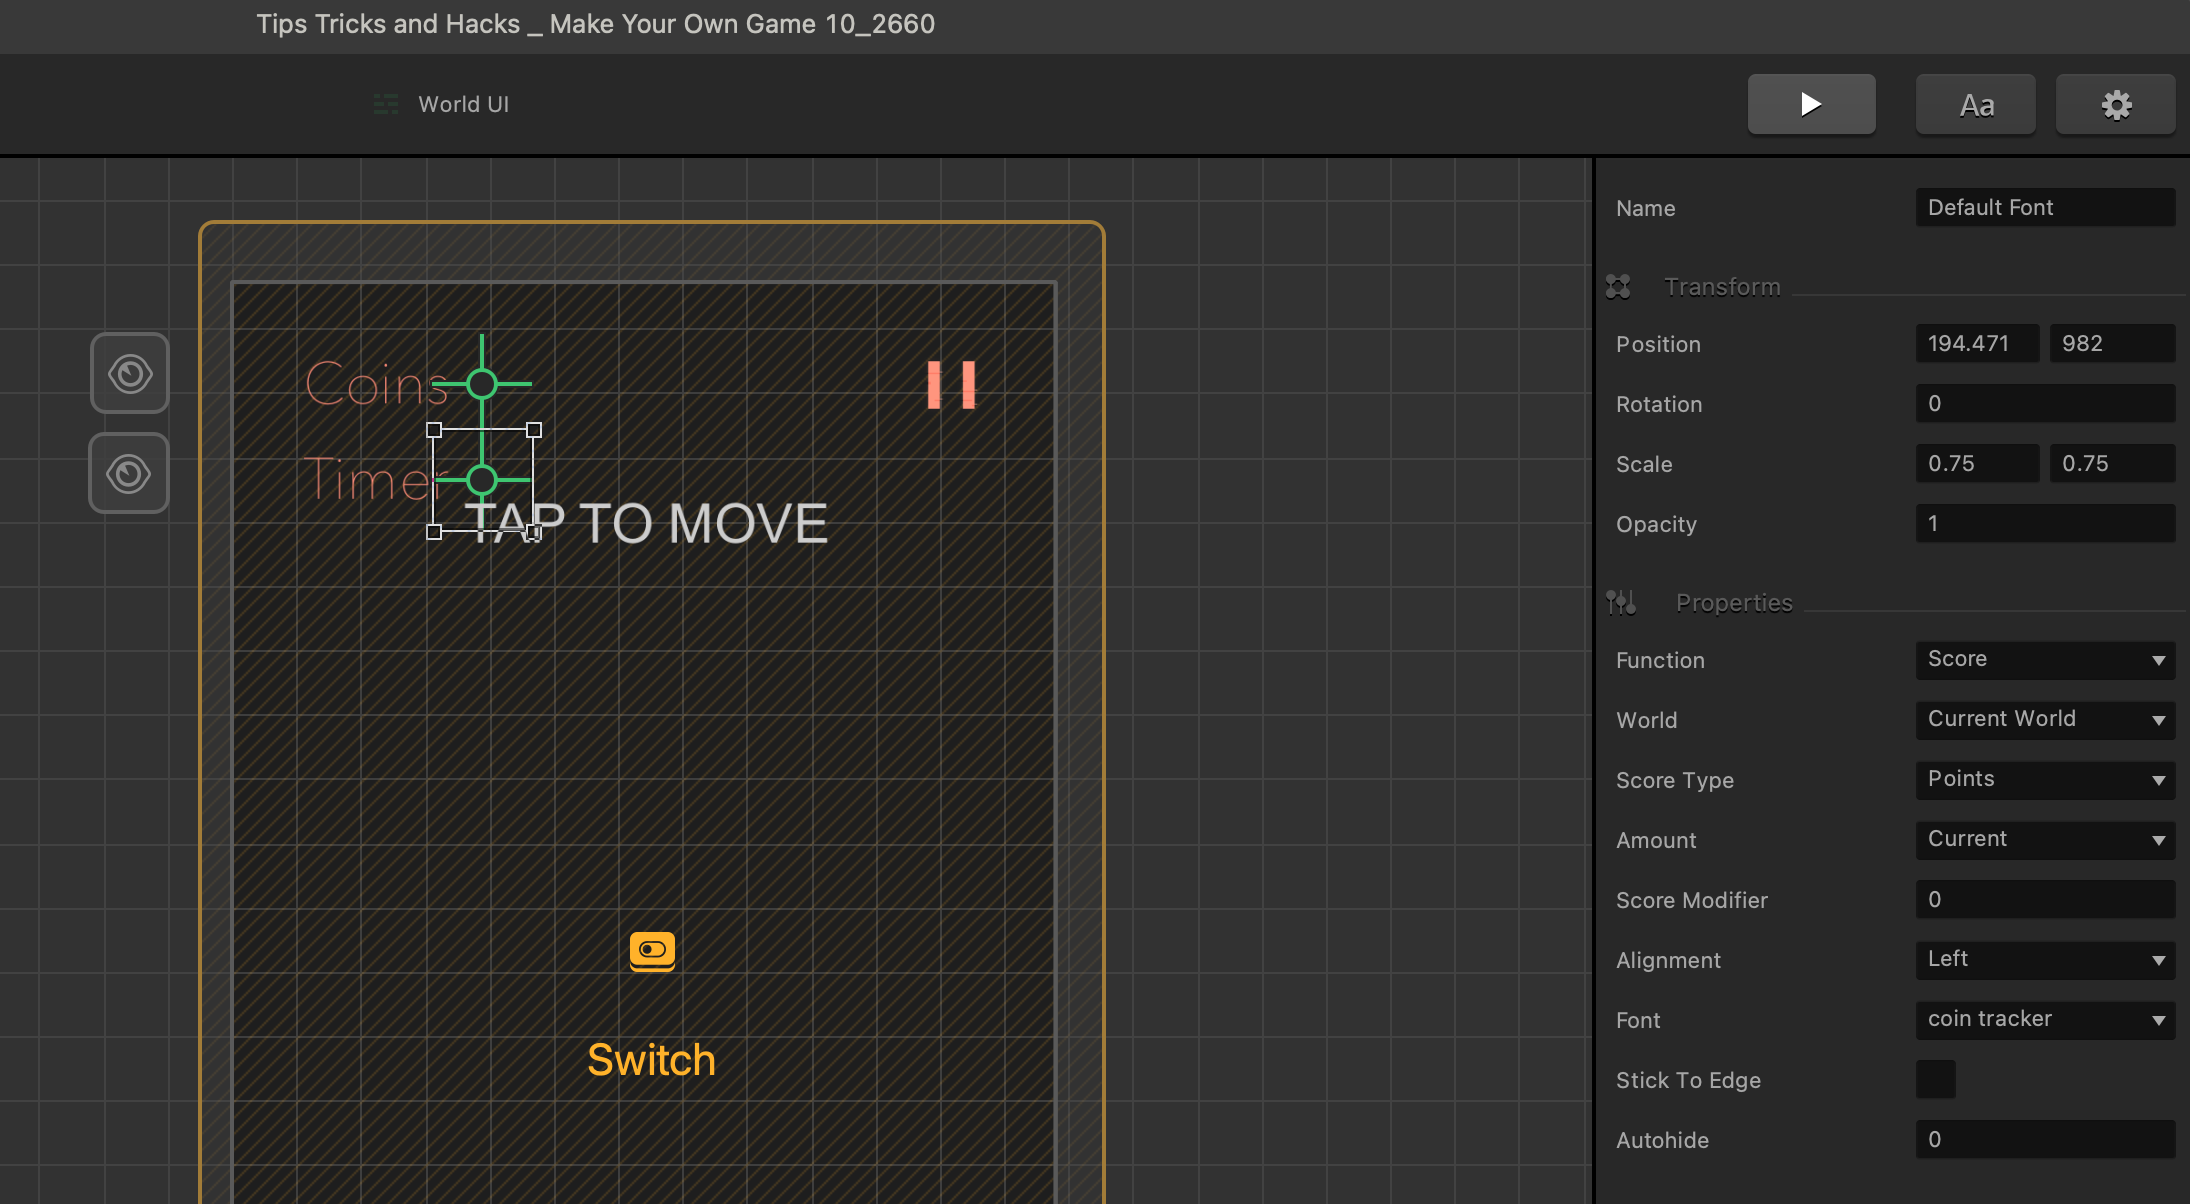
Go into our coin grab UI and duplicate our coin’s label and make it read timer. Duplicate the coin counter, and adjust it to keep score of the current world with our score type being coins, and the amount set to current.
Then, let’s change our Game Over event observer to keep track of the session points with a total of ten. So, now when we play hard mode and go into our coin grab after 10 seconds, we get kicked back to hard mode because we reached 10 seconds and times up.