

TODAY’S GOAL:
The Menu System
Logos, Menus and More
Now it’s time to create a simple logo and menu system for your game. Both of these steps can be as simple or as complex as you’d like. Know photoshop and how to create art? Then you can really go crazy and build something fantastic. Want to keep things simple and make a minimal atmosphere? Then you can do it almost entirely inside Buildbox.

STEP 1
STEP 2
STEP 3
Gather Any Art You’ll Need
Creating a great menu can be fairly difficult, but Buildbox also makes it easy for first timers.
The one thing you’ll need is a background for your Main Menu. This is required regardless of how complex or simple your menu is, and like everything with Buildbox, you can do it a few different ways:
THE EASY WAY
The easiest way to create a background for any of the menus is to simply use your game background. As you’ll see in Step 2, you can literally just drag and drop it into the menu and then quickly create some invisible buttons.
THE MEDIUM WAY
To take it up a notch, you can have someone create a custom background and user interface set! This looks great, but cost more time and/or money.
THE HARD WAY
What looks by far the best (and what Trey did in Phases) is the following:
- Create a scene and name it “Main Menu”
- This scene will be the background of your main menu and can use all physics and fixed objects just like your game.
- After you build out your scene MUTE it with the “M” key so players won’t accidentally get to this scene when playing the game
- On the menu system screen, choose this scene from the “Background Scene” option
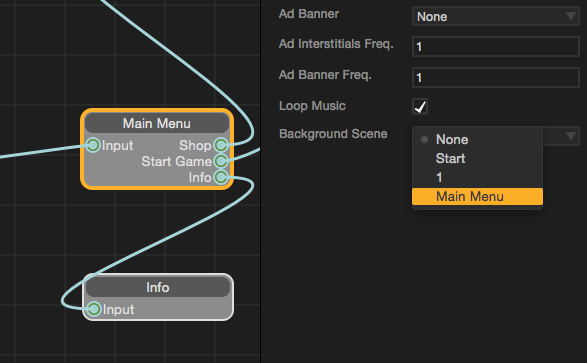
Now when a user opens your game, they will see this “Main Menu” scene as the background for their Main Menu. Anything you add to the main menu (including images, buttons, etc) will be layered on top.
Watch Menu Video
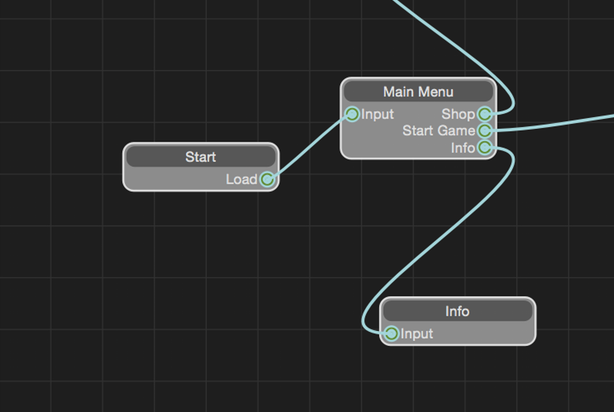
After you’ve gathered or created assets for your menu, it’s time to build it out.
As you’ll see, we can do this easily with the Font Builder and User Text option if we wish. Don’t forget that you’ll need to do more than just create a Main Menu. At minimum we recommend a Main Menu, Pause Menu and Game Over Menu.
Finish Menus & Logo
We strongly recommend you create at least the following menus:
- Main Menu
- Pause Menu
- Game Over Menu
- Information Menu
While the last one, information menu, is not required by most app stores, this is where you can put your credits and mention your name. So we think that’s important. ;) Also, if you have any in app purchases, you’ll be required by Apple and Google to have a “Restore Purchases” button. We’ll talk about this more in the next few videos, but an info screen is a great place for this. You don’ want to have to litter your main menu with buttons unless they are necessary.
As for your final logo, you can create a simple one like Trey showed in the video of Step 2, or you can even try to create a more complex one by purchasing a template.
GraphicRiver.net for example has hundreds (if not thousands) of logo templates including some that are made just for games.

What’s Coming Next…
You are now finished with Week 2 of the 30 Day Game Challenge.
You only have 2 weeks left with your Buildbox trial, so it’s essential we make the most of it. Even if you are behind, you need to at least have a game idea, art assets, game name and a few scenes done. If not, focus on that first. The scenes of your game will make it break it in the long run… much more than the logo or menu system!
In the 3rd week of the challenge we’re focusing on monetization. This will be an easy week with plenty of “Catch Up” time built in for you to focus on scenes, menus and everything else, but it’s still important. Our goal is for your first game to generate revenue right off the bat, and soon you’ll learn how. See you then.
30 Day Game Challenge Lessons:
Week 1 – Game Ideas & Basic Training
Week 2 – Creating Your Game
Week 3 – Monetization & Setup
- Coming Soon
Week 4 – The Launch
- Coming Soon


